Basic-Advanced Mapping
Mapping Necessity
Since ECLASS release 7.0, a BASIC Application Class (BASIC AC) and an ADVANCED Application Class (ADVANCED AC) coexist in the same classification system. In order to be interoperable, a mapping is necessary, so that users of the ADVANCED version can interpret the content users of the BASIC version. Vice versa is not possible, as the ADVANCED content cannot be interpreted with the help of the BASIC dictionary. I.e., the user of the ADVANCED version has the possibility to read both versions, the user of the BASIC version can only read the BASIC version.
Mapping Approach
The content of the BASIC version has therefore to be included in the ADVANCED version and not vice versa. Since ECLASS release 8.0, each classification class has two application classes: a BASIC AC and an ADVANCED AC. The BASIC version only contains the BASIC AC, the ADVANCED version contains both application classes in parallel.
The complete content of the BASIC AC is therefore mapped to content in the ADVANCED AC:
- First, the mapping of properties of the BASIC AC is done to the corresponding properties in the ADVANCED AC, where possible
- The path of the [BASIC AC ID] - [Property1 ID] is mapped to the path of the [ADVANCED AC ID] - ([Aspect1 ID]) - ([Block1 ID]) - [BlockN ID] - [Property 1 or Property2 ID]
- Preconditions for the mapping is identical information in the following attributes
- Second, all remaining properties of the BASIC AC that could not be mapped will be copied into the ADVANCED AC as "flat" properties, i.e. not structured in aspects or blocks
- Plus, their paths are then mapped from [BASIC AC ID] - [Property1 ID] to the path of the [ADVANCED AC ID] - [Property1 ID]
The following image shows how it works:
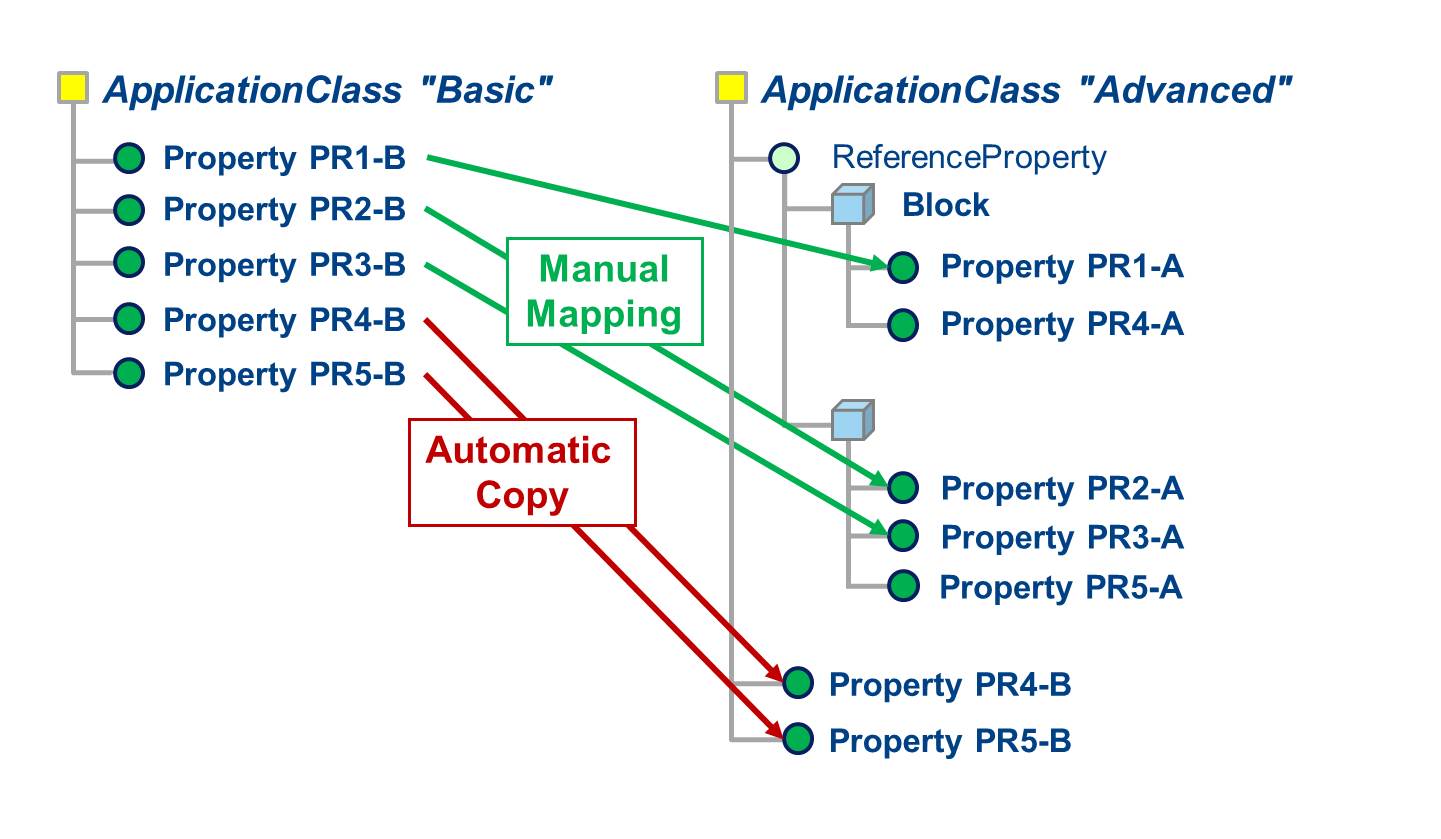
Figure 1: Mapping Basic-Advanced
The following example shows how differently the BASIC AC ("flat") and the ADVANCED AC (structured) are designed and how the content can be mapped:
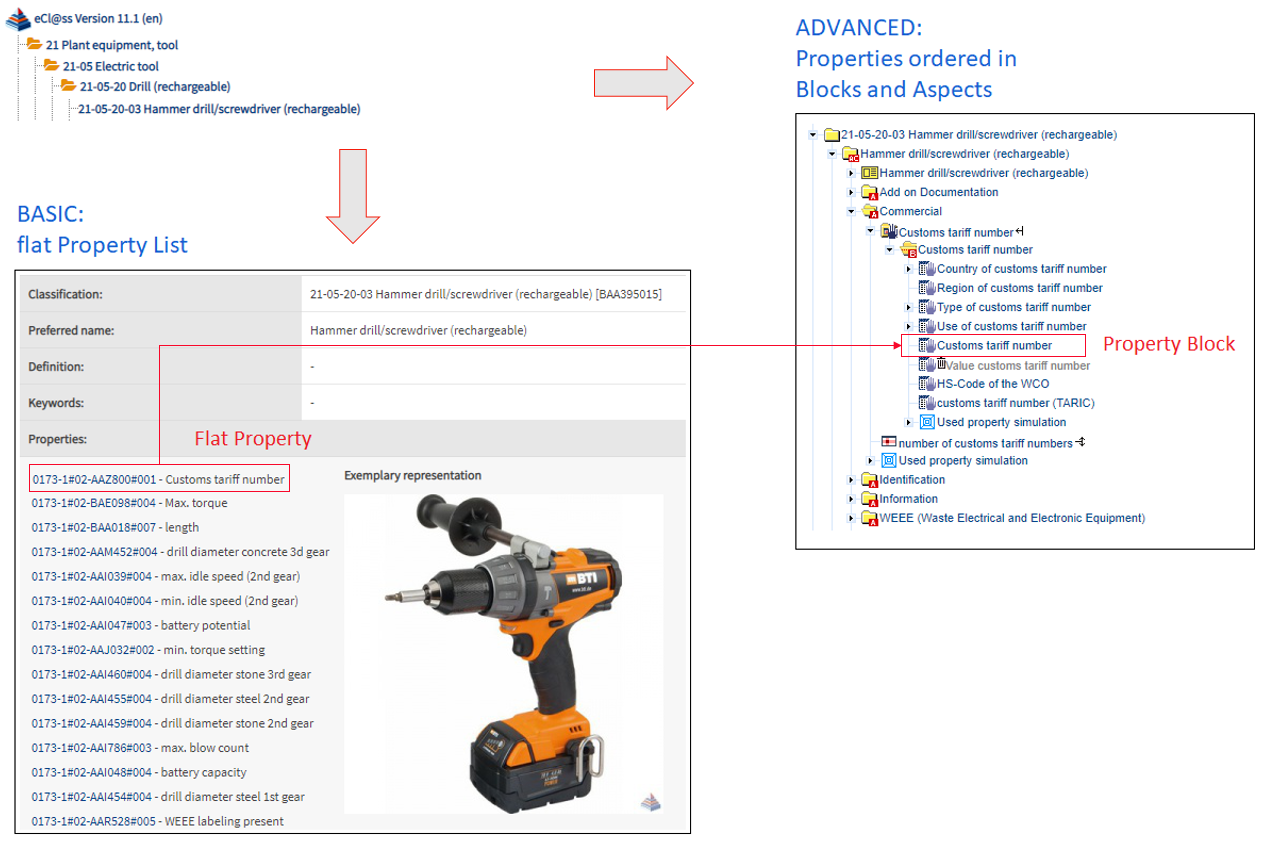
Figure 2: Basic-Advanced Mapping Version 11.1
Detailed view of the respective mapping in ECLASS CDP:

Figure 3: Customs tariff number CDP
Mapping File
In the mapping basic ➡ advanced file for each property in its context in the basic model the corresponding path in the advanced model of the same release is given.
Note that while the paths are written down in the form basic to advanced, also the opposite direction applies (as the mappings between basic and advanced model were made strictly 1:1).
The same explanation on paths applies as for the transaction update file.
XML Schema 1.0 (until Releases 7.1) is here.
XML Schema 2.0 (since Release 8.0) is here.
XML Schema 3.0 (since Release 11.0) is here.
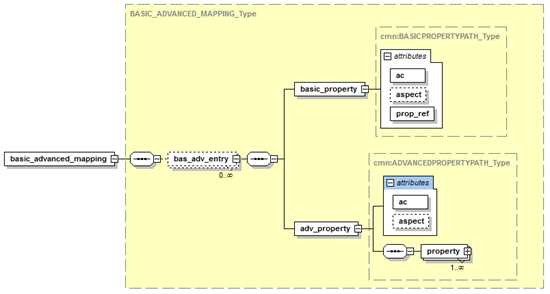
Figure 4: Basic Advanced Mapping ECLASSXML-1.0
Mapping Handling in the CDP
This paragraph explains how to request canges in the mapping in the ECLASS COntentDevelopmentPlatform (CDP).
Preconditions
User is authenticated.
ONLY the users that have the rights Mapping Manage will be able to create and edit Mappings.
ALL Users will have the rights Mapping Read, thus will be able to view Mappings.
View Mapping
All users are able to view available mapping via tab Basic-Advanced Mapping.
Step 1: To view the available mapping of a PR, click on the [Basic-Advanced Mappings] tab:
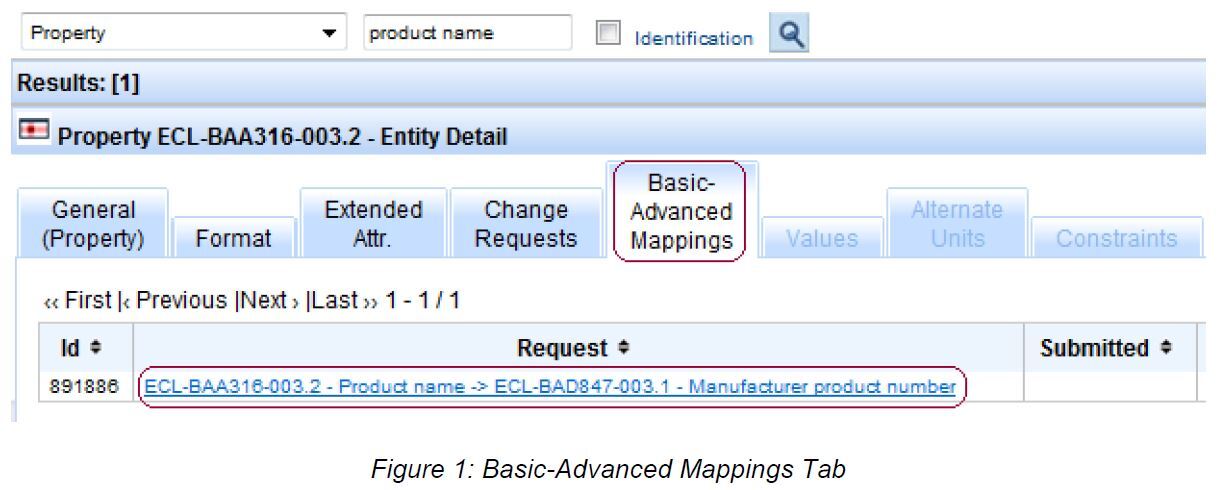
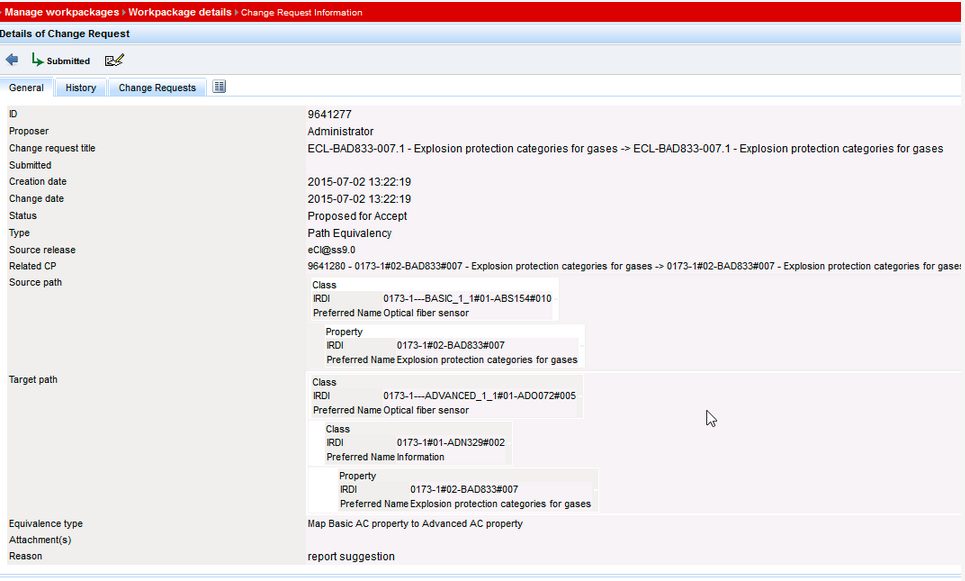
Step 2: Click the Identification link and the system will display the details:
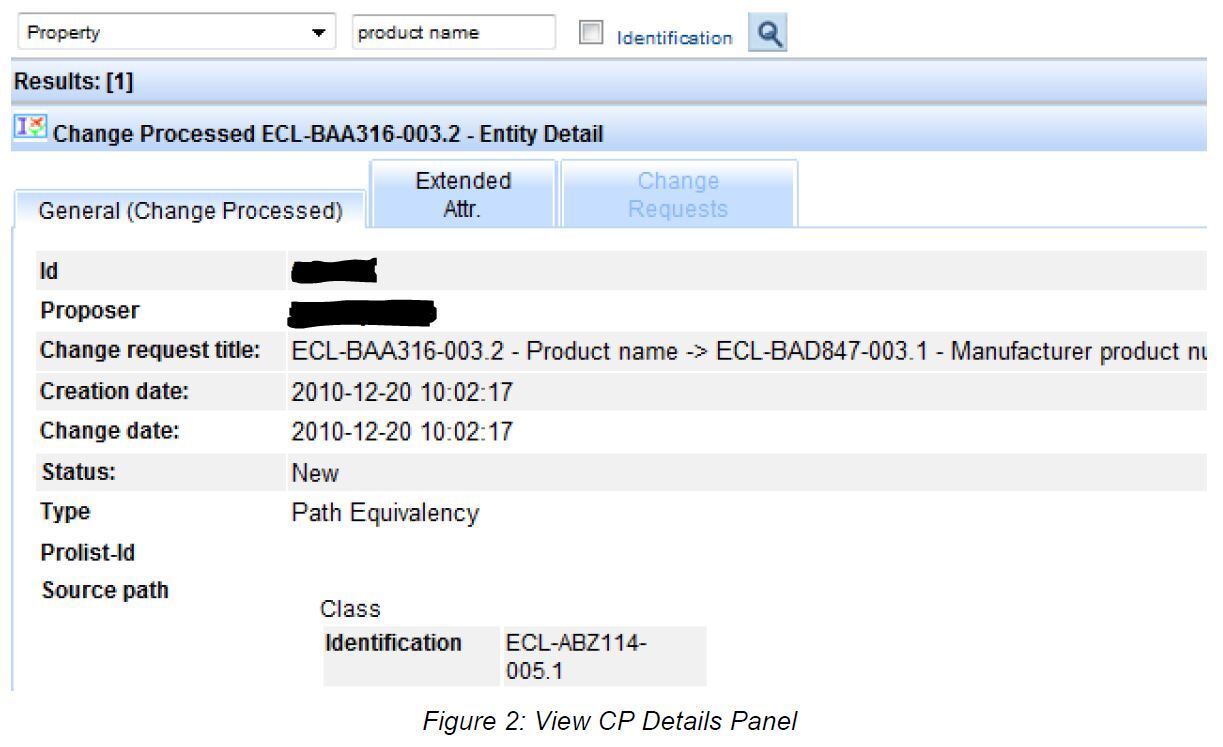
Create Mapping
Basic/Advanced mapping means linking two properties: a source property present in a basic AC and a target property from an advanced AC.
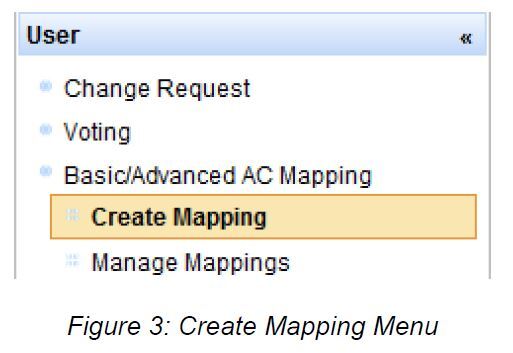
Step 1: Access the function via User -> [Basic/Advanced AC Mapping] -> [Create mapping]:
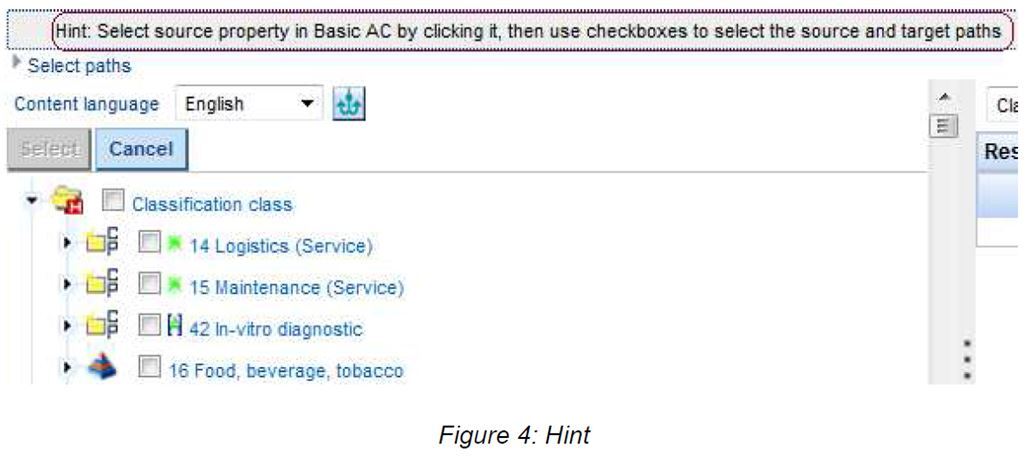
Step 2: System displays tree view and a hint regarding action to be performed:
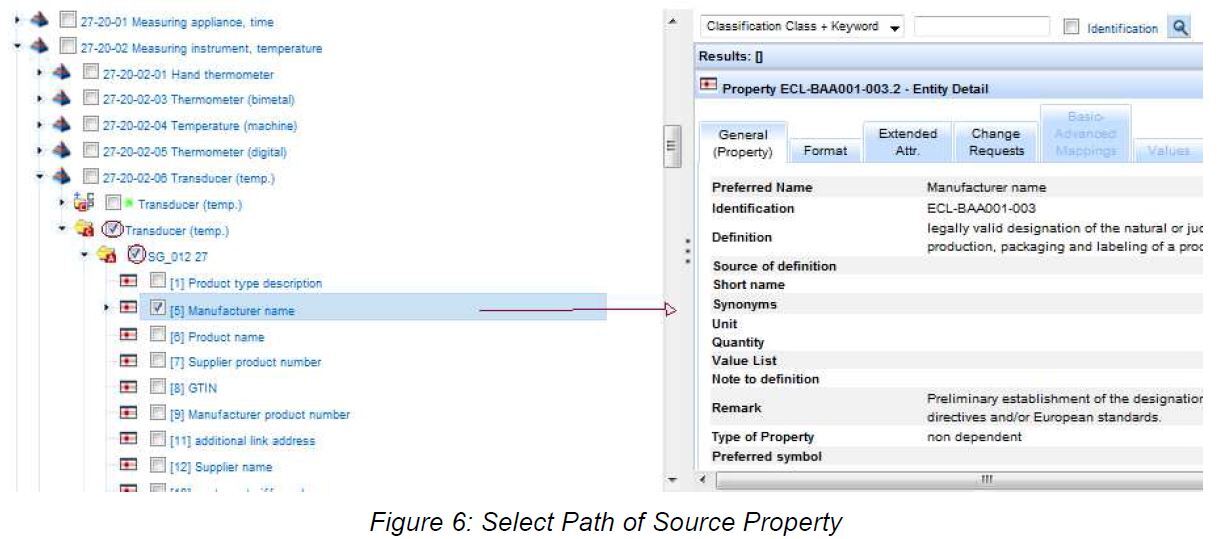
Step 3: In tree view, select the source property of the Basic AC. Click the link of the source property so that its details are displayed on the left hand details panel, then select it by ticking its checkbox:
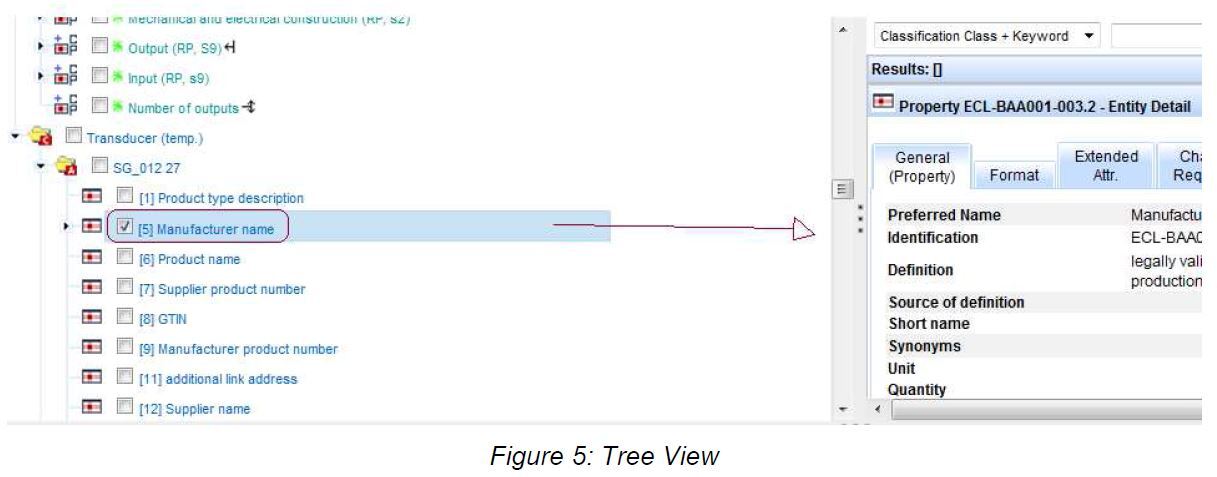
Step 4: Continue by selecting the entire path of the source property, by ticking the checkboxes of the structural elements that make up the path. Make sure that the property remains selected, i.e. its details are still being displayed on the left hand panel:
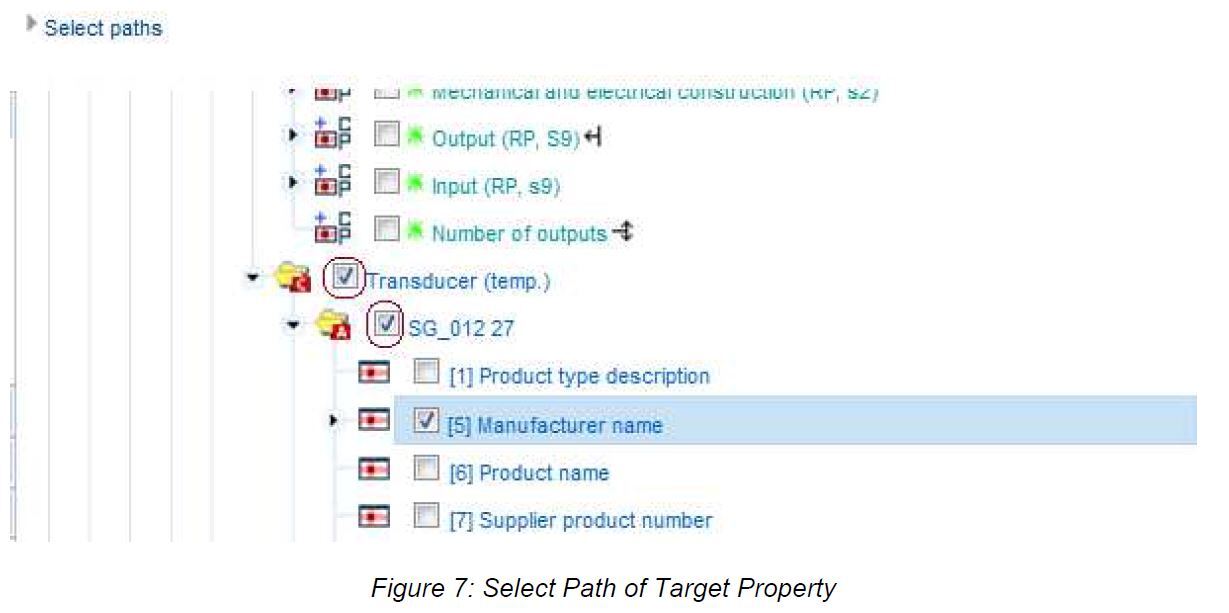
Step 5: To select the target property, expand the node of the Advanced AC and browse to the corresponding property and tick the checkboxes forming the path:
Step 6: click button [Select]
Observation: Only properties pertaining to the same data type can be mapped. Otherwise, the system will not allow mapping to be carried out:

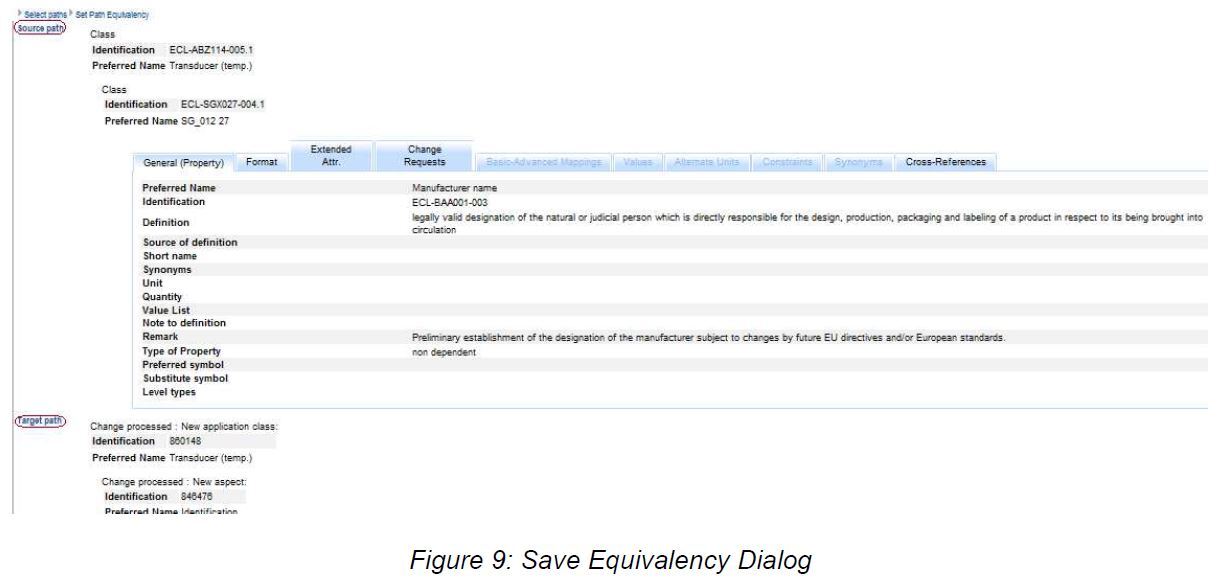
Step 6: The system displays the Set Path Equivalency dialog. Click [Save].
The system returns to the initial view and displays the corresponding message.
Mapping Mass Data Correction Tool
Users with role “Business Rule Checker” runs Business Rule “Basic used property mapping in advanced AC”, under menu entry [User] / [Reports]. In order to start the selected Business Rule, user presses toolbar button “Start Validation”.

Provided that basic PRs without mappings exist, user shall further on receive an additional report, in Excel format, containing all possible mapping suggestions of those PRs in the advanced side.
Based on received Report, user chooses from among the suggestions for each source AC-PR exactly one valid mapping and saves the file for a CR import. Suggestions that shall not be used, need to be deleted accordingly. After the Import file has been prepared, user with “Office Chair” role assigned, selects menu entry [User] / [Mappings] / [Browse] in order to organize CR/CP XLS Transformation Mapping Import.
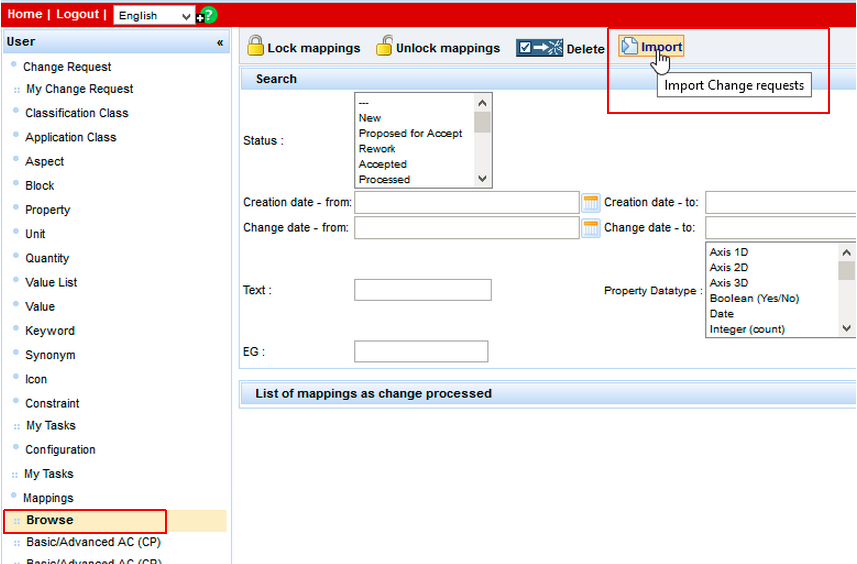
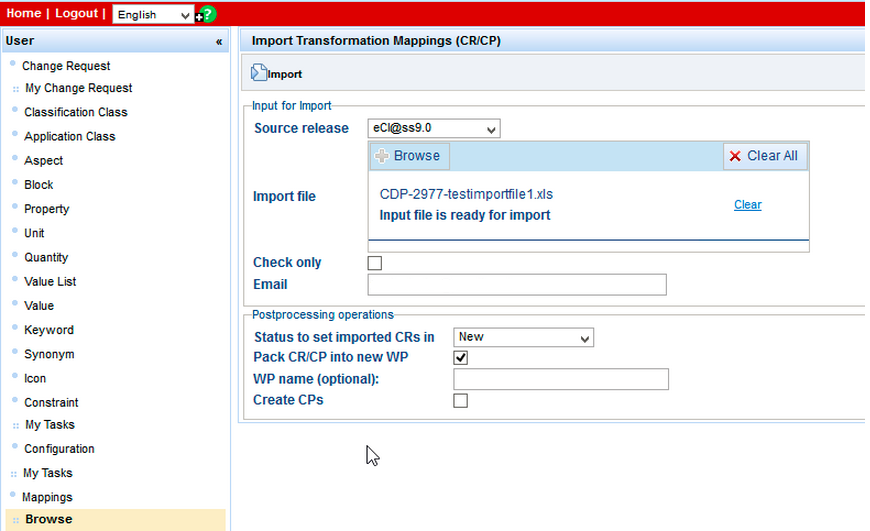
After Import has been organized, system creates Path Equivalency CRs Based on the Import file loaded by user. Also, user receives an import report. Report contains an extra commented Excel file, with status of each mapping line.
This imported CRs/CPs will be processed during next release post-processing phase and will be placed inside the currently configured mapping plan of that release.
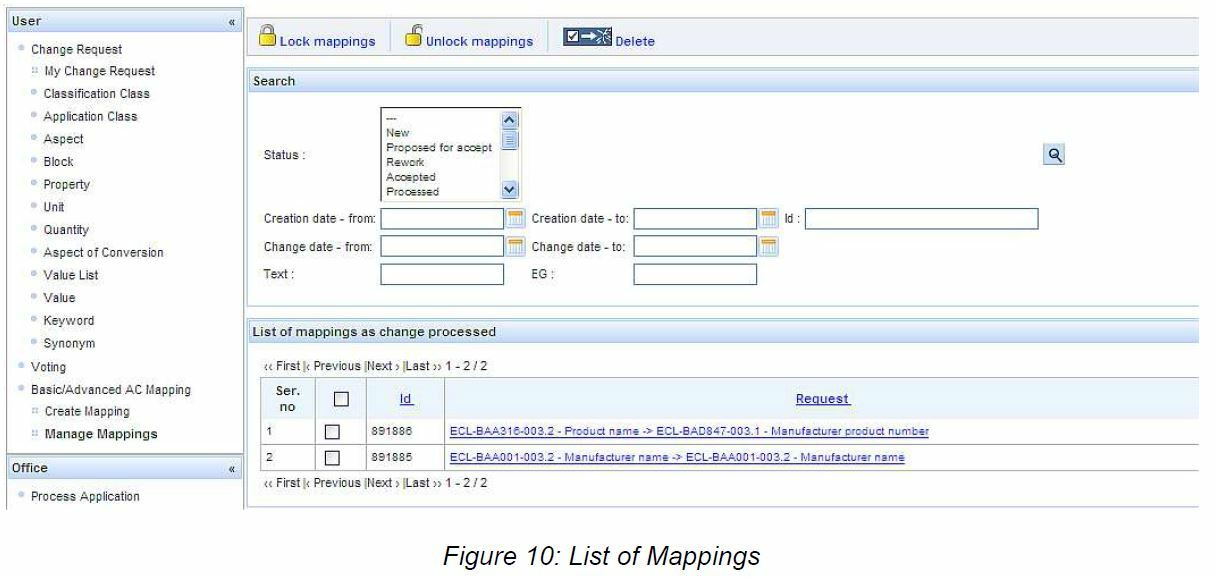
Manage Mappings
The function is accessible via User -> [Basic/Advanced AC Mapping]. Click [Manage mapping] and the system displays the list of mappings as change processed:
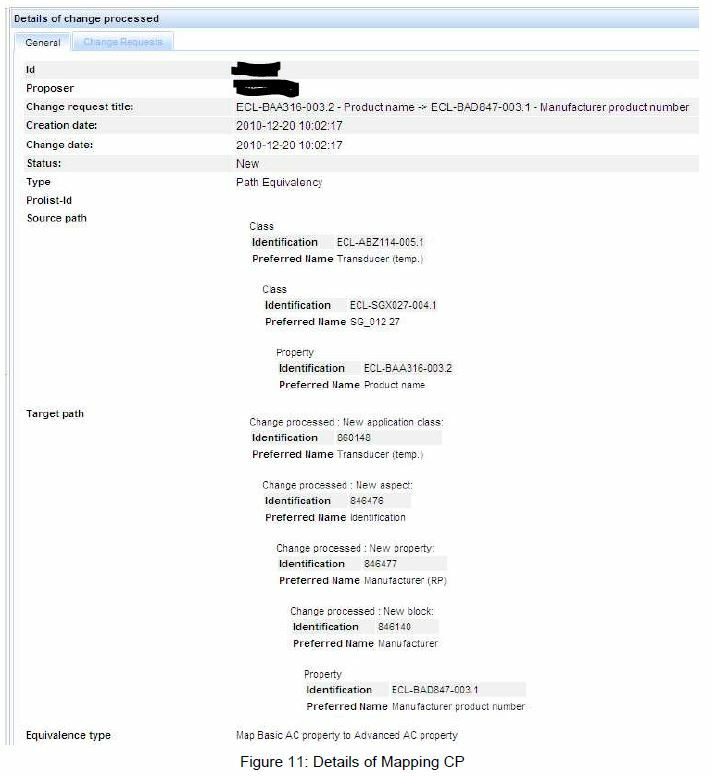
View Details of Mapping
In the list of mappings (change processed), select the desired mapping by clicking on it. System will display the details page of the mapping change processed:
Lock Mappings
Locking a mapping means that this mapping is set from status New in status Released and thus it cannot be changed anymore.
Step 1: Tick the checkbox the respective mapping in status New and click [Lock mappings]:
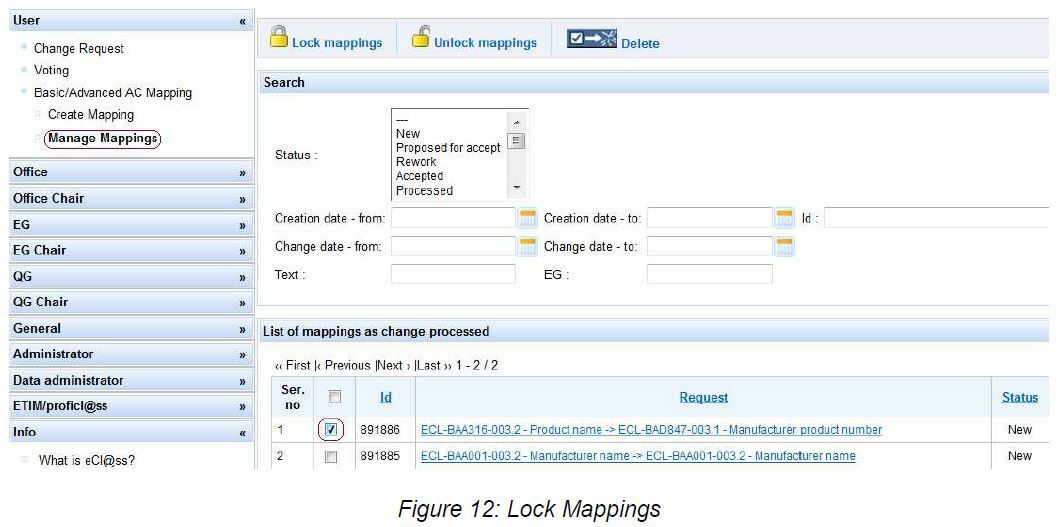
The system displays the corresponding message and the status of the mapping changes to Released:

Unlock Mappings
Unlocking a mapping means that this mapping is set from status Released in status New.
Step 1: Tick the checkbox the respective mapping in status New and click [Lock mappings]:
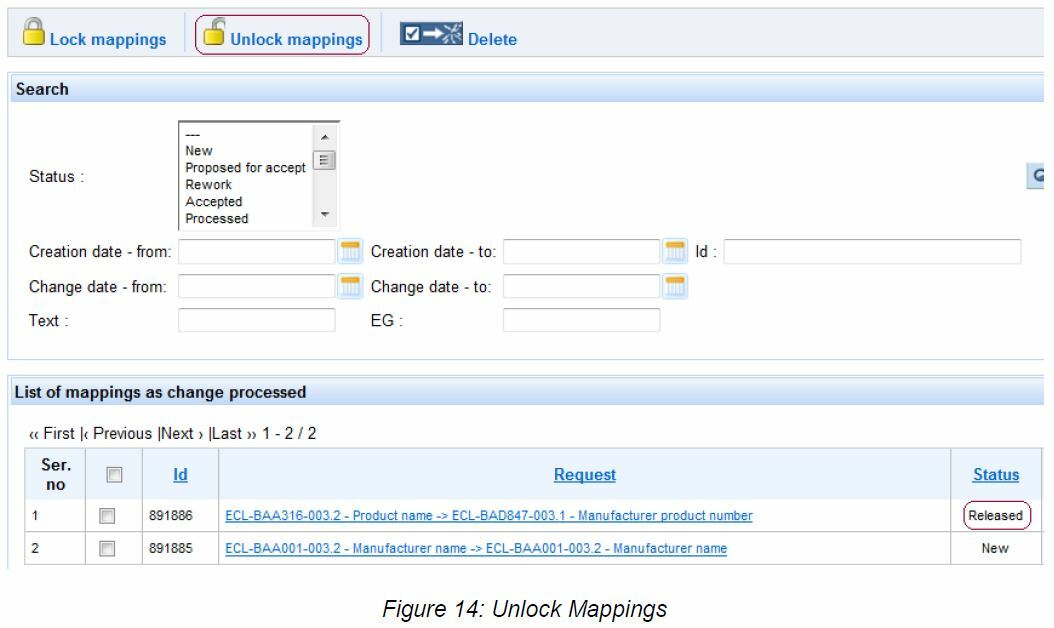
The system displays the corresponding message and the status of the mapping changes to New:

Delete Mappings
To delete a mapping, tick the checkbox the mapping to be deleted and click [Delete]. The system deletes the mapping and displays the corresponding message.