Template Manager
ECLASS Templates creation manual
Introduction
Definition: ECLASS Templates
An ECLASS template is a bilaterally agreed data specification, i.e. it underlies the communication between an information requestor and an information provider. It defines which data from an application class from the ECLASS dictionary shall occur in transactional data (messages) or catalogs and how this data is expected to be presented. Moreover it can clarify the usage of individual properties by narrowing down the options e.g. for a property being multivalued or having a restricted set of proposed values.
The data dictionary defines how products and services are classified and can be described. In the template, there is modelled how the expected respone to a query looks like; in other words: The template is used to structure the catalog and gives hints at filling out the catalog, but to understand the meaning of the catalog one does only need the dictionary. This means that the following referencing requirements apply:
- A template does not contain its own set of identifiers (except the template identifier itself).
- A catalogue references concept identifiers from the dictionary, not from the template.
- A template is not needed to decode a catalogue.
- A template is needed to create a catalogue that meets a data recipient’s requirements.
More technical information about ECLASS Template: eclass.eu/support
1 - Scope
This manual is a working guide for the creation of ECLASS templates by using the platform ECLASS CDP (ContentDevelopmentPlatform). The possibilities for using templates are very diverse. Therefore it is not possible to describe all functionalities in the context of the possible use. Using the example of the „Marketing“ template, the manual describes how a user can create a new template in CDP. In addition, the steps for defining filters and views are described, which are essential components of ECLASS templates.
The description and use of the templates in the XML structure is not discussed. For this you find further information under: https://eclass.eu/support
2 - Creating and editing templates
2.1 - Registration and Login
2.1.1 - Login
In order to enter the ECLASS ContentDevelopmentPlatform (CDP), a user must register by providing accurate and complete information in the registration form and by agreeing with the Terms of Usage.
The Template Manager does not belong to the standard rights of the CDP and is therefore not displayed in the menu. If you are interested, please inform the ECLASS Head Office so that the necessary rights can be assigned to you.
 1. Click on the link „Register new user“
2.1.2 - Select Template Manager
After successful registration and login, you can select the „Template Manager“ section in the CDP menu.

1. Select Template Manager and click on „Browse“
2.2 - Create a new “Template Type”
Templates are usually created not only for one class, but for many classes. The classes are grouped under the template types for a common export. You can edit existing template types or create new Template types.
2.2.1 - Template types

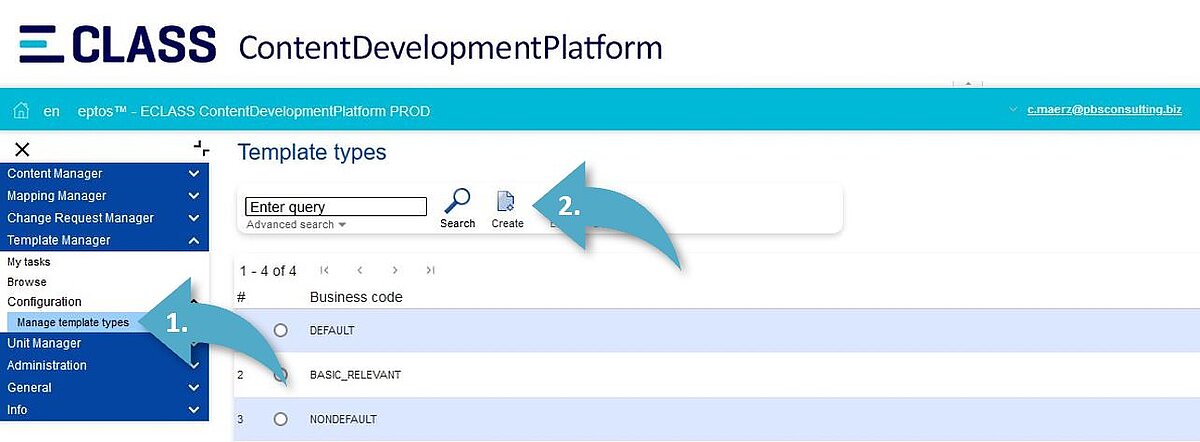
1. Click on „Manage template types“.
2. Create a new „template type“. Click on button „Create“.

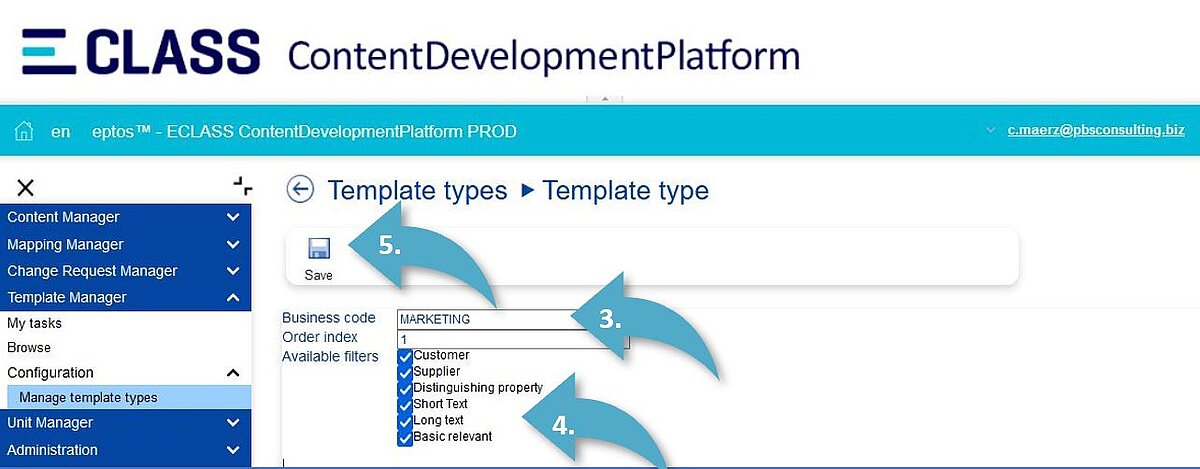
3. Set a „business code“ (e.g. MARKETING).
4. „Available filters“: If you want to use one of the filters in your template, you have to select these filters in this menu. Filters are exported as an additional flag for an ECLASS Property (PR).
5. Click on the button „Save“
2.3 - Editing of the new Template Type “MARKETING”
In the first step, the user selects a class and assigns it to the template type. Then the user can design the template by setting filters and indicators.
2.3.1 - Select a class

1. Change to „Template Manager/Browse“.
2. Click on the button „Create“.

3. Open the hierarchy (Application classes (AC)) by clicking on the small triangle. Navigate to the class you are looking for.

4. Select the AC for working with the template tye „MARKETING“.
5. Click on the button „Select“ → You will get a new window with many setting options.

6. There are several tabs for editing. (The tab functions are described below)
2.3.2 - Tab „General“
1. Selection of additional languages (when required).
2. Select a preferred name for the template in all languages.
3. Select a „template type“ (In our example „MARKETING).
2.3.3 - Tab „Extras“

1. Open the pop-up menu „Order type“ and select a value.
Important: If you want to sort properties (PR) by „drag and drop“ (Filters), you have to choose „User-defined order“ (see also „2.4.8 - Field representation / PR order“).
2. Make other settings if requested for your template.
2.4 - Filter Settings
The core of template creation is located on the tab „Filters“. The individual settings can be made here. The following setting options describe the most important functions.

2.4.1 - Filter
1. Propagate filter values: Select hidden and visible flags. Click on the „settings icon“ (gear) and you get a new windwow.
2. Select the required filters for your Template.
3. Set filters for the PRs.
2.4.2 - Reuse template for class
2.4.3 - Groups
With „groups“ you have the option of combining related PRs of a class into a group. (e.g. PRs: „width“, „length“, „height“ --> group „dimensions“). Groups only have to be created once for a template type and can then also be used for other classes.

1. Fill in a „group name“ and arrange some PR to a group.
2.4.4 - Change default unit

1. Click on the button „change default unit“.
2. In the window „Change default unit“ you can add an additional unit of the ECLASS Dictionary.
2.4.5 - Value generation rules

1. Click on the button „Manage value generation rules“.
2. In the window „Manage value generation rules“ you can change value settings or define new rules.
2.4.6 - Overwrite names
For each language it is possible to change the displayed name of the PR.
(e.g. color → frame color)

1. Click on the button „Overwrite names“.
2. In the window „Overwrite names“ you can overwrite PR name of the ECLASS dictionary (e.g. color → frame color).
2.4.7 - Overwrite symbol
If available, you can set an alternate symbol.

2.4.8 - Field representation / PR order
The order of the PRs can be changed by two options.

1. Click an „Order type“ arrow -> PR move up/PR move down.
2. Change order by „drag and drop“. (note: „user defined order“ will be activated on tab „Extras“)
2.4.9 - Required
Using this filter, you can define mandatory PRs in the template. In the export these PRs get a corresponding flag. Helpful for the data maintenance (e.g. in PIM or ERP systems).

2.4.10 - Multivalue

2.4.11 - Hidden
This filter makes it possible to hide PRs of a class. You can use this to control which PRs are necessary for your intended use. The class-PR-relation can be presented much more clearly.

1. Set filter „Hidden“ to hide unnecessary PRs.
2. Checkbox „Show hidden entries“: show or hide the „hidden“ PRs in the Template Manger.
2.5 - Views
Sometimes it is not enough to adapt all the PRs of a class via a template. If further separations and different descriptions are required within a template, additional template views can be created. A possible example would be an additional view „short text“ that only contains a small part of the PRs.
2.5.1 - Create a new view
Please repeat the steps 1-3 of „2.3.1 - Select a class“

1. Click on the small triangle (in front of your chosen AC (e.g. „Infoframe“) and open the hierarchy.

2. Please select your root class (e.g. „Infoframe“) and the template (e.g. our template „MARKETING“) for which you want to create a view.
3. Click on the button „Create template views“.

4. Fill in a name for the new view.
5. Click on tab „Properties“ to make the settings of the view.
2.5.2 - Editing of a view

1. Click on the button „Add properties“.
2. A new window will open „Template node selection“.
3. Select PRs for the view „short text“.

4. The selected PRs are now available. The order/index can be changed by „drag-and-drop“.
5. If needed, you can add chapters for more separations within the view.
6. After working, finish click on the button „Save“.
2.5.3 - View administration

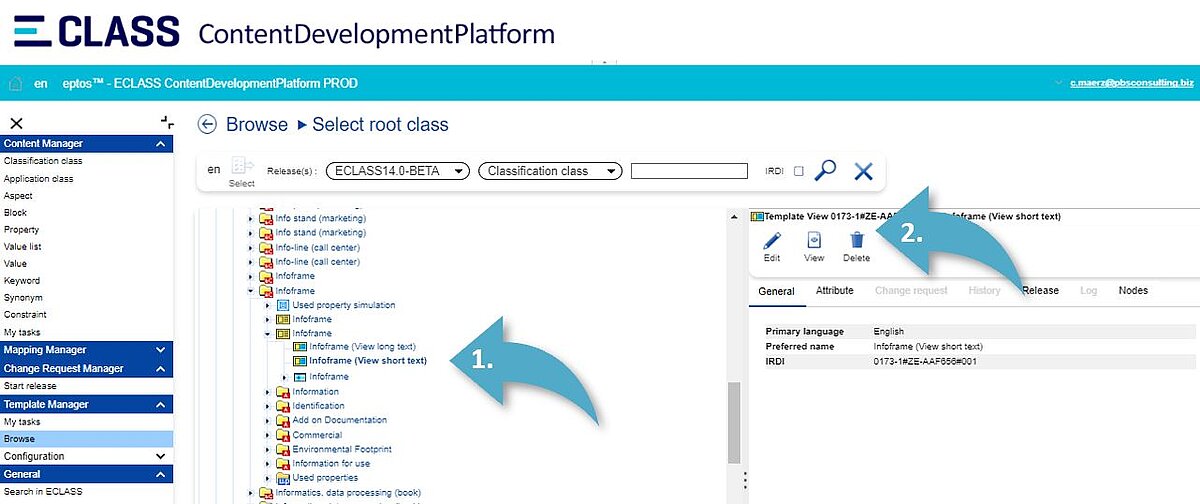
1. When the view has been saved successfully, you can administrate in this area.
2. You can edit, view or delete existing views.