Value List (Help Page)
Overview
Value Lists are meaningful groupings of Values.
When a Value List is assigned to a Property it restricts the possible Values of the Property.
Value Lists are defined by specific attributes like Value specification and Data type:
- Value specification CODED includes following data types: Boolean, Date, Integer (count), Rational, Real (count), Reference, String, Time, Timestamp
- Value specification EXPLICIT includes following data types: Boolean, Date, Integer (count), Integer (currency), Integer (measure), Rational, Rational (measure), Real (count), Real (currency), Real (measure), Reference, String, Time, Timestamp.
Note: Explicit values are directly stated and easy to understand, such as "25" or "blue." Coded values, on the other hand, use symbols or codes to represent information, like "M" for male or "1" for yes.
General Information
The workspace area for the management of Value lists can be accessed via menu Value List.

Figure 1: General information Value List
Search | Triggers a search in the available content, considering the search options set in the advanced search. |
Tree view | Allows navigation to the hierarchical view. |
Compare | Allows the comparison of two or more Value Lists. |
Create | Allows the creation of new Value Lists. |
Change text | Allows editing the Attributes of a selected Value List. |
Remove | Allows removal of a selected Value List. |
Reactivate | Allows reactivation of a Value list reference assigned to a Property. |
Values | Allows Assigning Values to / Withdrawing Values from / Reactivating Values in Value Lists. |
Search for a Value List
First of all the user can change the language of the content by navigating the mouse to the button “en” which is left to search field. Various languages can be selected.

Figure 2: Language of the Content
In the field Enter query it is possible to type in the ID or the preferred name of the Value List.
By clicking on “advanced search” (under search field), there are several search options available.

Figure 3: Advanced Search
The search options are explained via mouse over in the CDP. By clicking on the Search button without entering name or ID in the search field, all Value Lists are displayed in the list view below.
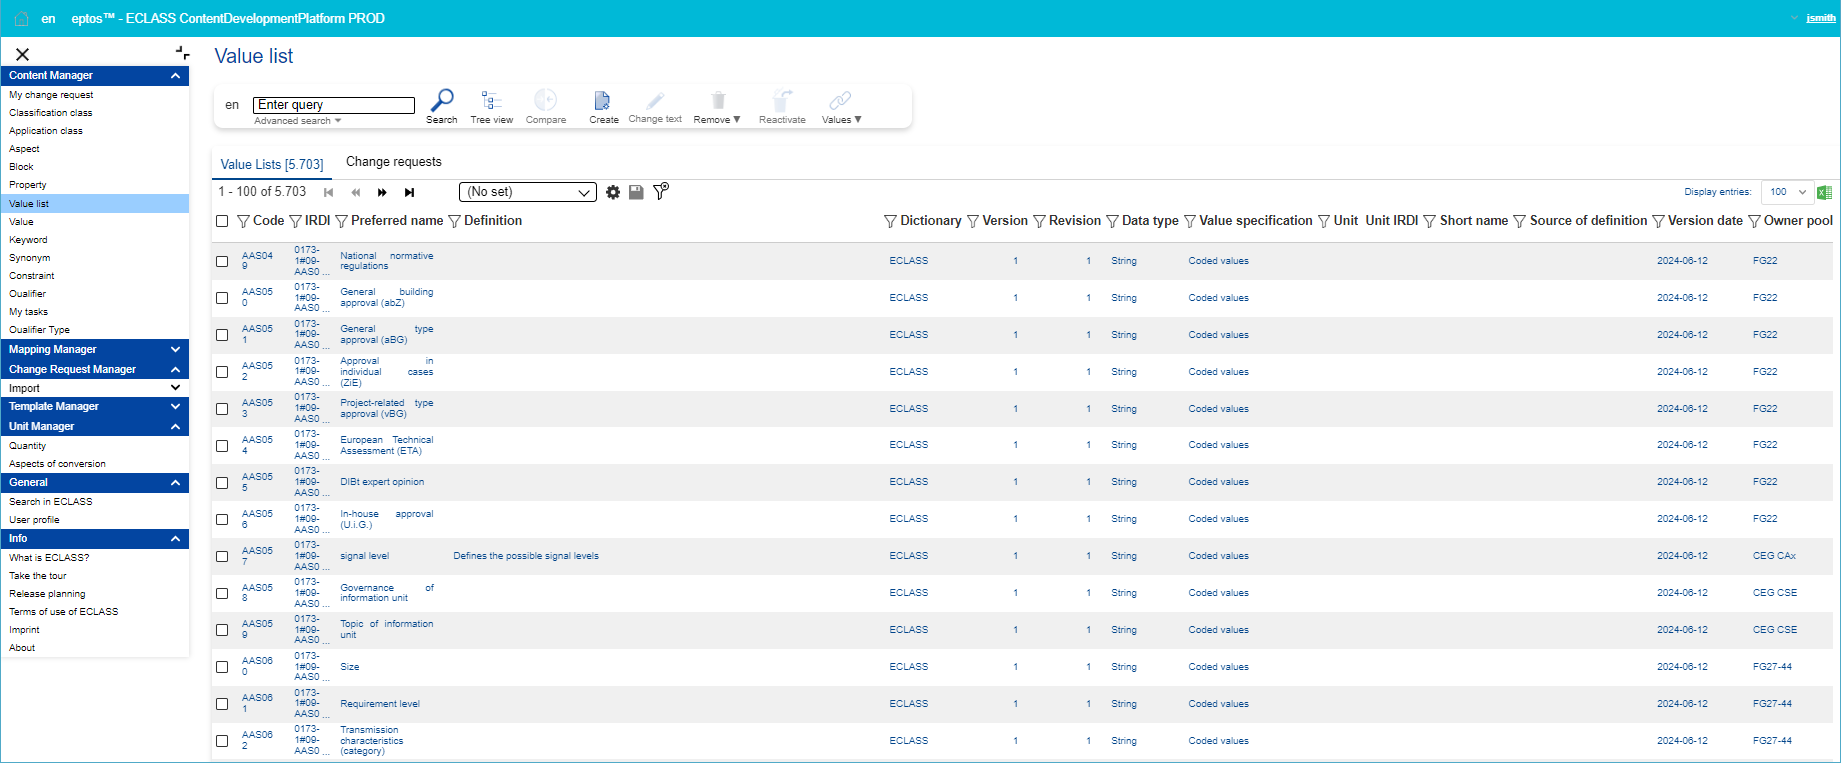
Figure 4: List View of all Value Lists
The user can select between the tabs Classes [number of existent Value Lists] and Change requests [number of Change Requests].
Tab Value List

Figure 5: Columns in List View
Code | 6-digit identifier (part of the IRDI) |
IRDI | International Registration Data Identifier |
Preferred name | Name of the Value List |
Definition | Definition of the VL |
Dictionary | The dictionary in which the Value List is used |
Version | Displays number of changes of the Value List (part of the IRDI) |
Revision | Technical versioning that is not part of the IRDI |
Data type | Data type of the Property on which the VL is assigned (Conceptual data model) |
Unit | A Unit of Measurement is a definite magnitude of a Quantity, defined and adopted by convention or by law, that is used as a standard for measurement of the same kind of Quantity. |
Unit IRDI | IRDI of assigned Unit |
Short name | Short name of Value List |
Source of definition | Source of definition of value list (e.g. “AI generated”, “ISO-IEC”) |
Version date | Date when the version number (last three digits of IRDI) of the VL has changed. |
Owner Pool | Owner of the VL, meaning the responsible group for that VL |
In order to view the details of a Value List SE click the respective Value List.

Figure 6: List of Value Lists
Within the displayed details-page of the respective Value List, users may view the following:
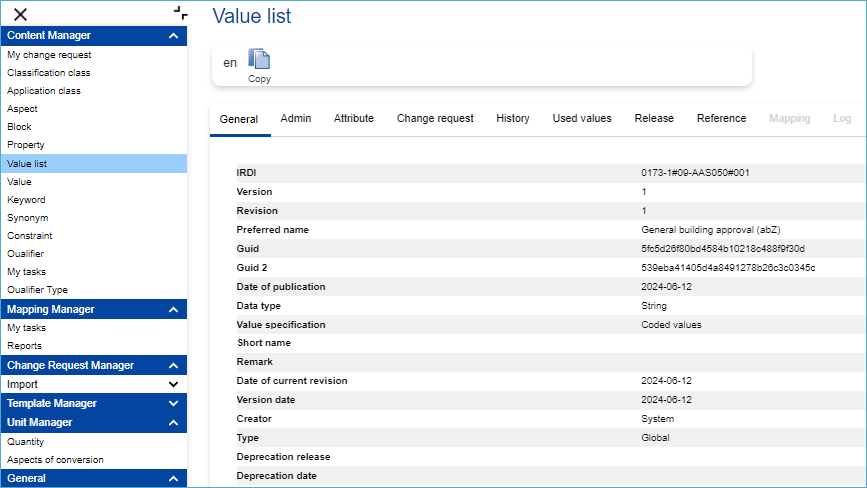
Figure 7: Details of Value List
Tab Change Requests
![]() Figure 8: Columns in the Tab “Change Requests”
Figure 8: Columns in the Tab “Change Requests”
ID | Change Request Identifier |
Request | Name of the Change Request |
Submitted | Submission date of Change request |
Status | The status of the Change Request |
Type | Type of change request |
Proposer | Proposer of the change request |
Data type | Data type of the Property on which the VL is assigned (Conceptual data model) |
Work package | Name of the work package the VL belongs to (if there is one) |
Release | Version of Release on which the Change is requested on |
Dictionary | The dictionary in which the VL is used |
Owner pool | Owner of the VL, meaning the responsible group for that BL |
In order to view the details of a Value List CR, click the respective Value List CR.
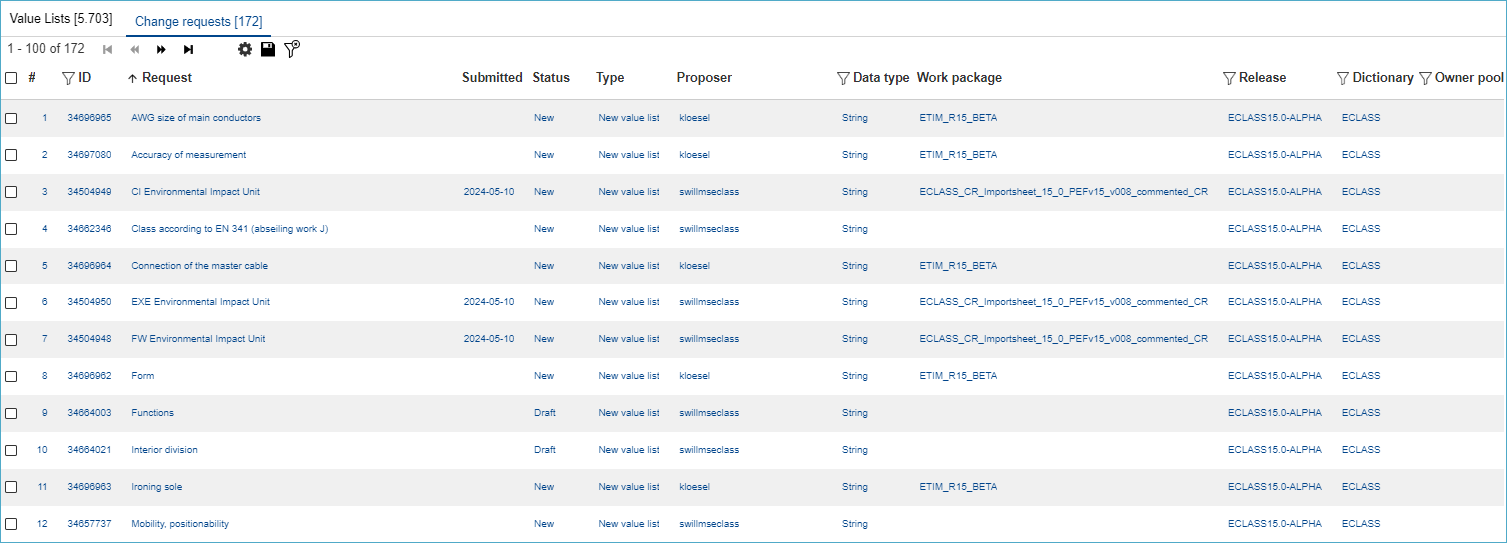 Figure 9: List of Change Requests
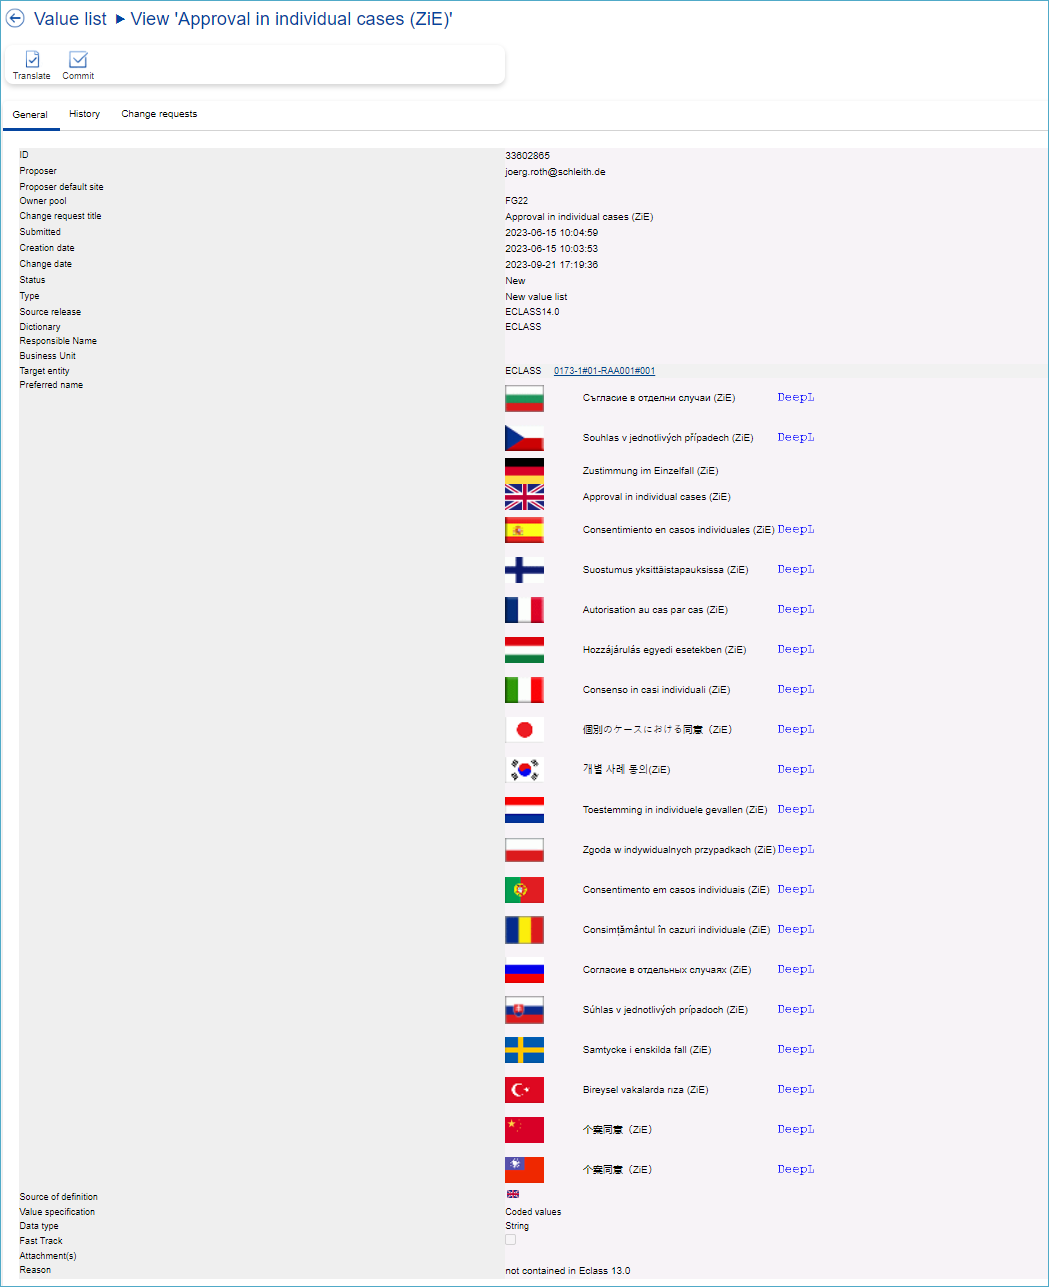
Figure 10: Details of Change Request
Under Tab “Change Requests” the CRs related to the Value List CR will be displayed:

Figure 11: Change Requests Related to the Value List CR
Export certain Value Lists

Figure 12: Selection of Filter Options
On the far-right side, the option to display up to 100 entries is available. Here the Excel icon allows to directly export in an Excel file the entries that are displayed on the page:

Figure 13: Options “Display entries” and exporting an Excel file
To export a certain Value Lists, the user can filter as needed and select the Value Lists they want.
For example, filter for Data Type and select the Value Lists with the Data Type “Boolean (Yes/No)”
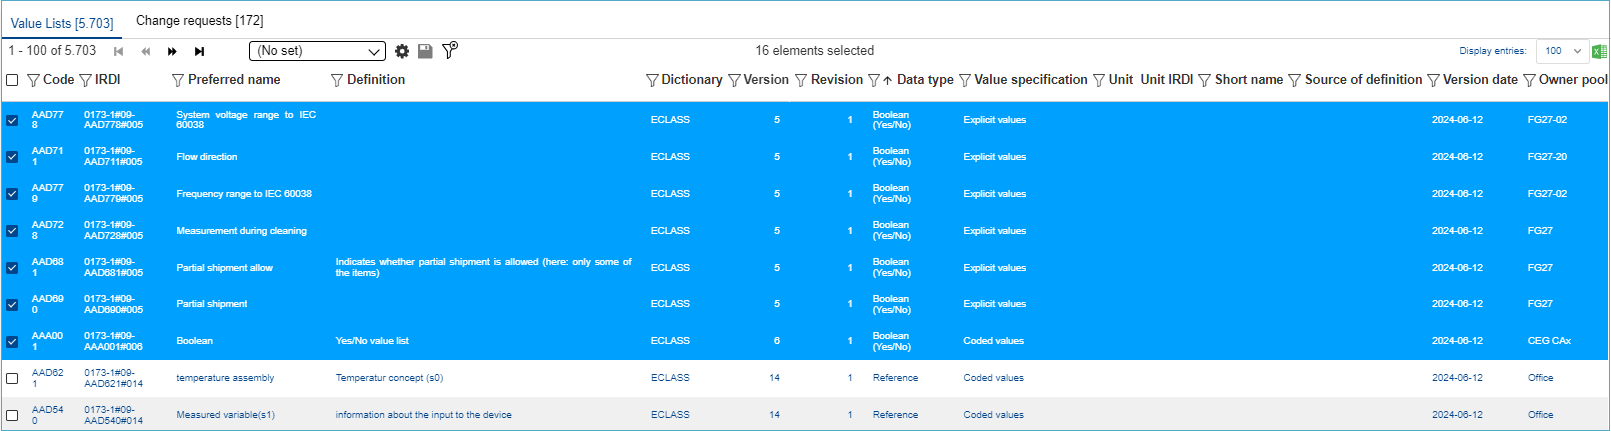
Figure 14: Example of filtering Value Lists
These same selected Value Lists will also be displayed at the bottom. There, the user is able to export only the selected Value Lists via the Excel icon on the right side:
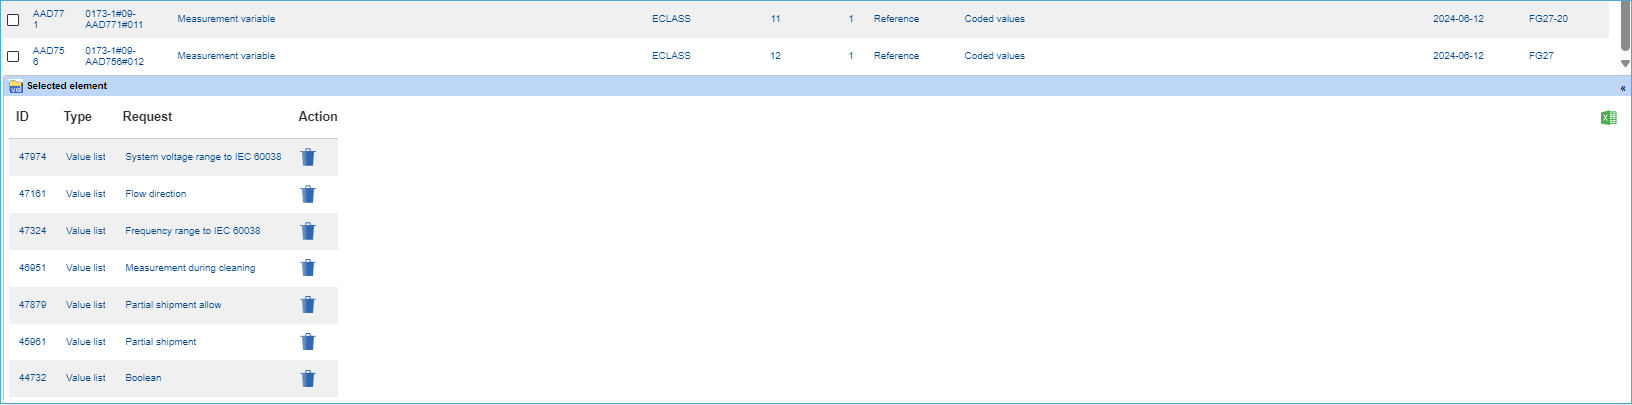 Figure 15: Display of the selected Value Lists
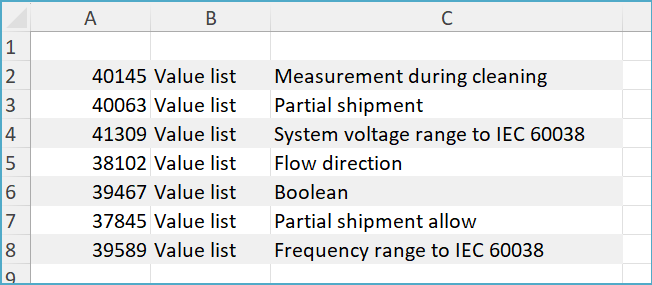
Figure 16: View of the exported Value Lists
Change Requests
Change Text
In the search overview, where all available Value Lists as well as Change Requests are displayed, users have the possibility to change the content language (in which Value Lists will be displayed) and search after specific Value Lists (structure elements or change requests).
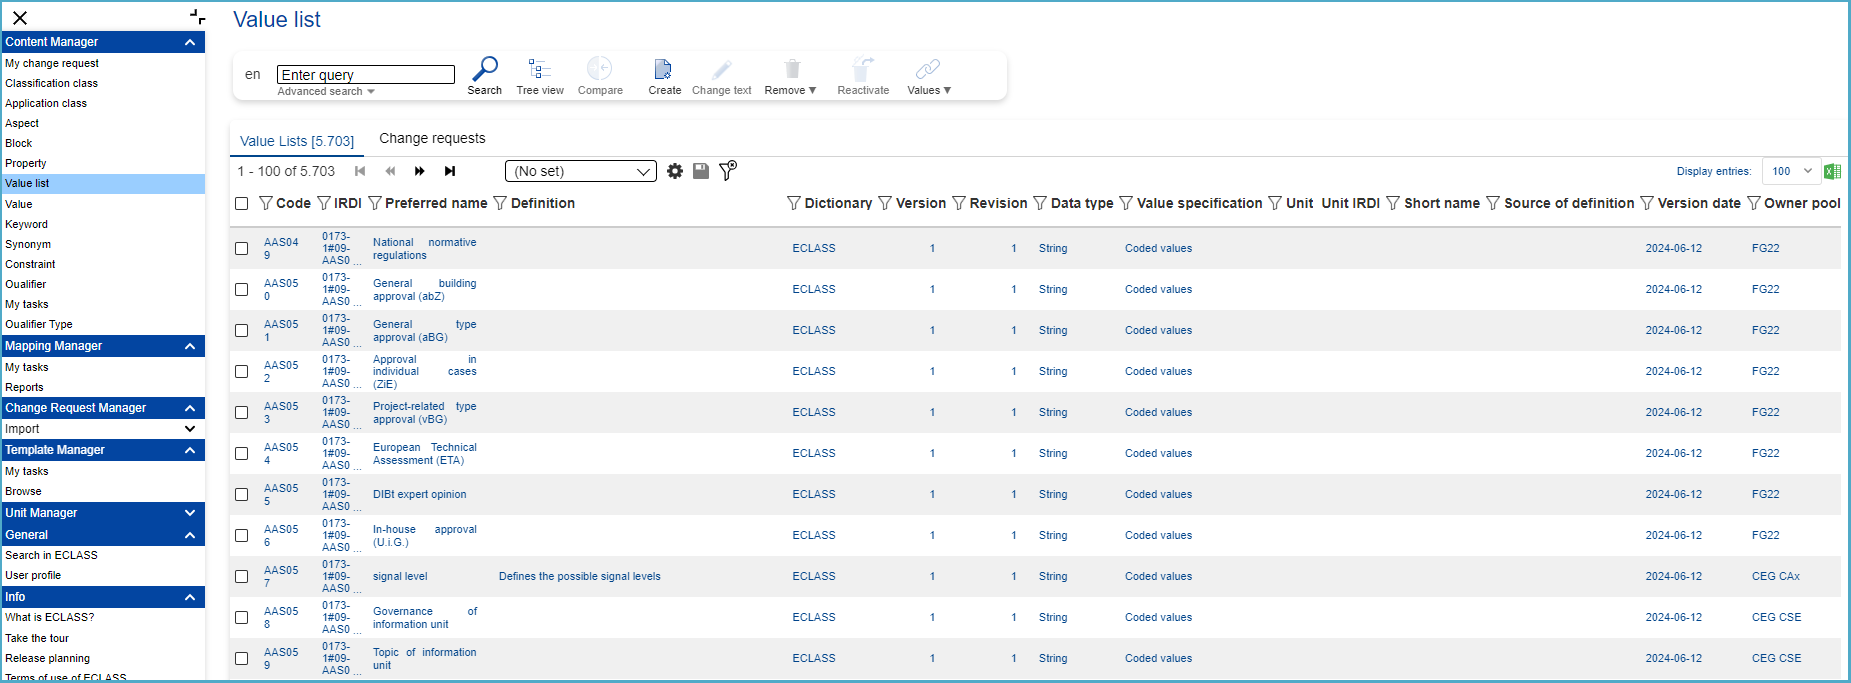 Figure 17: List of All Available Value Lists and CRs Related to Value Lists
Select a Value List in the list by clicking it in order to create a CR for changing the textual information.
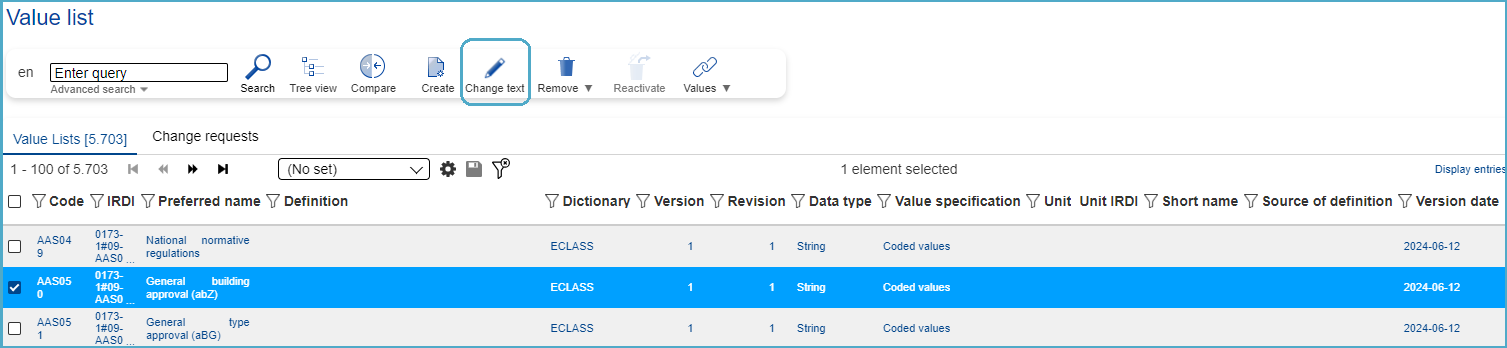
Figure 18: Select Value List in order to change text
The Change Text dialog will open:

Figure 19: Change Text Dialog
Fill in the fields with the new text and then press button “Save”.
Attention: The fields Preferred Name and Reason are mandatory fields!!!
System displays message: Change request saved. The new created change requests will be displayed under My Change Request.

Figure 20: Change Request Saved
Create Value List
After selecting Value List under Content Manager, users can directly select the option “Create”.

Figure 21: Option “Create”
The system will display the Create dialog:
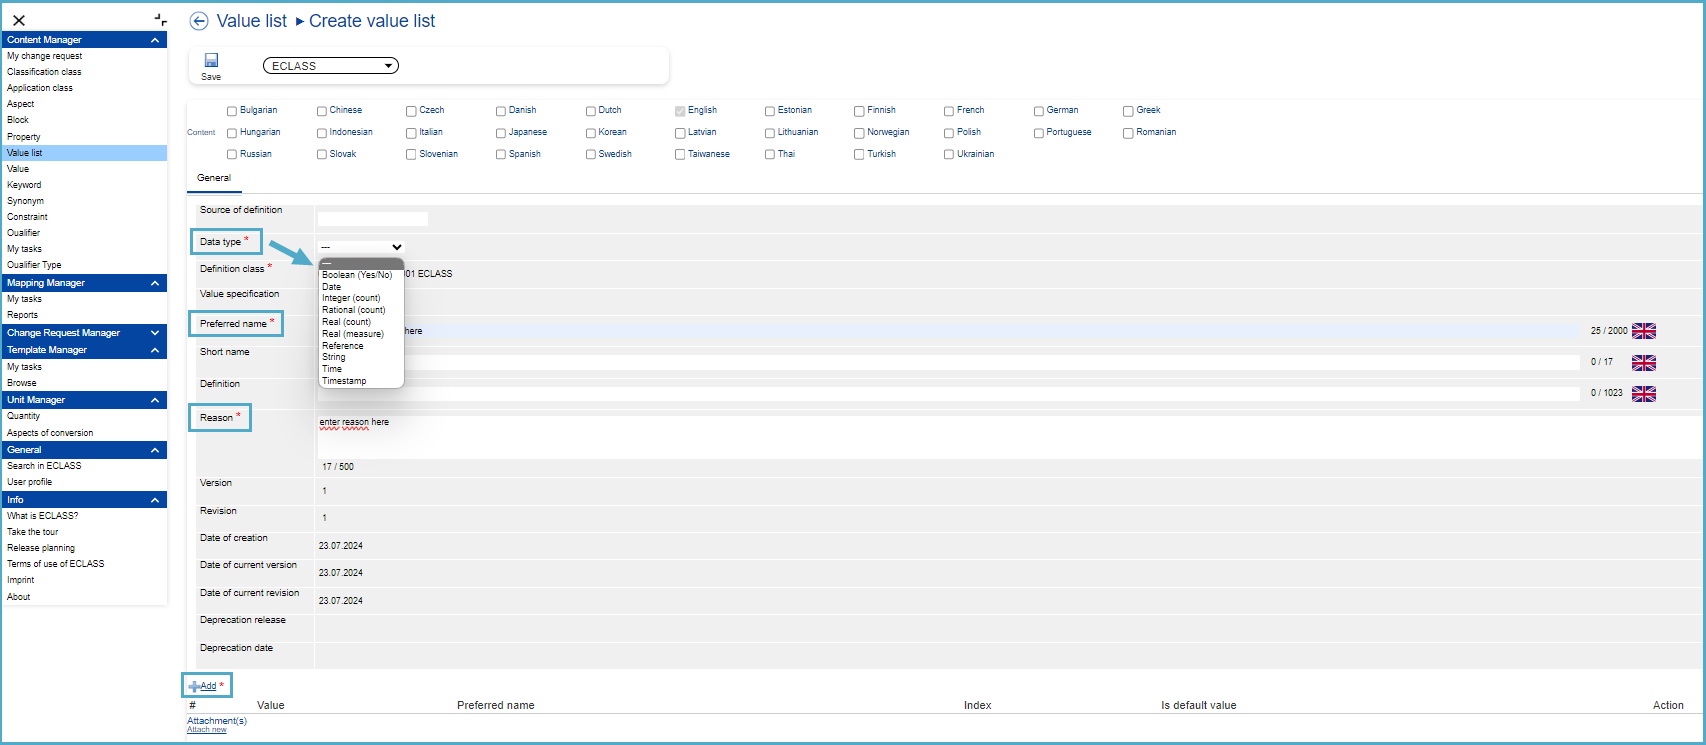
Figure 22: Create Value List Dialog
Mandatory fields are:
- Preferred Name
- Data Type: Boolean (yes/no), Date, Integer (count), Rational (count), Real (count), Real (measure), Reference, String, Time, Timestamp
- And additionally, if Value specification “explicit value” is selected, Data Type: Integer (currency), Integer (measure), Rational (measure), Real (currency), Real (measure)
- Reason
- Create Value List with Data Type Integer measure/Real measure
In case of Data Type “Real (measure)”, additionally a unit of measure has to be selected, in all other cases no unit of measure is allowed.
STEP 1: Select Data Type Real (measure).
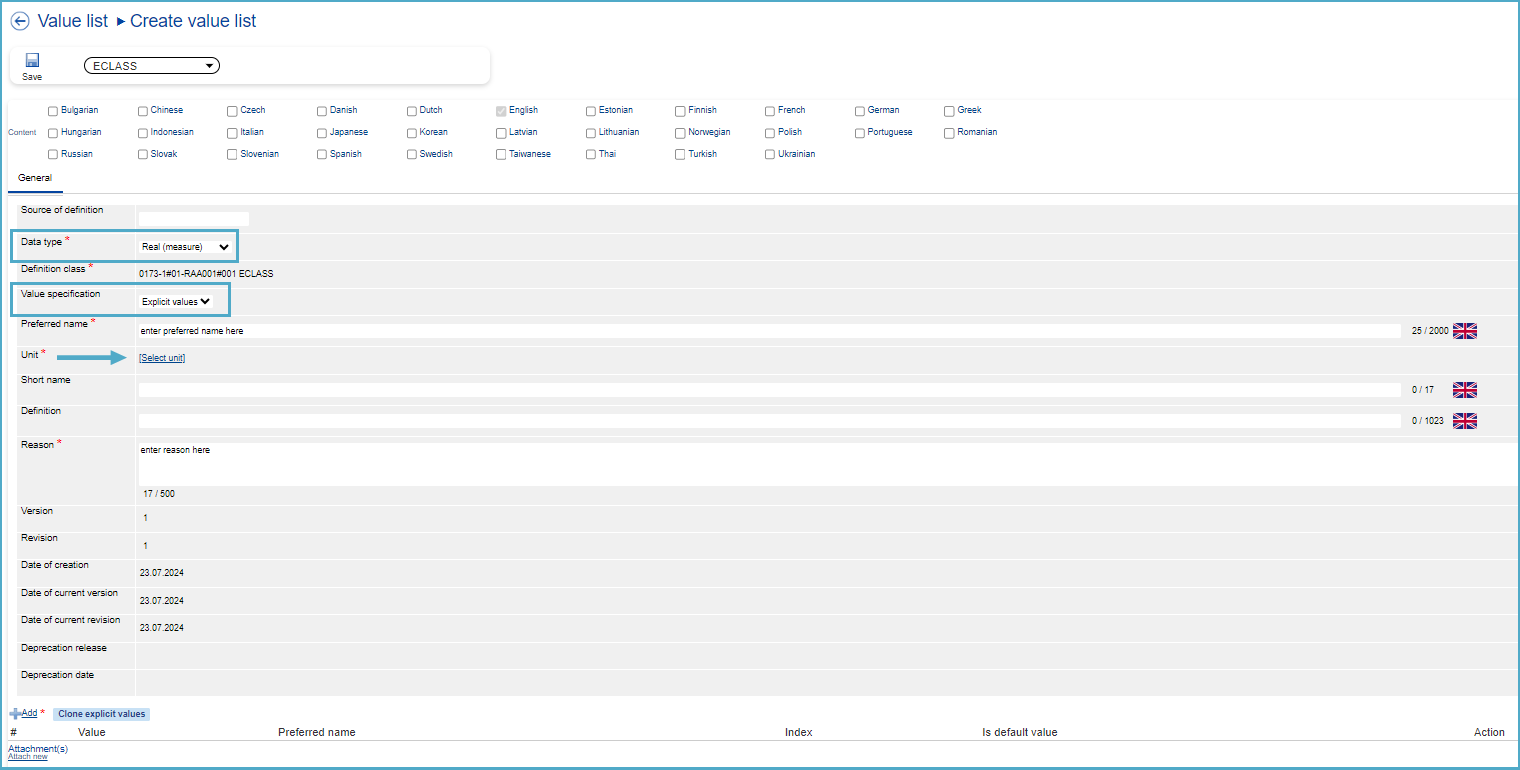
Figure 23: Create Value List Dialog – Data Type Real (Measure) Selected
STEP 2: Press link “Select unit”.
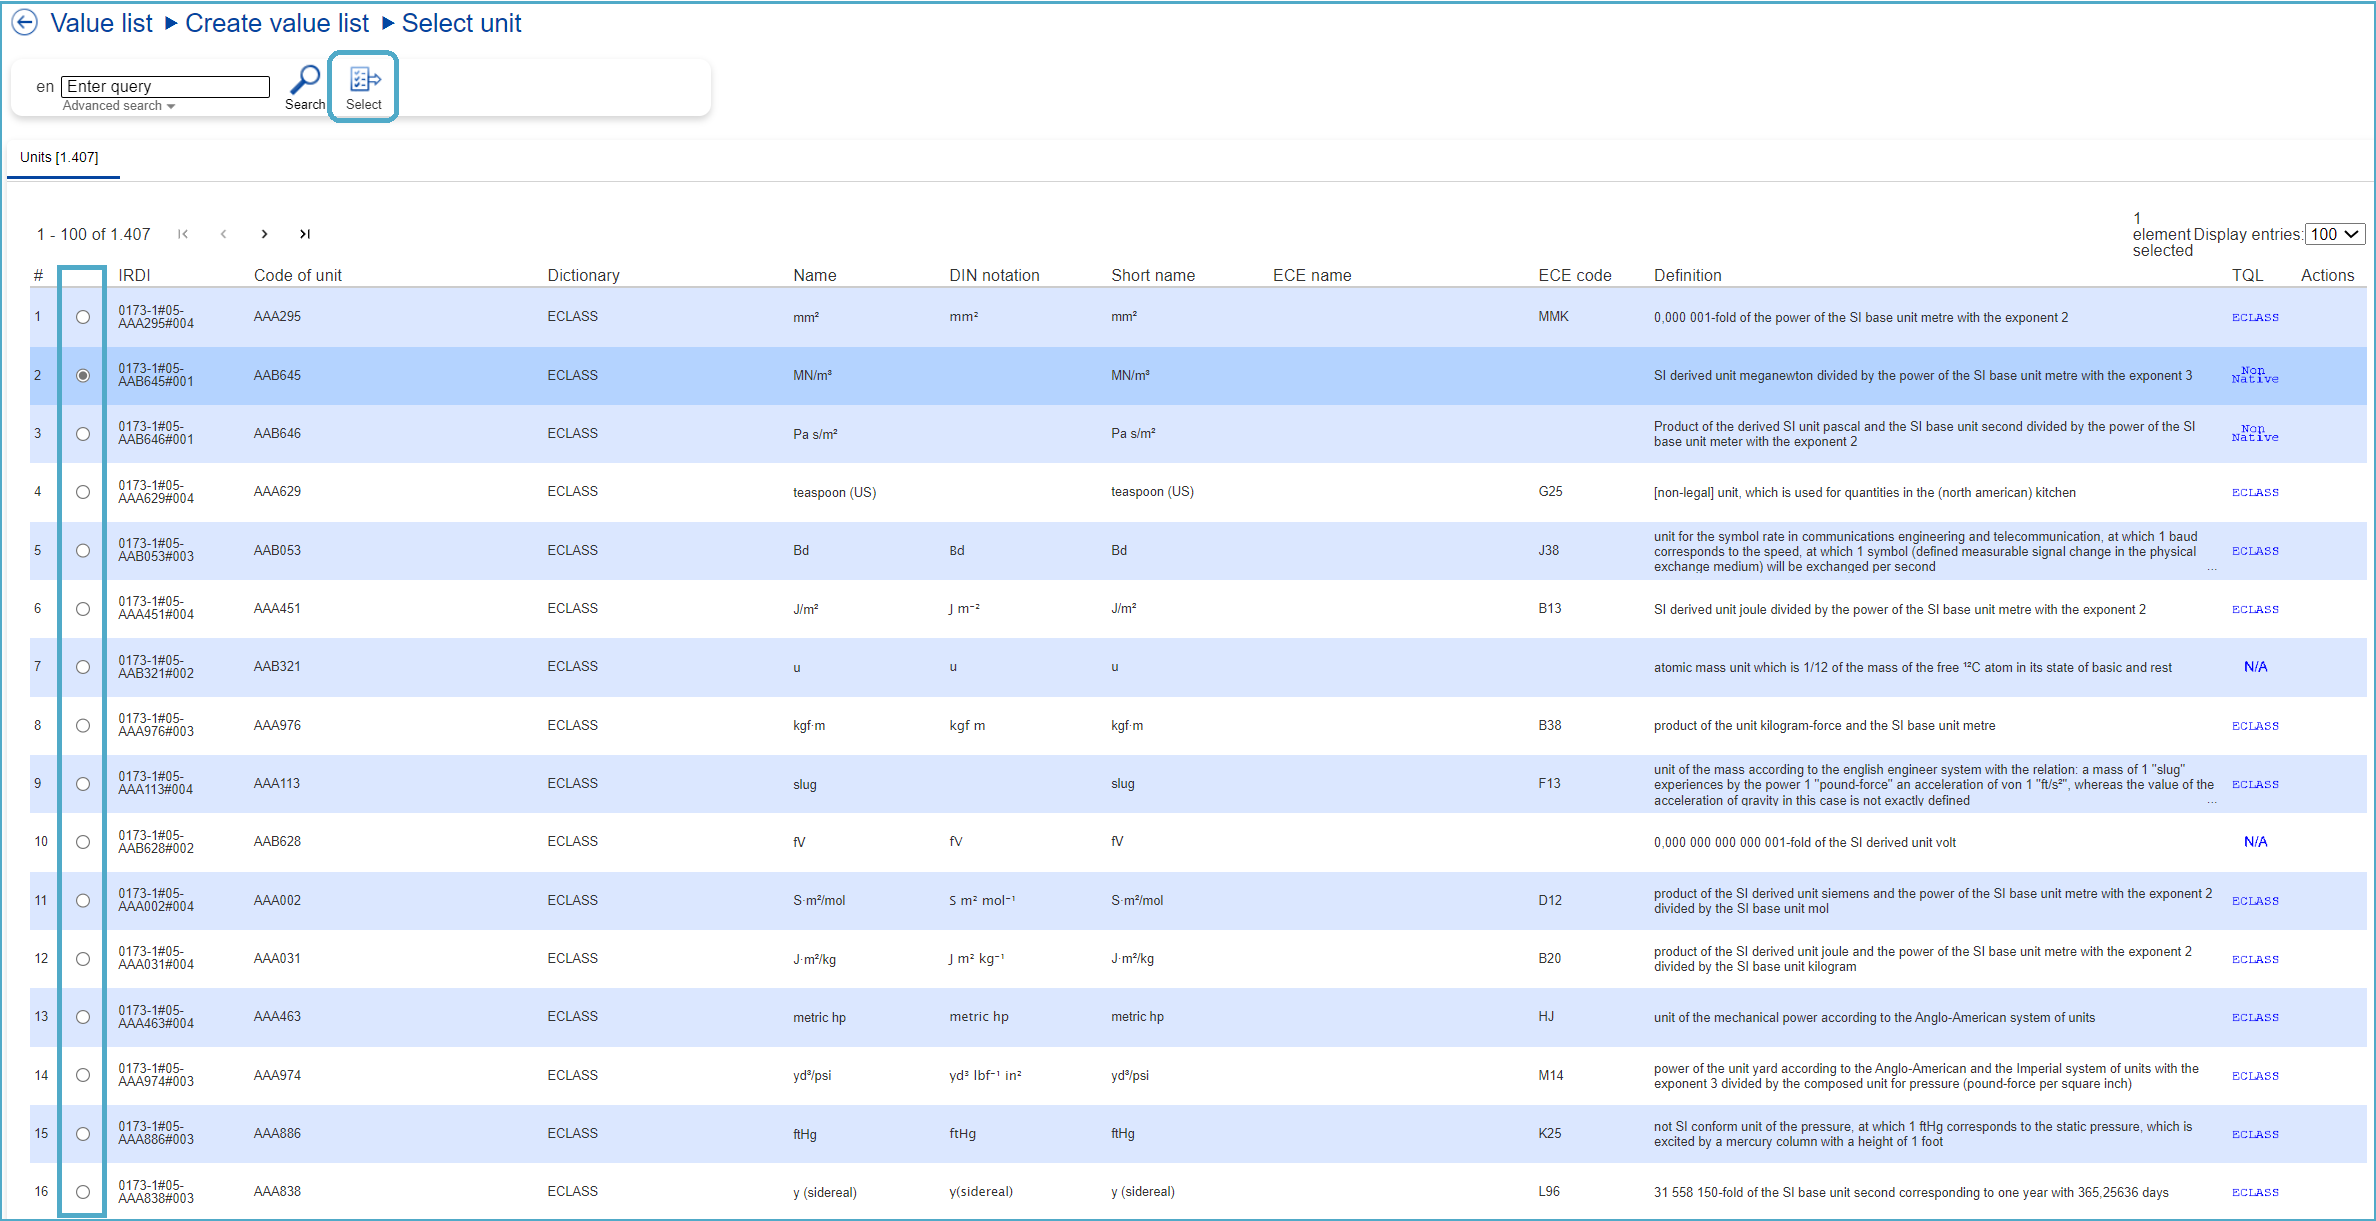
Figure 24: Create Value List – Data Type Real (measure) selected – Select Unit
STEP 3: Check in box in front of desired unit and press button Select.

Figure 25: Create Value List – Unit Selected
STEP 4: Select Value specification and press button “Add”.
Note: Depending on the value specification (explicit or coded), follow the steps described under chapters "Create Value List with Explicit Value" or "Create Value List with Coded Value" in order to add the desired value.
STEP 5: Fill in mandatory fields “Preferred Name” and “Reason”. Press button “Save”. “Change request saved” message will be displayed.

Figure 26: Change Request Saved
Note: Data Type of the Value has to match Data Type of Property and the one of Value List.
Create Value List with Data Type Integer currency/Real currency
In case of Data Type “Integer (currency)” and “Real (currency)”, additionally a currency needs to be selected.
STEP 1: Select Data Type Integer (currency).
STEP 2: Press link “Select currency”.
STEP 3: Check in box in front of desired currency and press button Select.
STEP 4: Select Value specification and press button “Add”.
STEP 5: Fill in mandatory fields “Preferred Name” and “Reason”. Press button “Save”. “Change request saved” message will be displayed.
Note: Data type of the value has to match data type of property and the one of value list.
Create Value List with Explicit Value
If Value Specification is EXPLICIT, the system shows a dialog where the user may enter Values and optionally translated Preferred Names for the values (depending on preferred name customization).
STEP 1: Choose Value Specification Explicit Values.
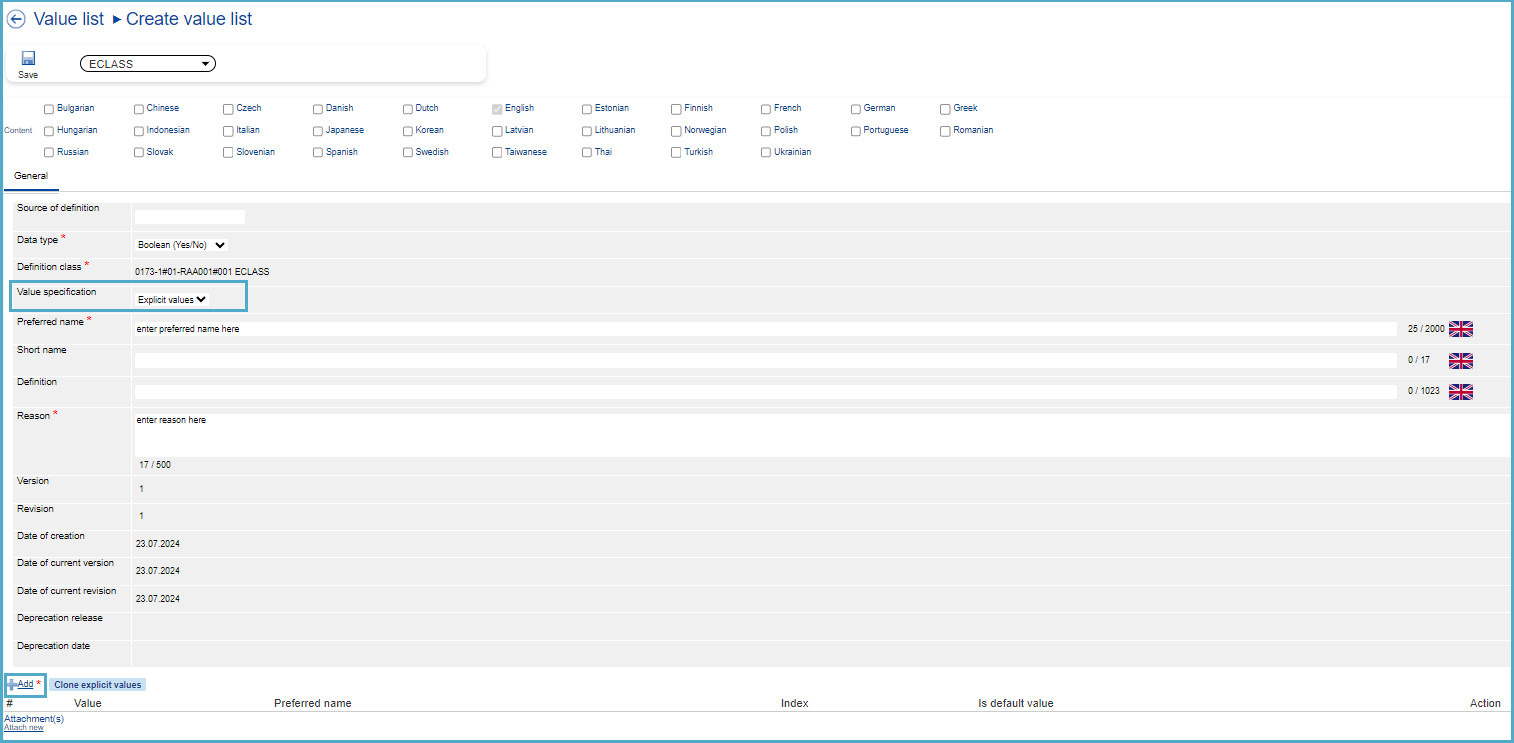
Figure 27: Create Value List Dialog – Select Value Specification Explicit
STEP 2: Press button “Add”:

Figure 28: Create Explicit Value
STEP 3: Insert a Value and a Reason and press button “Save”. Preferred Name is not mandatory. The “Change request saved” message will be displayed.
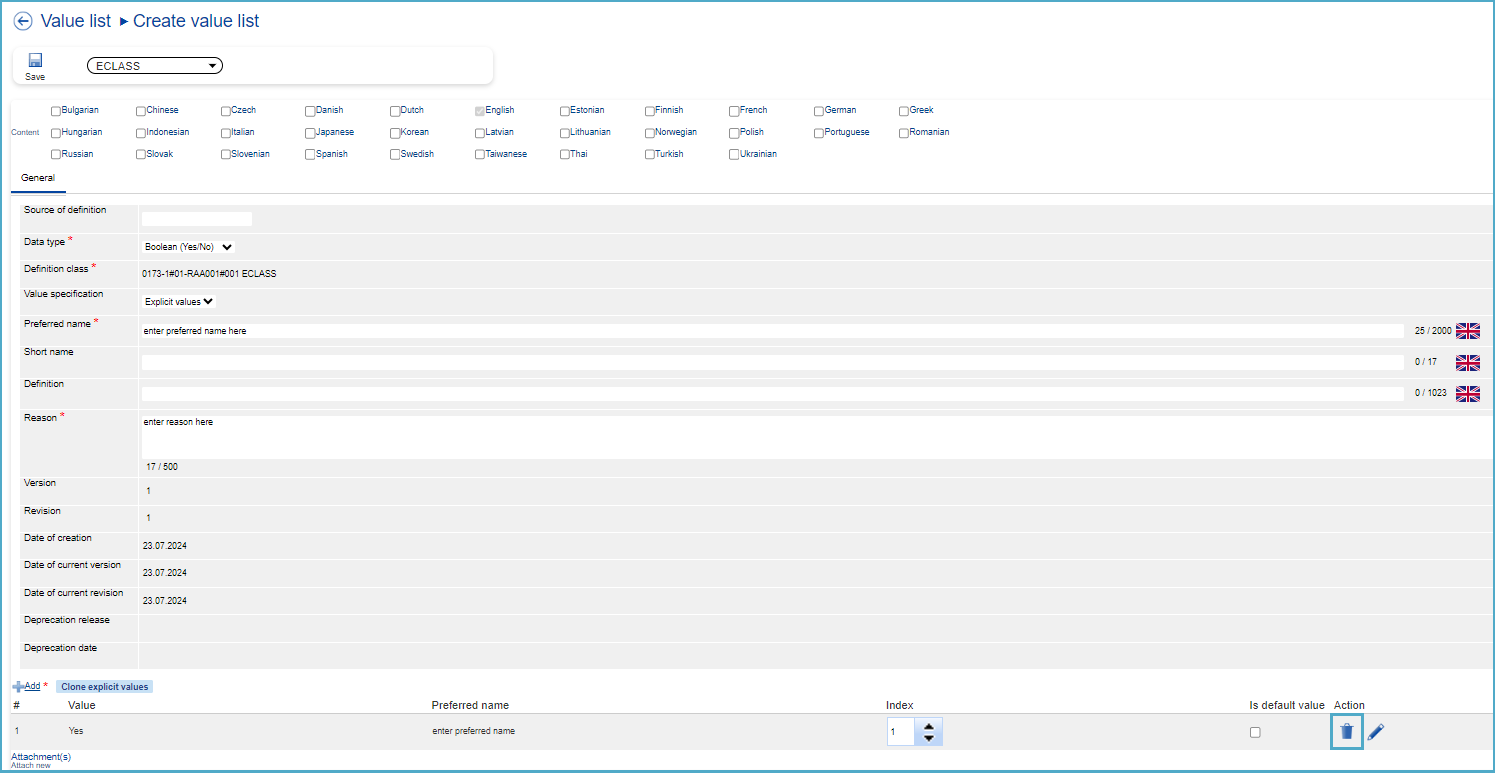
Figure 29: Create Value List Dialog
Note: A Value can be removed from a Value List by pressing the trashcan icon within the Create Value List dialog and replaced by another one, by pressing again button “Add”.
STEP 4: Fill in mandatory fields within the Create Value List Dialog and press button Save. The “Change request saved” message will be displayed.

Figure 30: Change Request Saved
Create Value List with Coded Value
If Value Specification is CODED, adding values by selecting existing Values or CRs for existing Values in the Value List is possible (Coded Values have an identity and are reusable).
STEP 1: Choose Value Specification Coded Values.
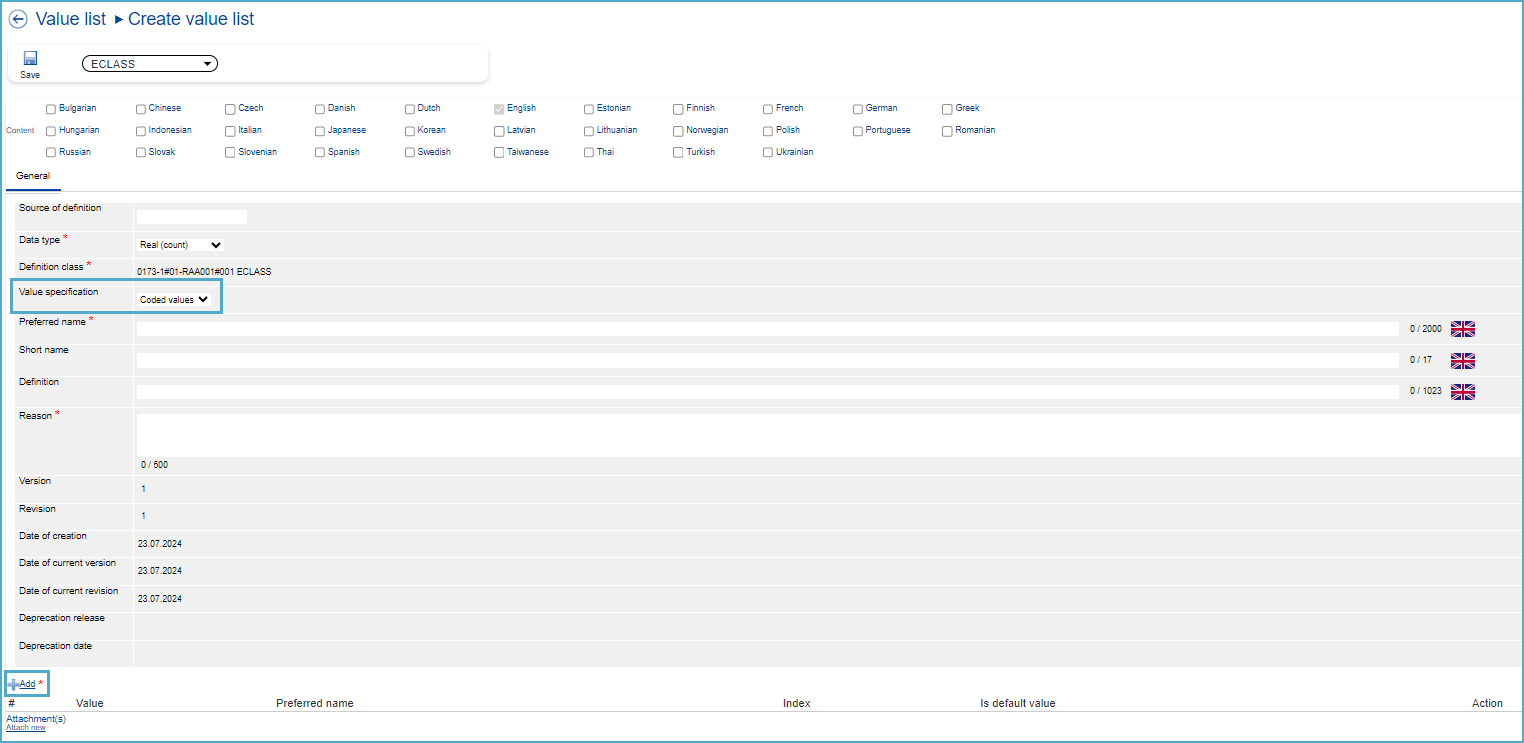
Figure 31: Create Value List Dialog – Select Value Specification Coded
STEP 2: Press button “Add”:
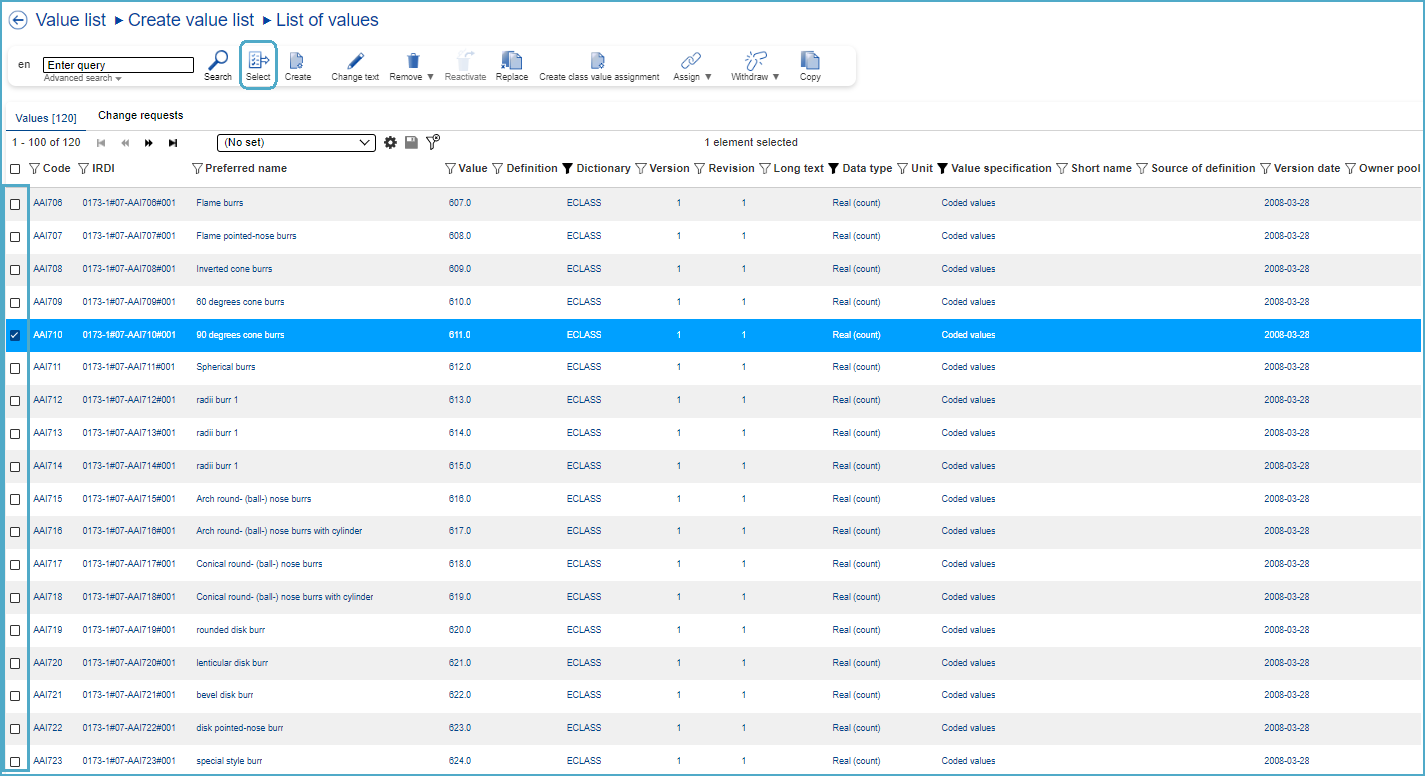
Figure 32: List of Values and CRs for New Values
STEP 3: Select Value/CR for New Value or press button “Create Value”. If the “Create Value” button is pressed, the Create Value Dialog shall open.

Figure 33: Create Value Dialog
STEP 4: Fill in mandatory fields, choose for Value Specification “Coded values” and press button Save. The “Change Request saved” message will be displayed.

Figure 34: Create Value List Dialog
STEP 5: Fill in mandatory fields within Create Value List Dialog and press button Save. The “Change Request saved” message will be displayed.

Figure 35: Change Request Saved
Remove Value List
After selecting Value List under Content Manager, the user has to select a specific Value List they would like to remove. After this the user has to hover above the “Remove” icon and will have two options to choose from: “Delete (CR)” and “Hard-delete”.
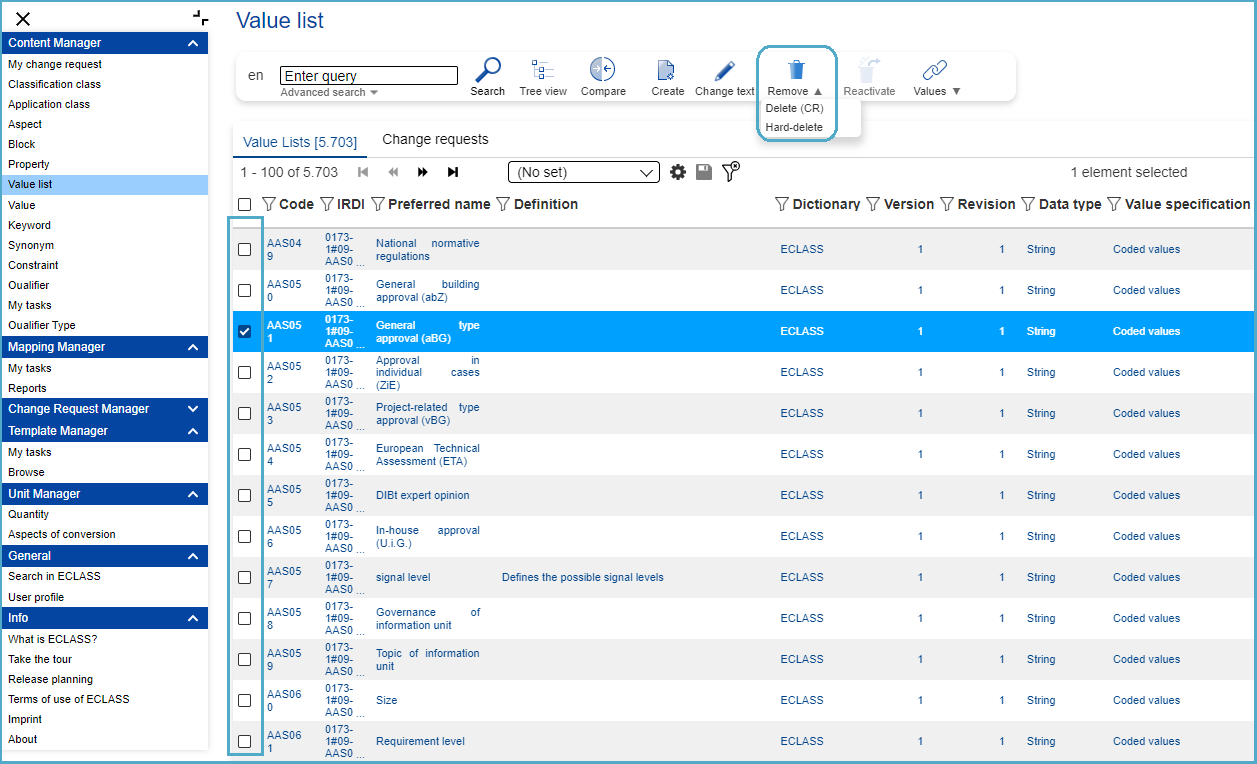
Figure 36: Select Value List to remove
Delete (CR) Value List
User selects a Value List from the list – the system displays the Delete Value List dialog:

Figure 37: Delete Value List Dialog
Under the tab “Reference”, all instances where the Value List is used are displayed, so that the user can evaluate the impact the operation “Delete Value List” will have on the system.
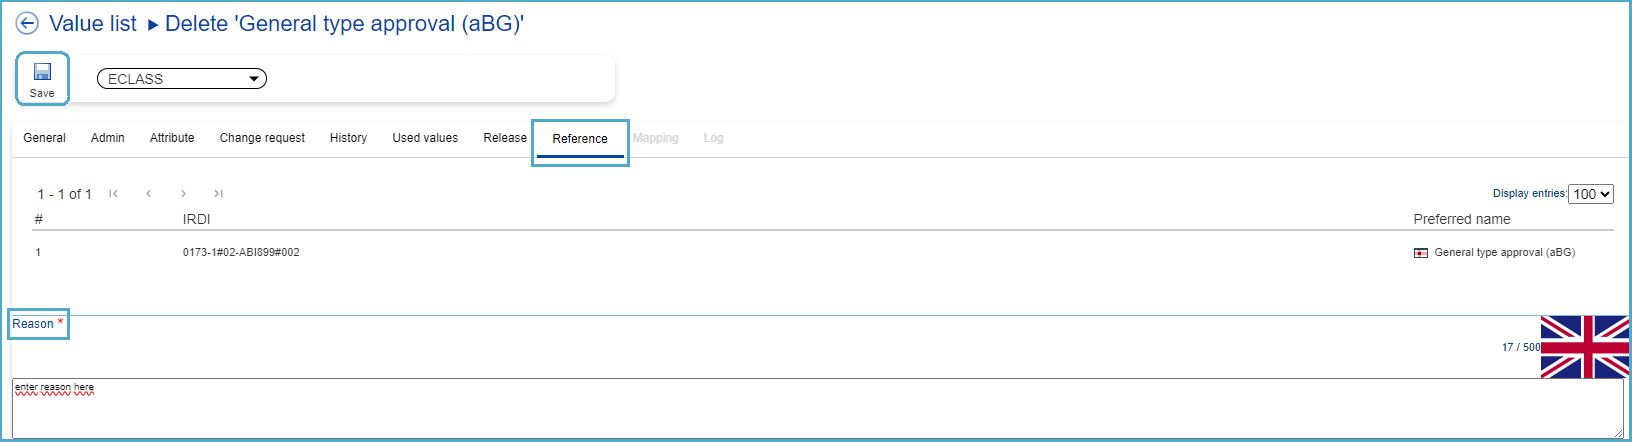
Figure 38: References Tab
Fill in the mandatory field “Reason” and press save -> “Change request saved” message will be displayed.

Figure 39: Change Request Saved
The CR for Deleting (CR) the Value List can be viewed under “My Change Requests” or “List of Value Lists”.
Hard-delete Value List
The hard delete function gives the user the opportunity to remove structural elements that were created incorrectly or by mistake in Alpha and Beta versions.
In order to hard-delete a Value List, the user needs to select first respective element in the corresponding list or tree view. Then he needs to open the drop-down of "Remove" button in toolbar and select option "Hard-delete".
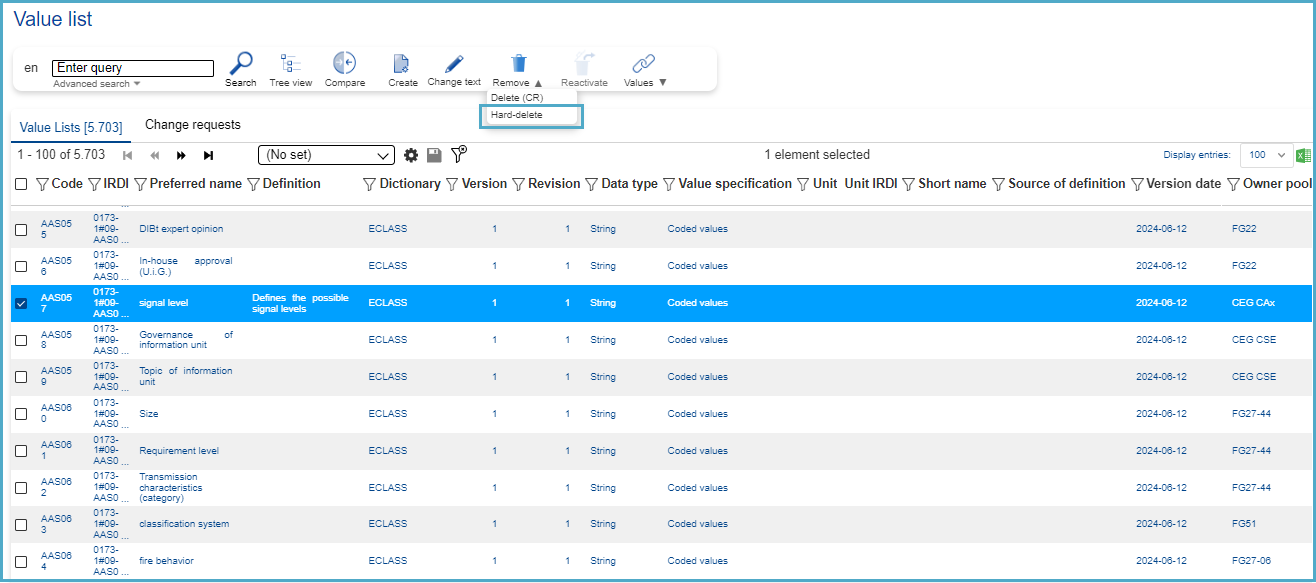
Figure 40: Select Value List to Hard-delete
Depending on the structure element selected for hard deletion, system might display one of the following messages in console:
- in case selected element fulfills the requirements for hard deletion, a confirmation question is displayed, including Warning that after confirmation, the structure element will be removed completely from respective dictionary and will not be part of the Release. Example:

Figure 41: Confirmation Question for Hard-delete
- in case that Release of the selected Value List is FINAL, system indicates that no release of the selected entity allows modifications, example:

Figure 42: Console in Case of a Final Release
- in case respective User does not have appropriate rights to delete selected Value List, system displays message that the selected entity can be hard-deleted only by its creator or the configured data-administrator, example:

Figure 43: Console if Appropriate Rights are not given
Deprecated elements may also be hard deleted. As soon as the User presses OK, system starts processes of hard deletion. User will also receive an e-mail notification with details. The result of the hard deletion of any element is the permanent removal of respective entity and its connections. Hard delete does NOT trigger the removal of the connected elements themselves.
Assign Value to Value List
After selecting Value List under Content Manager, the user has to select a specific Value List (SE or CR) in the list they would like to assign a Value to, after which they will be able to press on the button “Values” and select “Assign Value”.
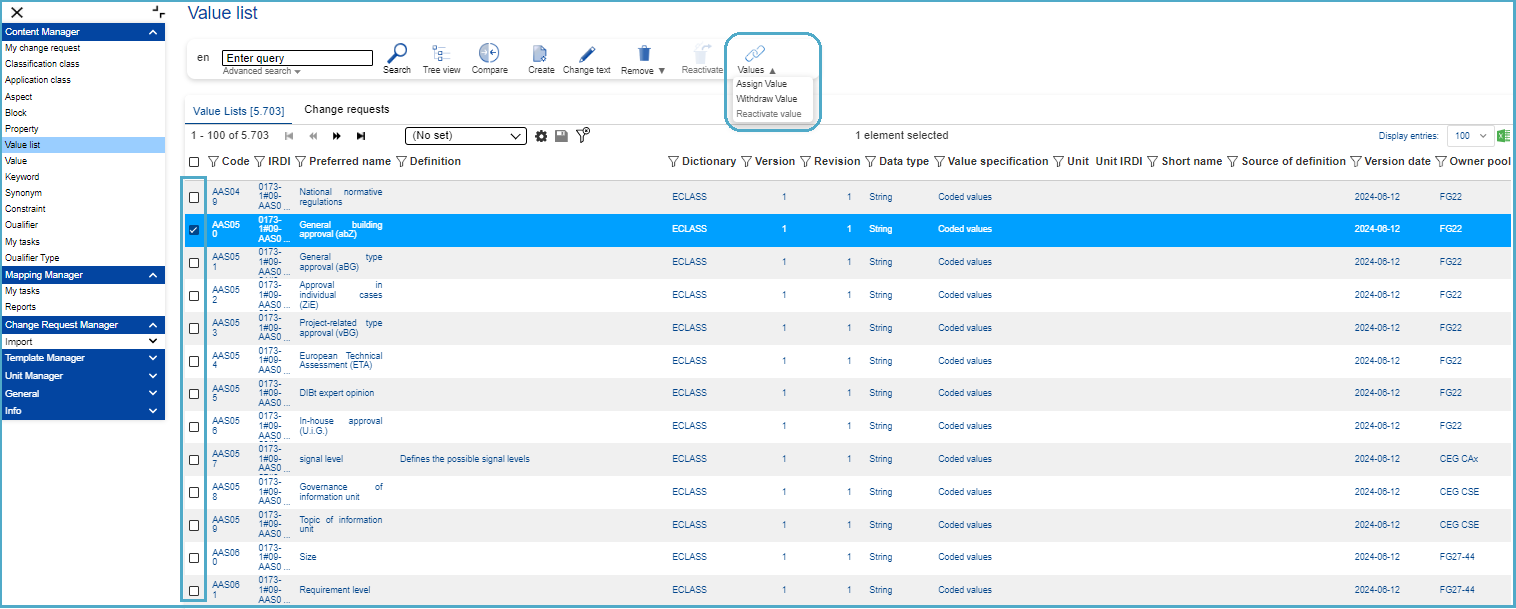
Figure 44: Select Value List to Assign Value
In the next dialog, all Values available in the system, as well as all existing Change Requests for new Values, will be displayed as a list.
In this list, users have the possibility to change the content language (in which Values will be displayed) and search after specific Values (Structure Elements or Change Requests).
To proceed, use one of the following approaches:
- Select the Value/Values (Structure Elements or Change Requests) to be assigned to the Value List by checking the box in front of it/them and press button “Select”.

Figure 45: List of Values and List of Change Requests for New Values - If several Values and/or Change Requests for New Values are to be assigned to the Value List:
- Select the Values (Structure Elements) to be assigned to the Value List by checking the box in front of them and press button “Select”.
- Select the Change Requests for New Values to be assigned to the Value List by checking the box in front of them and press button “Select”.
As next step, press button “Select”. System opens the “Assign Value to Value List” dialog.
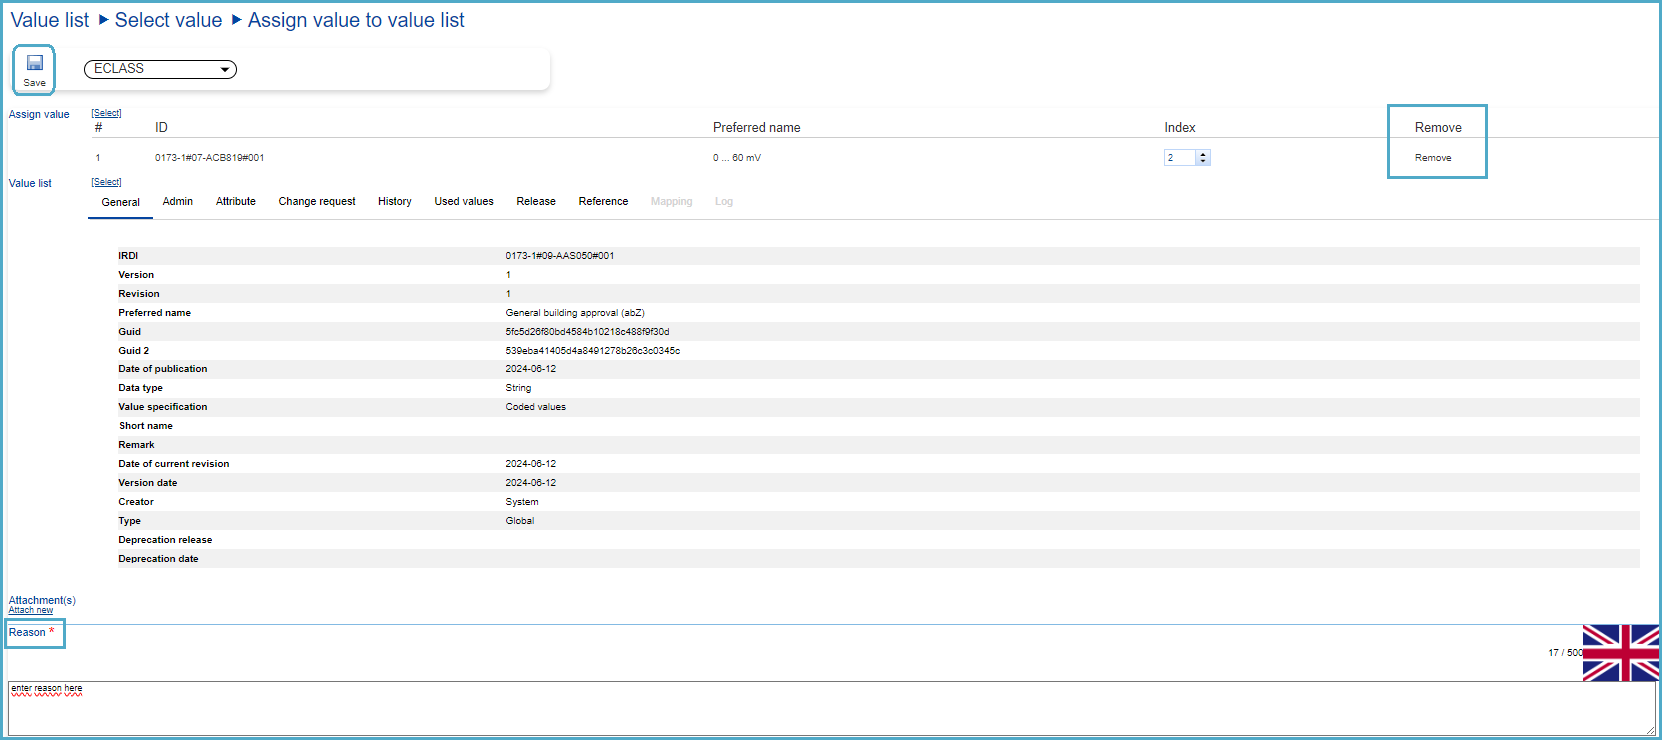
Figure 46: Assign Value to Value List Dialog
Notes:
- By pressing Remove, the respective Value SE or CR will be removed.
- By pressing Select, user can select another Value List to which Values will be assigned / other Values to be assigned to the Value List.
Fill in the field “Reason*” and press Save.
System displays message: Change request saved. The new created Change Requests will be displayed under My Change Request.

Figure 47: Change Request Saved
Withdraw Value from Value List
Select function [Withdraw Value List] under the menu entry [Property]. The system displays the list of Properties SEs.
In the menu entry Property the user also has the option to withdraw Value Lists. For this purpose, the user has to select a specific Property they would like to withdraw a Value List from, after which they will be able to go to the button “Withdraw” and select “Withdraw Value List”.
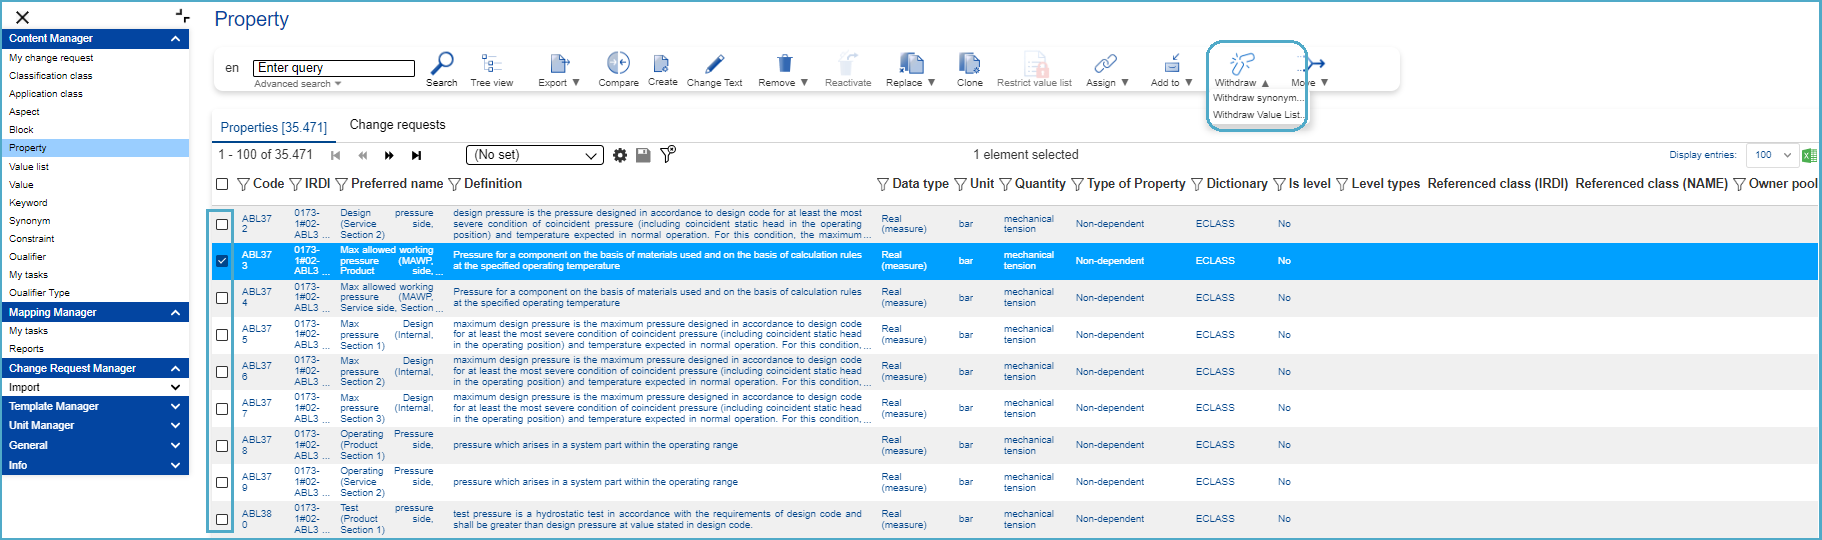
Figure 54: Select Property to Withdraw Value List
The system will display the Withdraw Value List Dialog.
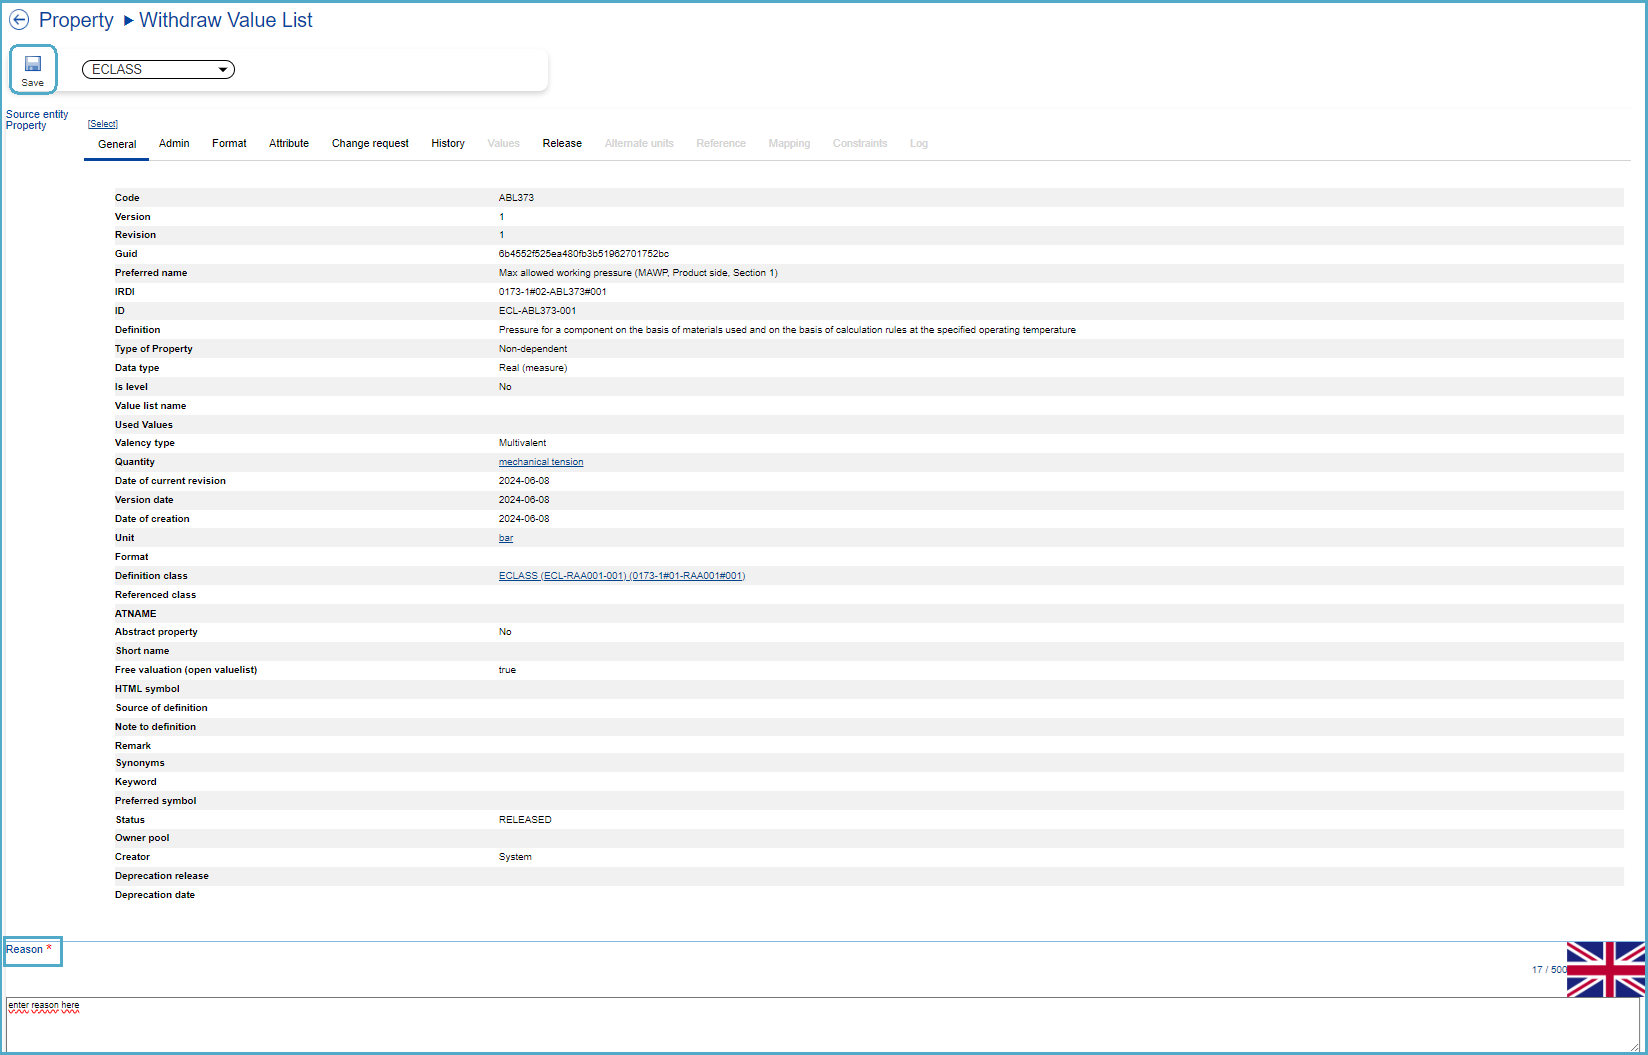
Figure 55: Withdraw Value List Dialog
Fill in mandatory field “Reason” and press Save. The CR for “Withdraw Value List from Property” will be saved and can be viewed under “My Change Requests”.
Replace Value List
If the user wants to replace a Value list on a Property, it is necessary to follow the next steps:
First the user must navigate to the Property menu in the Content Manager.
Afterwards the user can select a Property by ticking the check box in front of it. If the Property is selected succesfully it is higlited in blue. Hover over the "Replace" button. Now the options "Replace Property" and "Replace Value list" are available.
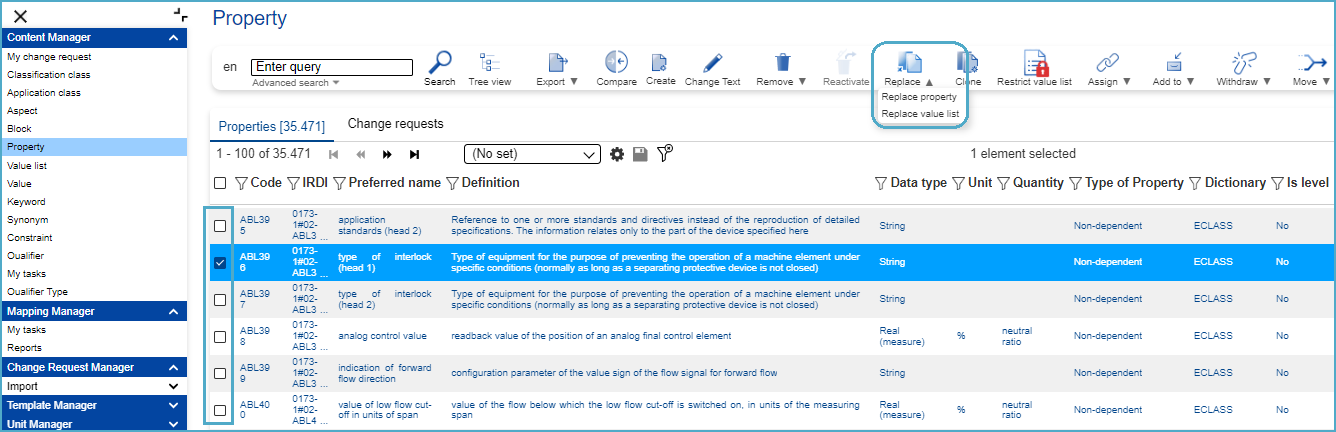
Figure 56: Select Property to Replace Value List (VL)
After clicking on the option ‘Replace Value List’, the dialog ‘Select replacing valuelist’ page is opened. The user can execute search by clicking on search loupe, so that the available Value lists are displayed.
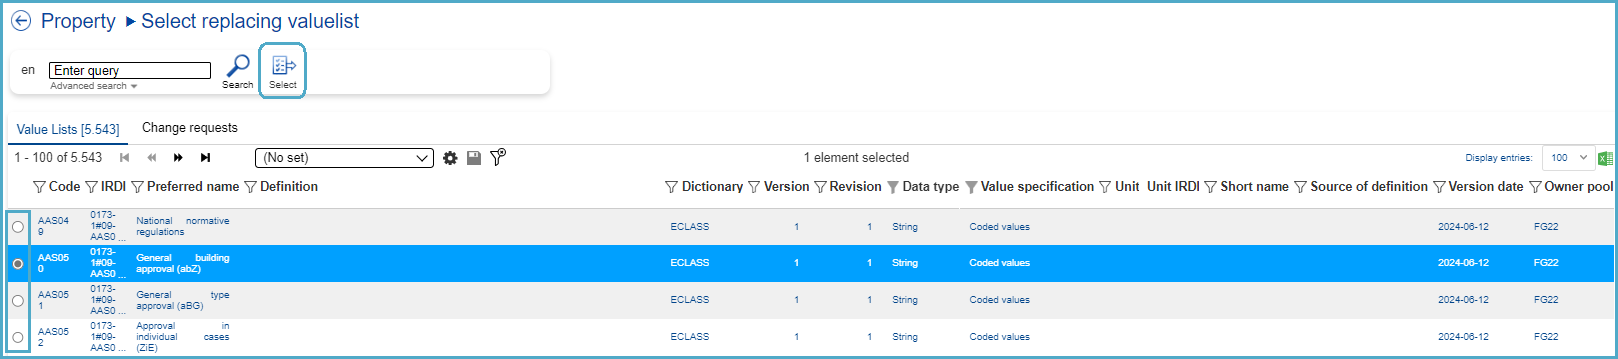
Figure 57: List of Value Lists to Replace
The user has to select now the Valus Lists that will replace the old list with. Afterwards, the user needs to click on the ‘Select’ button in the toolbar. Subsequently, the user is forwarded to the ‘Replace valuelist’ step, with the tabs ‘Valuelist to replace’ and tab ‘Replacing valuelist’.
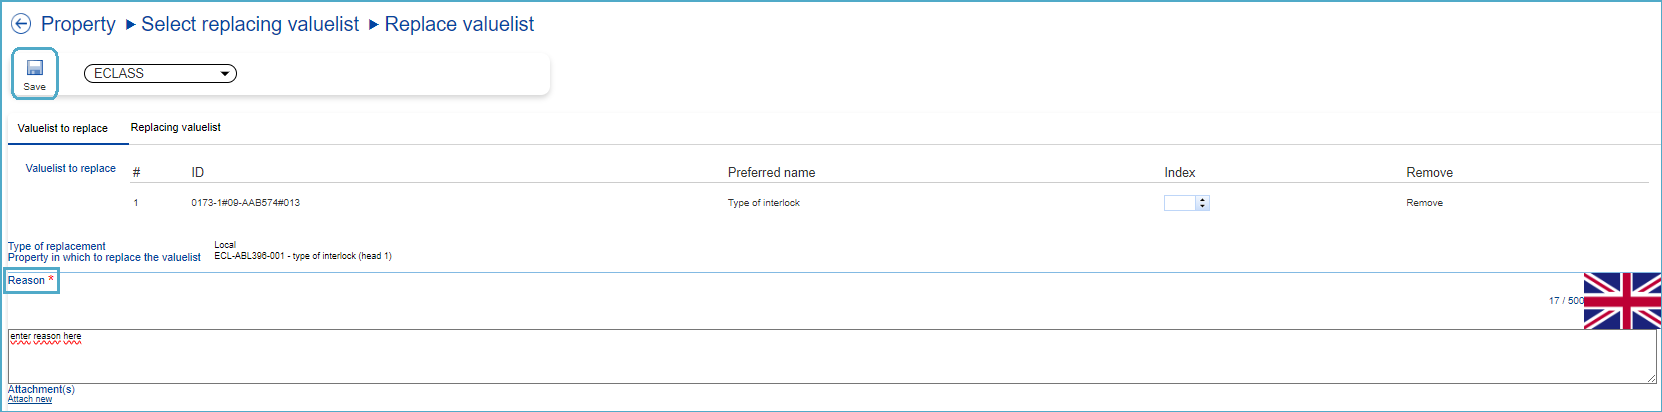
Figure 58: Repalce Value List Dialog
The system informs the user that ‘The source property has a closed valuelist and if values of it are not fully contained in the replacing valuelist, the property COULD be replaced by a NEW property during the next release.’
In the tab ‘Valuelist to replace’, the user can check the Value List that is replaced. In the tab ‘Replacing valuelist’, the user can check the new value list.
Fill in mandatory field “Reason” and press Save. The CR for “Replace Value List from Property” will be saved and can be viewed under “My Change Requests”.