Application Class (Create Change Request)
Functionalities of an Application Class
Overview
Application Classes are used for defining the set of Properties needed for the description of a family of products. Application Classes can form a hierarchy of specializations and may also be connected to Classification Classes, thus being included into a broader categorization hierarchy.
There are three types of Application classes:
- Basic AC
…features a simple and flat property structure, and the data can be exported in CSV or XML file formats. Basic ACs are designed for simplified implementation and offer both human-readable and machine-readable data. - Advanced AC
…offers a more flexible and hierarchical property structure compared to Basic ACs. Advanced ACs are designed for more complex implementations and Properties can be displayed in a structured manner using blocks and aspects. - Asset AC
…represents assets in the Asset Administration Shell (AAS). It contains information related to assets, such as technical data, carbon footprint, service request notification, and contact information.
General Information
The workspace area for the management of Application Classes can be accessed via menu Application Class.

Figure 1: General Information Application Class
Search | Triggers a search in the available content, considering the search options set in the advanced search. |
Tree view | Allows navigation to the hierarchical view of Application Classes |
Compare | Allows the comparison of two or more Application Classes |
Export | Allows the export of desired Application Classes |
Create | Allows the creation of new Application Classes. |
Edit | Allows editing the attributes of a selected Application Class |
Remove | Allows removal of selected Application Class |
Clone | Allows cloning of a selected Application Class |
Move | Allows moving of a selected Application Class to a new parent class |
Reactivate | Allows reactivation of deprecated Application Classes, deprecated Aspects or Properties assigned to an Application Class. |
Assign | Allows assignment of dictionary elements (Aspect, Block Reference, Property) to a selected Application Class. |
Withdraw | Allows withdrawal of dictionary elements (Aspect, Block Reference, Property) from a selected Application Class. |
Search fo an Application Class
First of all the user can change the language of the content by navigating the mouse to the button “en” which is left to search field. Various languages can be selected.

Figure 2: Language of the Content
In the field Enter query it is possible to type in the ID or the Preferred Name of the Application Class.
By clicking on “advanced search” (under search field), there are several search options available.
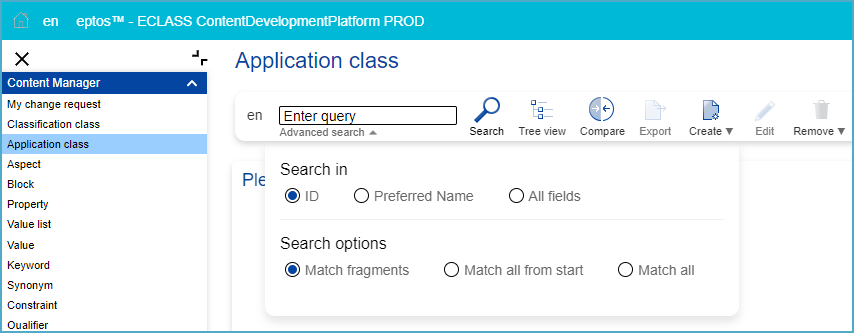
Figure 3: Advanced Search
The search options are explained via mouse over in the CDP. By clicking on the Search button without entering name or ID in the search field, all Application Classes are displayed in the list view below.

Figure 4: List View of all Application Classes
The user can select between the tabs Classes [number of existent Acs] and Change Requests [number of Change Requests].
Tab Classes

Figure 5: Columns in List View
The list view contains the following columns:
Code | 6-digit identifier (part of the IRDI) |
IRDI | International Registration Data Identifier |
Preferred name | Name of the Application class |
Definition | Definition of the AC |
Application class type | Basic, Advanced and Asset AC can be displayed. |
Version | Displays number of changes of the AC (part of the IRDI) |
Revision | Technical versioning that is not part of the IRDI |
Dictionary | The dictionary in which the Application Class is used |
Owner Pool | Owner of the AC, meaning the responsible group for that AC |
Coded name | 8-digit ECLASS identifier – position in the ECLASS hierarchy |
Tab Change Requests

Figure 6: Columns in the Tab "Change Requests"
ID | Change Request Identifier |
Request | Name of the Change request |
Status | The status of the Change request |
Type | Type of change request. |
Proposer | Proposer of the change request |
Parent Class | Class above the AC in the ECLASS hierarchy |
Application class type | Basic, Advanced and Asset AC can be displayed. |
Work package | Name of the work package the AC belongs to (if there is one) |
Release | Version of Release on which the Change is requested on |
Dictionary | The dictionary in which the Application Class is used |
Owner Pool | Owner of the AC, meaning the responsible group for that AC |
Details Page
In order to view more details related to an Application Class, users may open the Application Class in view mode by clicking on it (IRDI or preferred name) from the tabular view. The details page of an Application Class is subdivided into different tabs. Tabs which do not contain any information are grayed out.
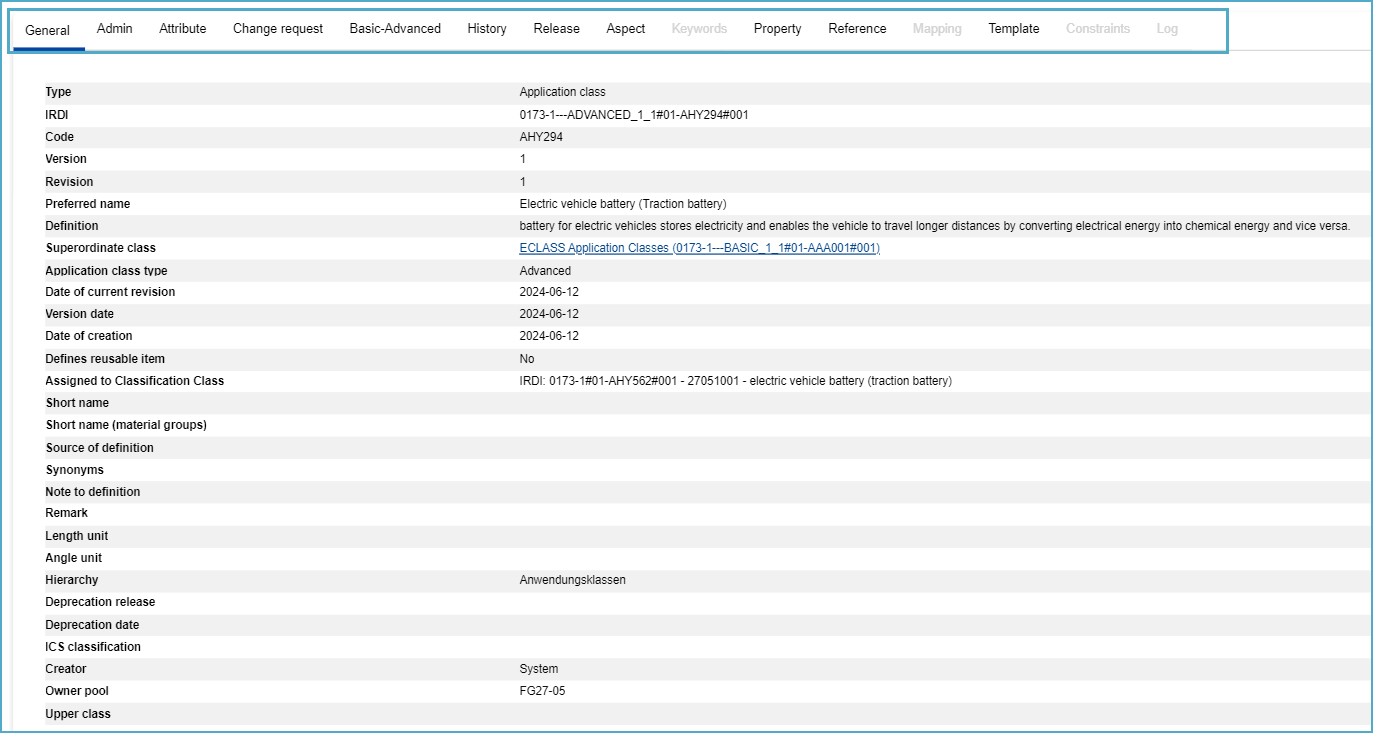
Figure 7: Details of Application Class
General (selected in screenshot) | Tab General displays the standard and extended Attributes of an Application Class. |
Admin | Tab Admin displays administrative information such as creation date, version date and creator of the selected Application Class. |
Attribute | Tab Attribute displays extended attributes of the selected Application Class. |
Change requests | Tab Change request displays the Change Requests in connection with the selected Application Class. |
History | Tab History displays historical information on the selected AC. |
Release | Tab Release displays the release(s) the Application Class is part of. |
Aspect | Tab Aspect displays in a tabular view information related to the Aspects assigned to the selected Application Class. |
Property | Tab Property displays in a tabular view information related to the Properties assigned to the selected Application Class. |
Reference | Tab Reference displays in a tabular view information related to the Classification Class(es) in which the selected Application Class is used. |
Mapping | Tab Mapping displays in a tabular view information related to the Mappings of the selected Application Class to other Application Classes. |
Template | Tab Template displays in a tabular view information related to the Templates of the selected Application Class. |
Constraints | Tab Constraints displays in a tabular view the Constraints existing for the selected Application Class. |
Log | Tab Log contains logging information, structured in a clear, user-friendly manner, related to the selected Application Class and is visible only for users with administrator rights. |
Change Requests
Change Text
The textual information of an Application Class is to be edited without changing the meaning of the Application Class, but rather to correct mistakes. If the editing of the Application class would result in changing the meaning of the Application class, please create a new Application Class instead.
In the search overview, where all available Application Classes as well as Change Requests (CR) are displayed, users have the possibility to change the content language (in which Application Classes will be displayed) and search after specific Application Classes (structure elements or change requests).
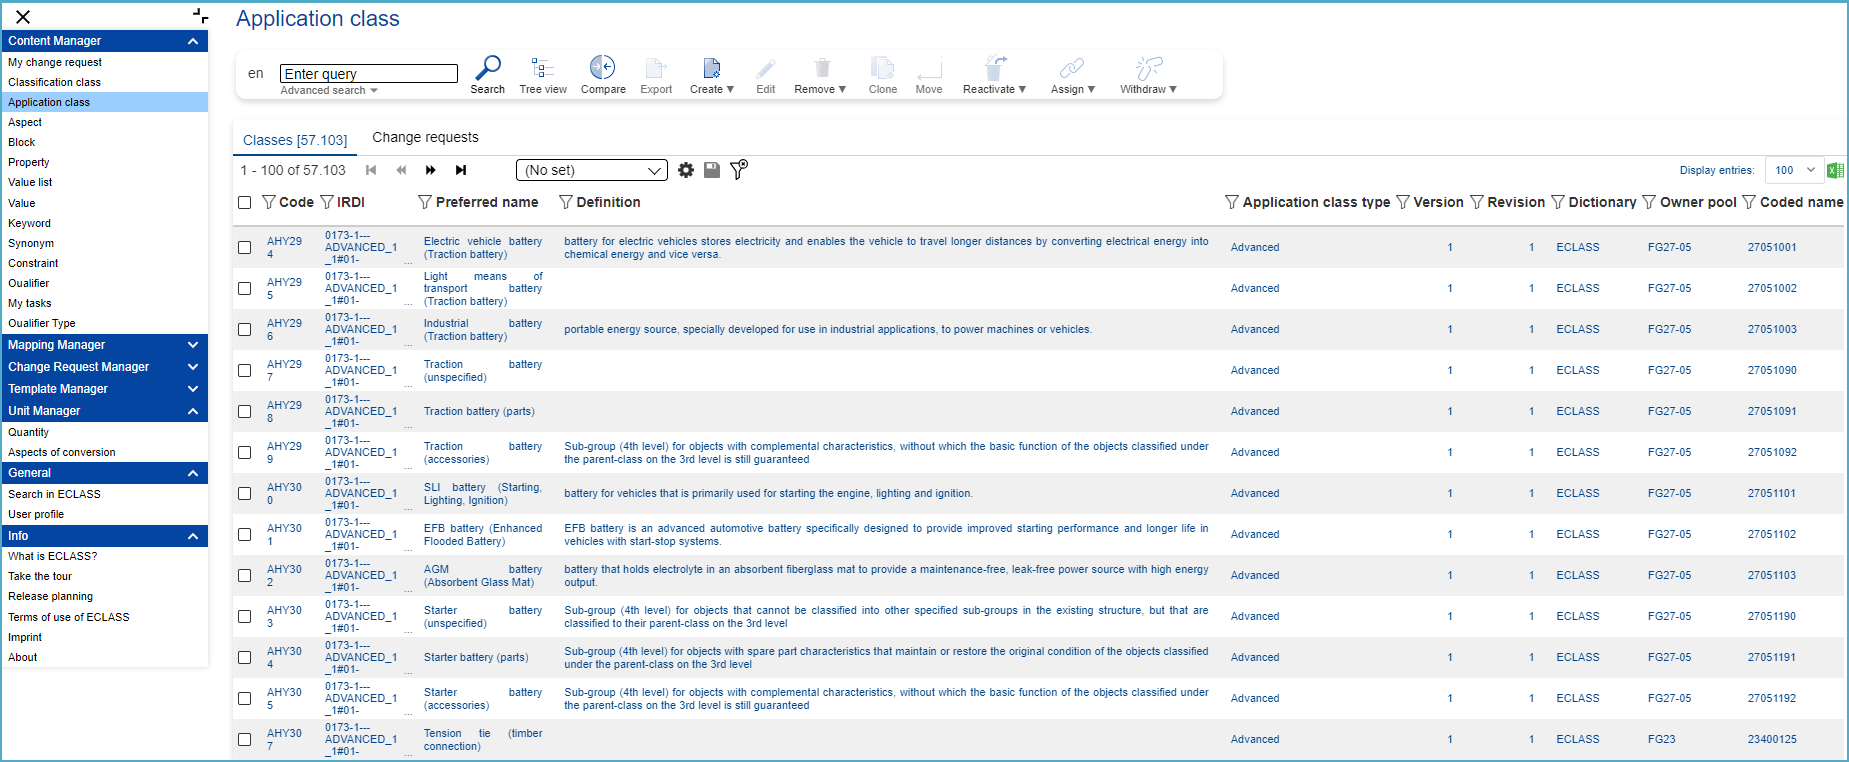
Figure 8: List od All Available Application Classes and CRs Related to AC
Select an Application Class in the list by clicking it in order to create a CR for changing the textual information (button “Edit”).
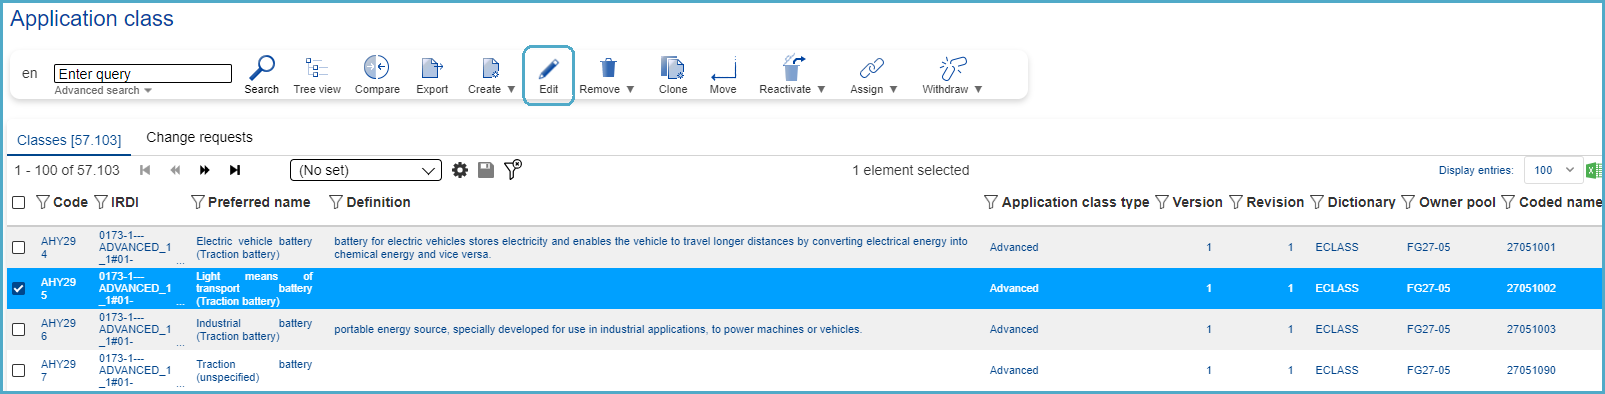
Figure 9: Select Application Class in order to Change Text
The Change Text dialog will open:
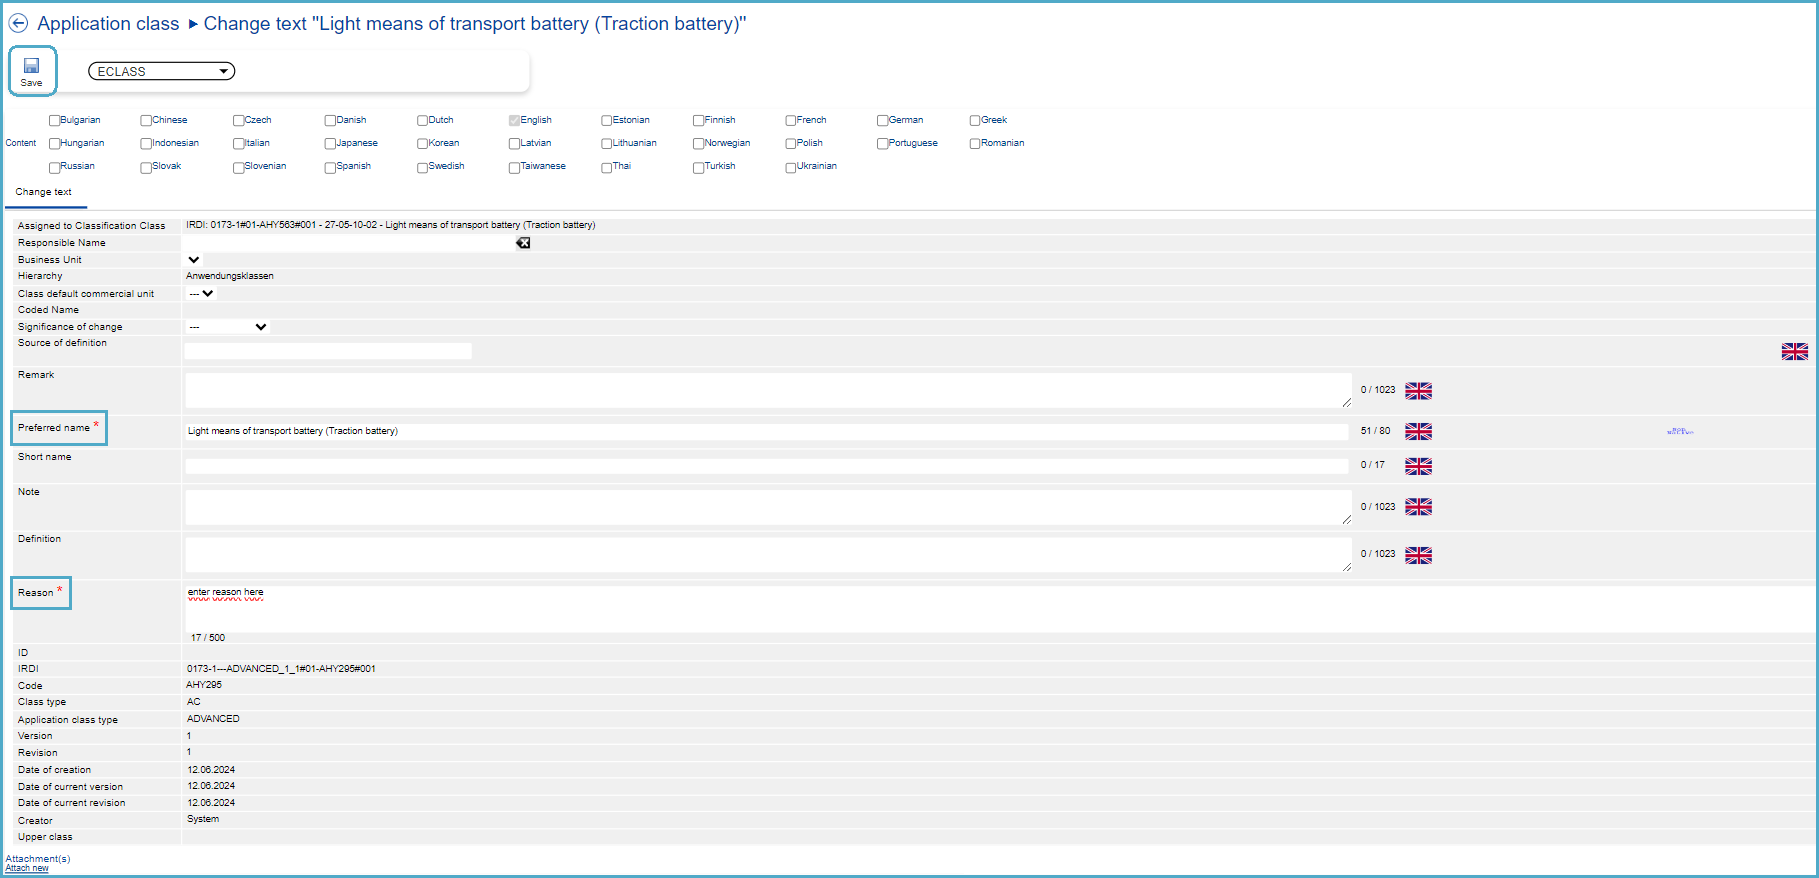
Figure 10: Change Text Dialog
Fill in the fields with the new text as well as the mandatory reason and then press button “Save”.
System displays message: Change request saved. The new created change requests will be displayed under My Change Request.

Figure 11: Change Request Saved
Create Application Class
In order to create a Change Request for a new Application Class (AC), the user has to hover above the “Create” button and will have three options to choose from: “Create…”, “Create Application Class on CC…” and “Create product structure application class…”

Figure 12: Option "Create"
After clicking on the option “Create…”, the system will display the Create dialog:
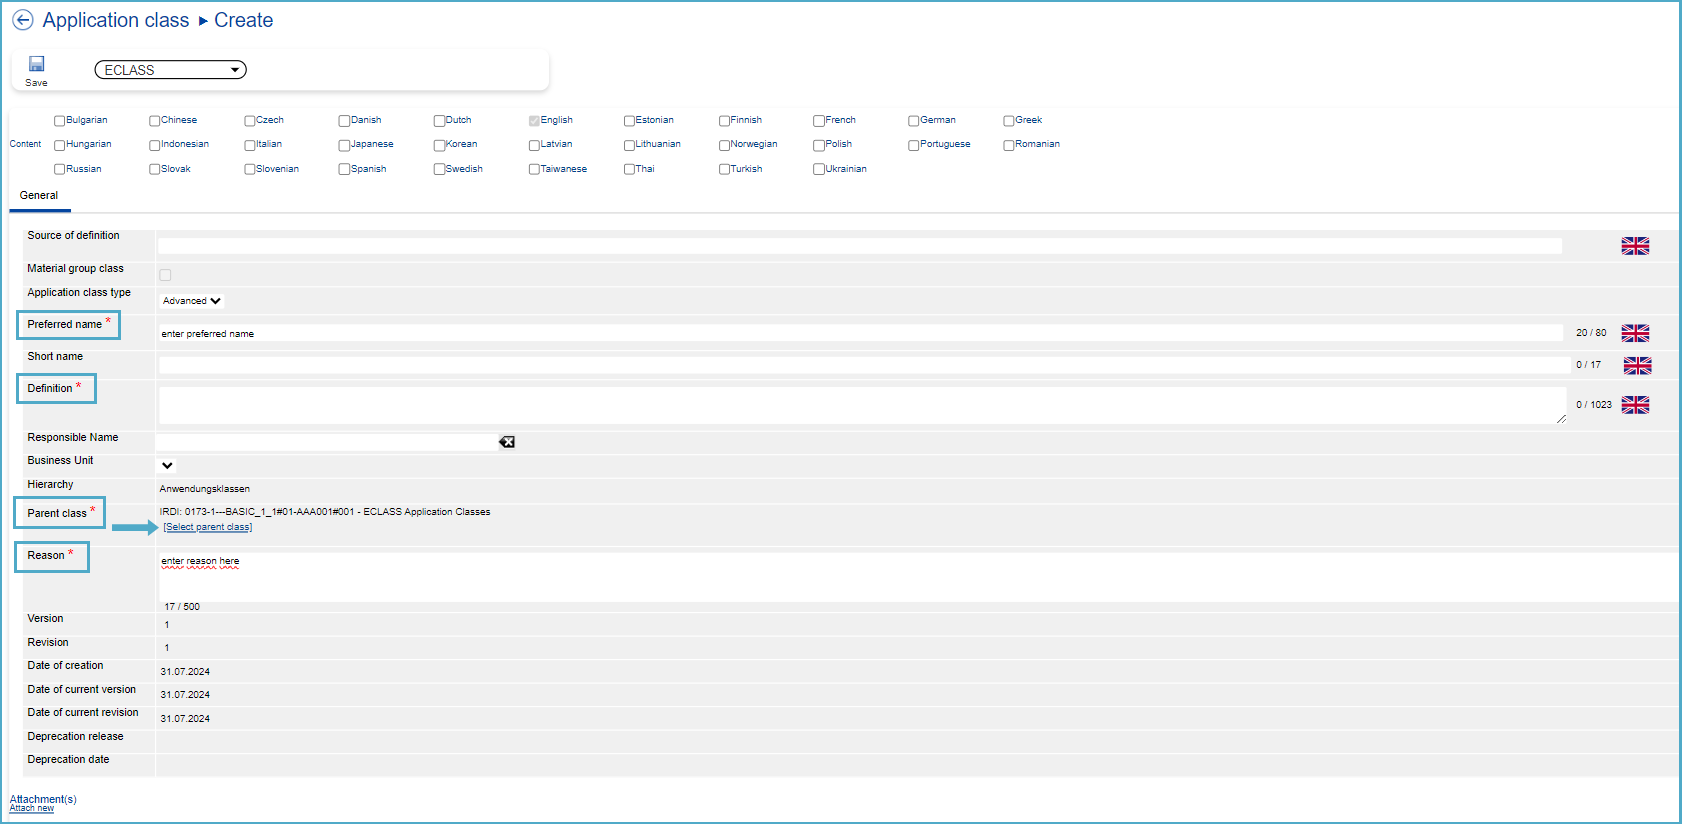
Figure 13: Create Dialog
Mandatory fields are:
- Preferred Name
- Definition
- Parent Class
- Reason
The user can also select the Application class type: “Advanced” and “Asset” (Basic is created automatically in the Release process).
After clicking on “Select parent class”, the user can select hierarchy for the Application Class.
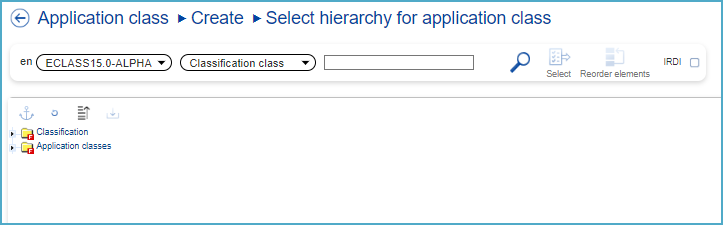
Figure 14: Select Hierarchy for Application Class
After selecting the target Classification Class (4th level) in the hierarchy, on the right a window with all details about this Classification Class will open. At this point, the user can continue the creation process by clicking “Select”.
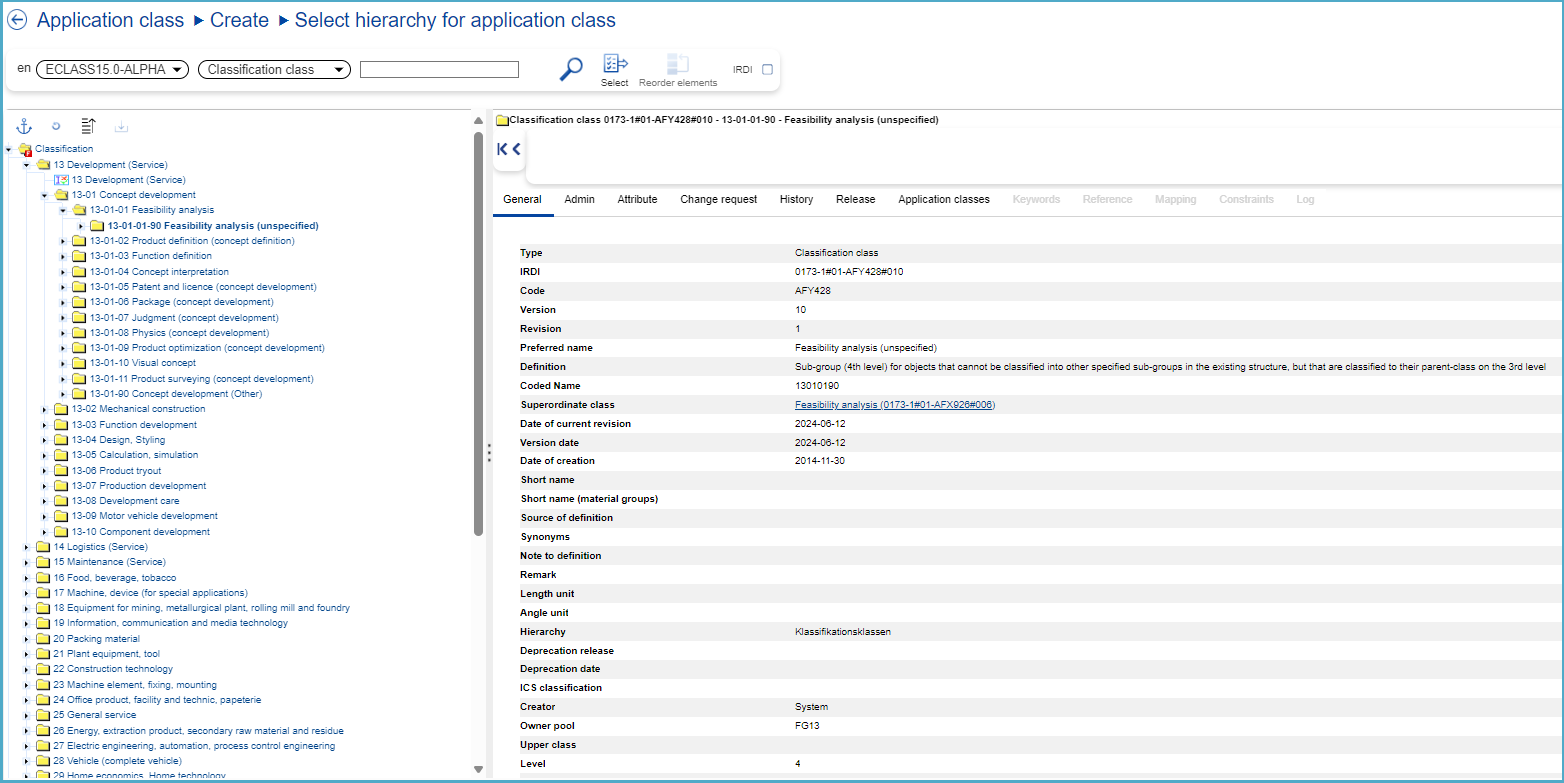
Figure 15: Selecting the Target Classification Class in the Hierarchy
Once all required fields have been filled out, the user can press on the “Save” button and the “Change request saved” message will be displayed.
Figure 16: Change Request Saved
Create Application Class on CC
After selecting the option “Create Application Class on CC…”, the user must first select the target CC, to which they would like to assign the AC. Browse through the class hierarchy, click on the target CC (4th level) and then the option “Select” will appear.
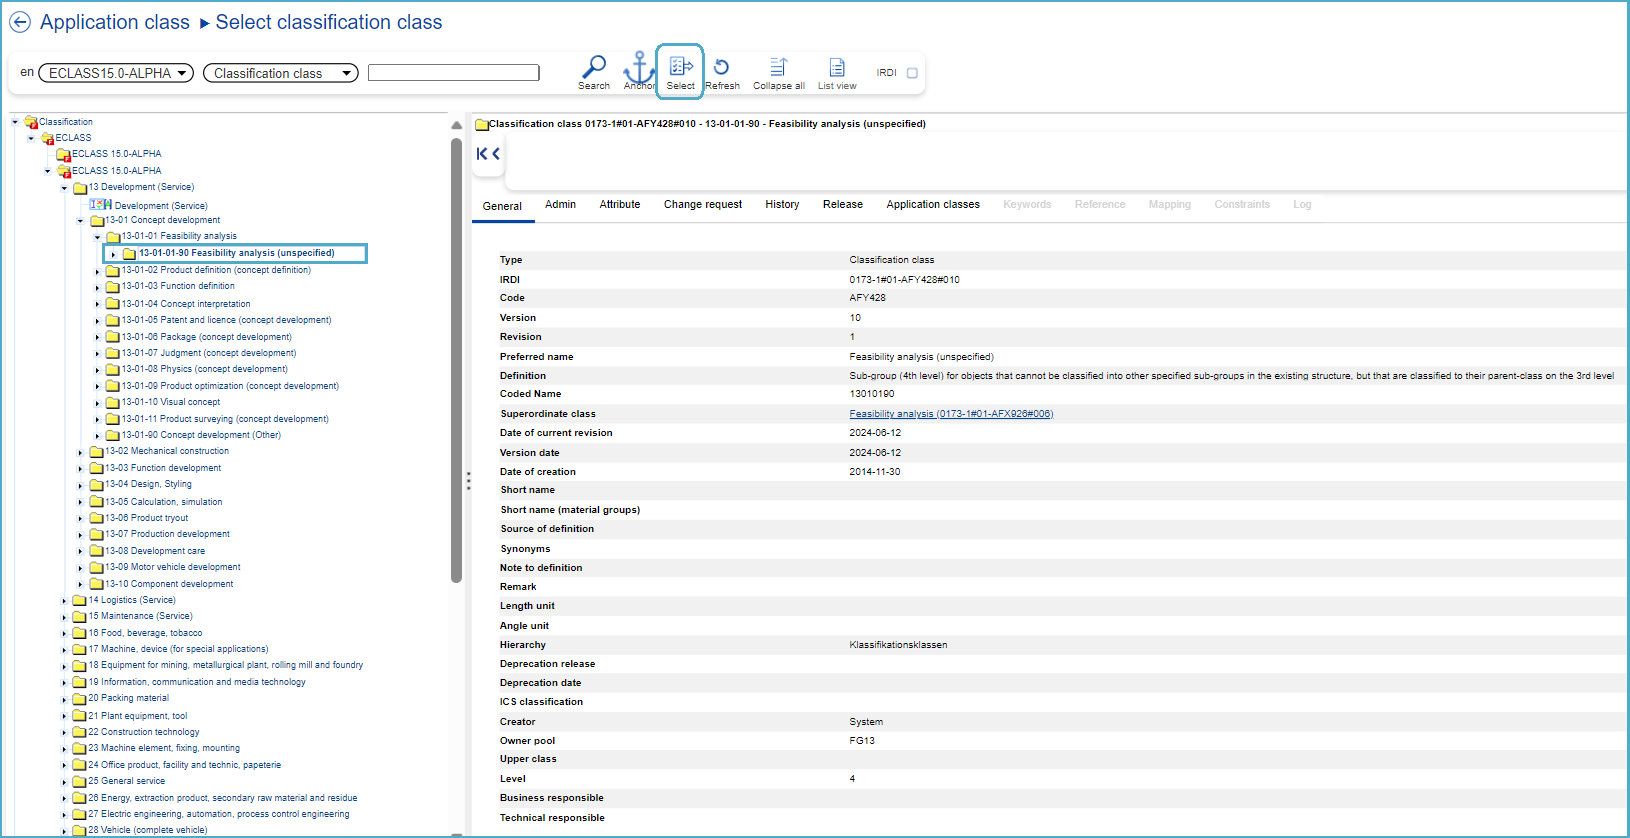
Figure 17: Select Classification Class
After clicking on “Select”, the Create dialog will appear:
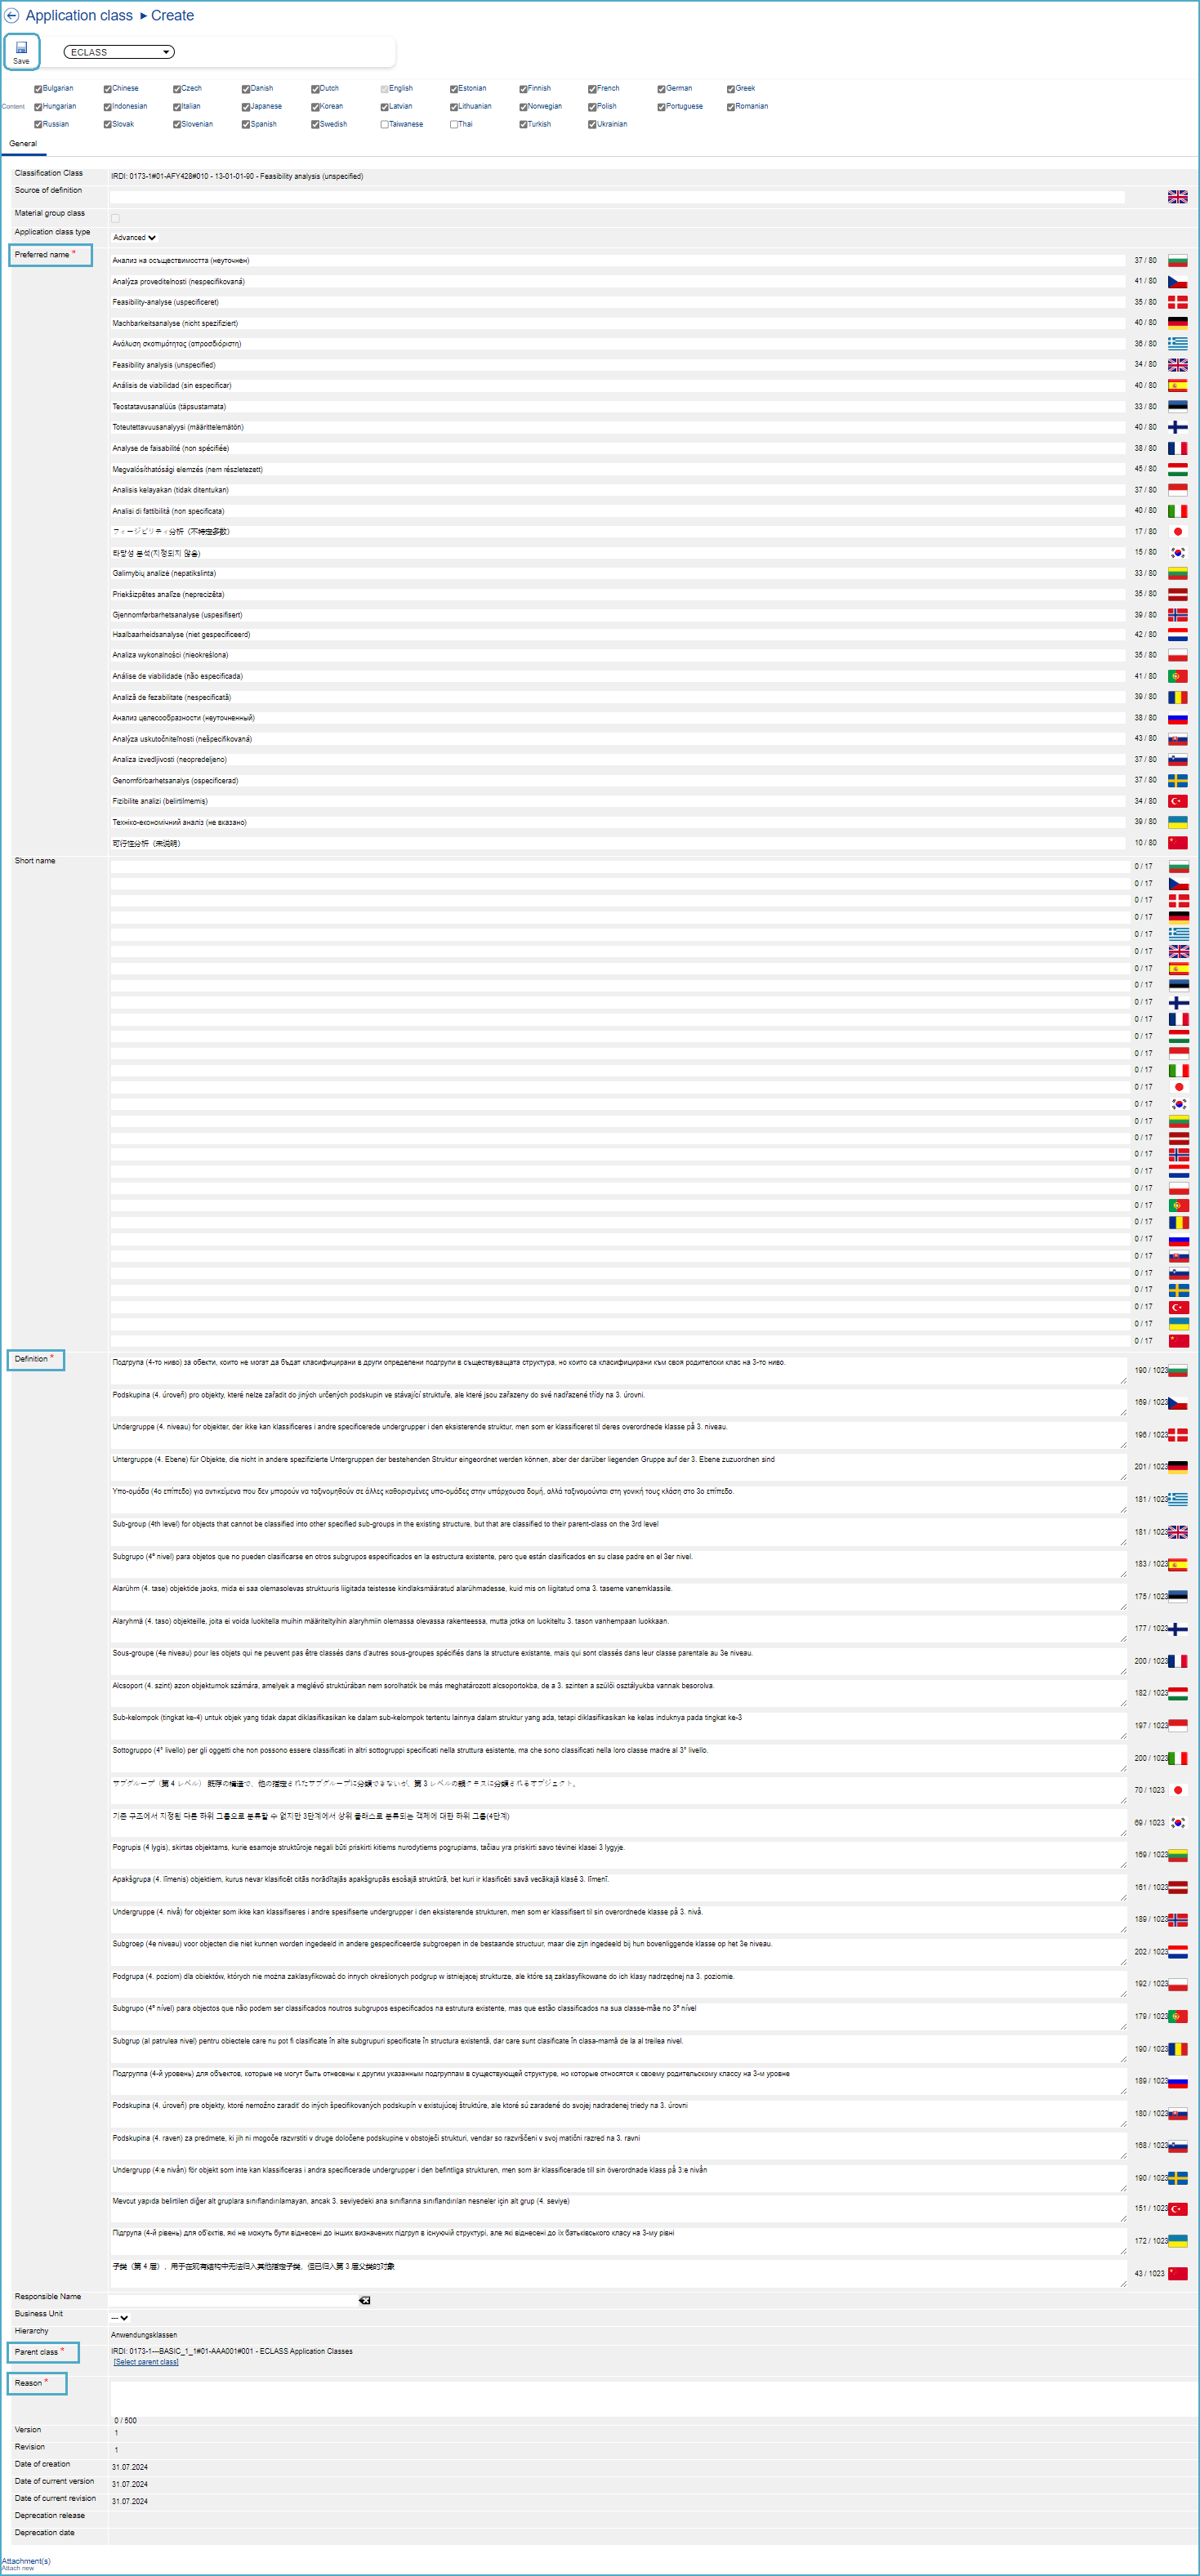
Figure 18: Create Dialog
Choose the type of AC (ASSET; ADVANCED) and fill in the information of the new AC in fields of Create Application Class Dialog and press Save.
Result: A CR for the new AC and another CR for assigning the AC to the chosen CC will be saved and may be retrieved for further editing/submittal under menu entry My Change Request.
NOTE: An AC usually has to have the exact same name as the CC it will be assigned to! Only if the AC is used multiple times the name can differ from the CCs name.
Create Product Structure Application Class
That option can be ignored, because it will be discontinued in one of the upcoming CDP Releases.
Remove Application Class
Note: Following the ECLASS Business Rules there must always be three Application Classes linked to a Classification Class (Basic, Advanced, Asset). Therefore, removing an AC without a successor is not permitted.
In order to create a CR for removing an AC proceed as follows: After selecting Application Class under Content Manager, the user has to select a specific Application Class that is to be removed. Subsequently the user has to hover above the “Remove” icon and will have two options to choose from: “Delete (CR)” and “Hard-delete”.
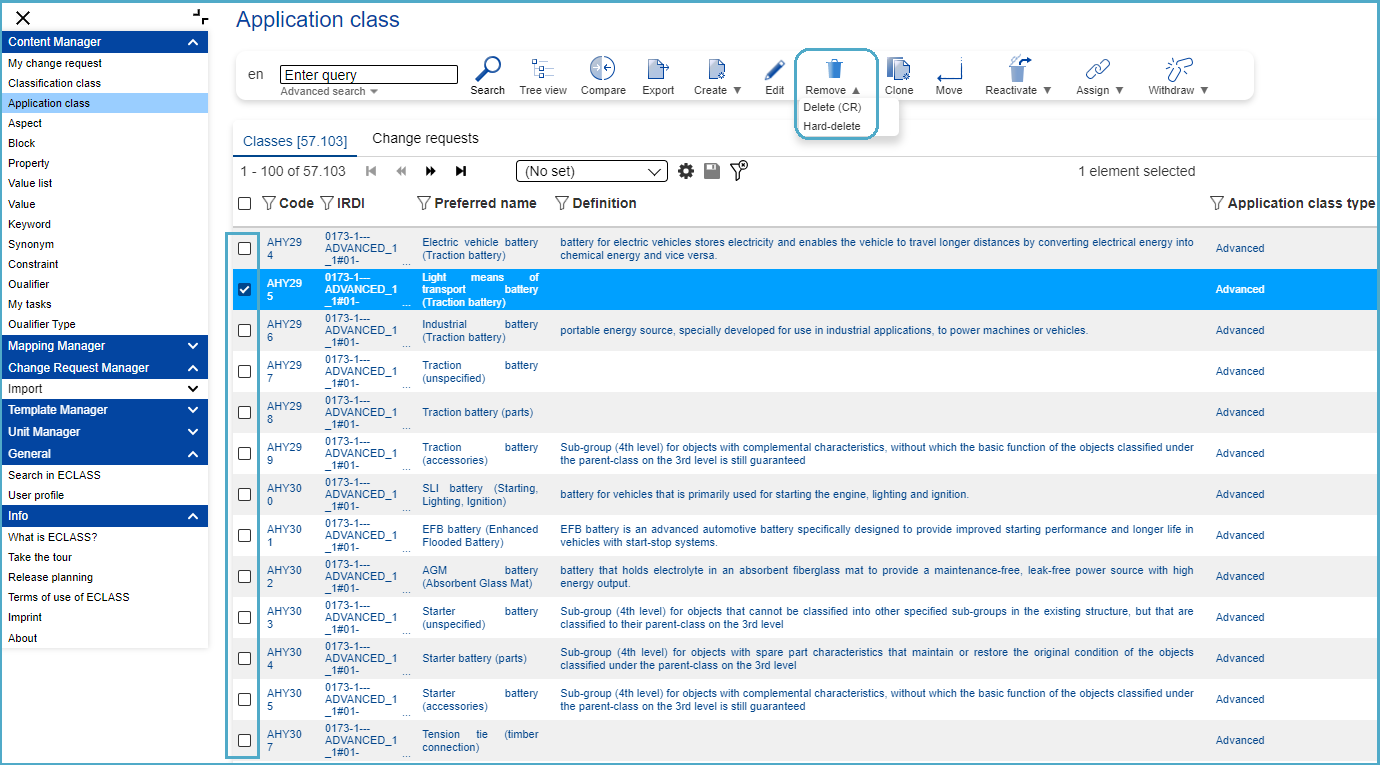
Figure 19: Select Application Class to Remove
Delete (CR) Application Class
User selects an Application Class from the list – the system displays the Withdraw Application Class dialog:
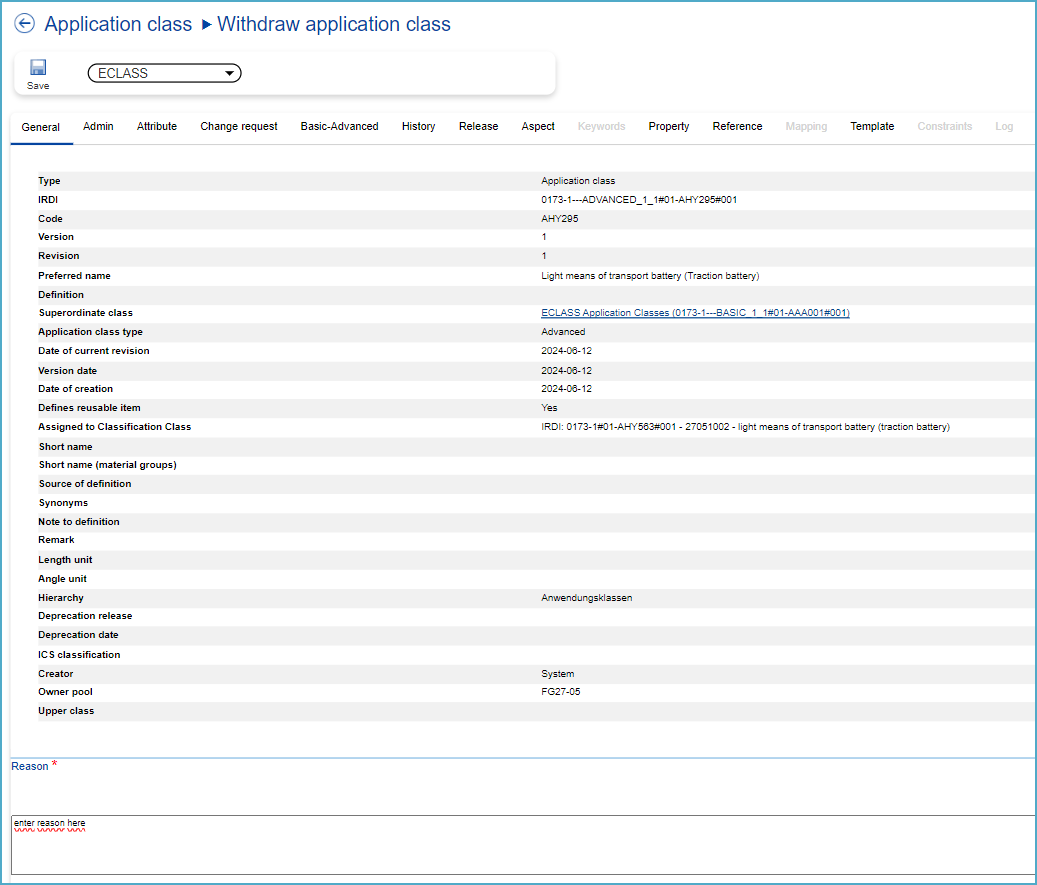
Figure 20: Withdraw Application Class Dialog
Under the tab “Reference”, all instances/Classification Classes where the Application Class is used are displayed. The user can evaluate the impact the operation “Withdraw Application Class” will have on the system.
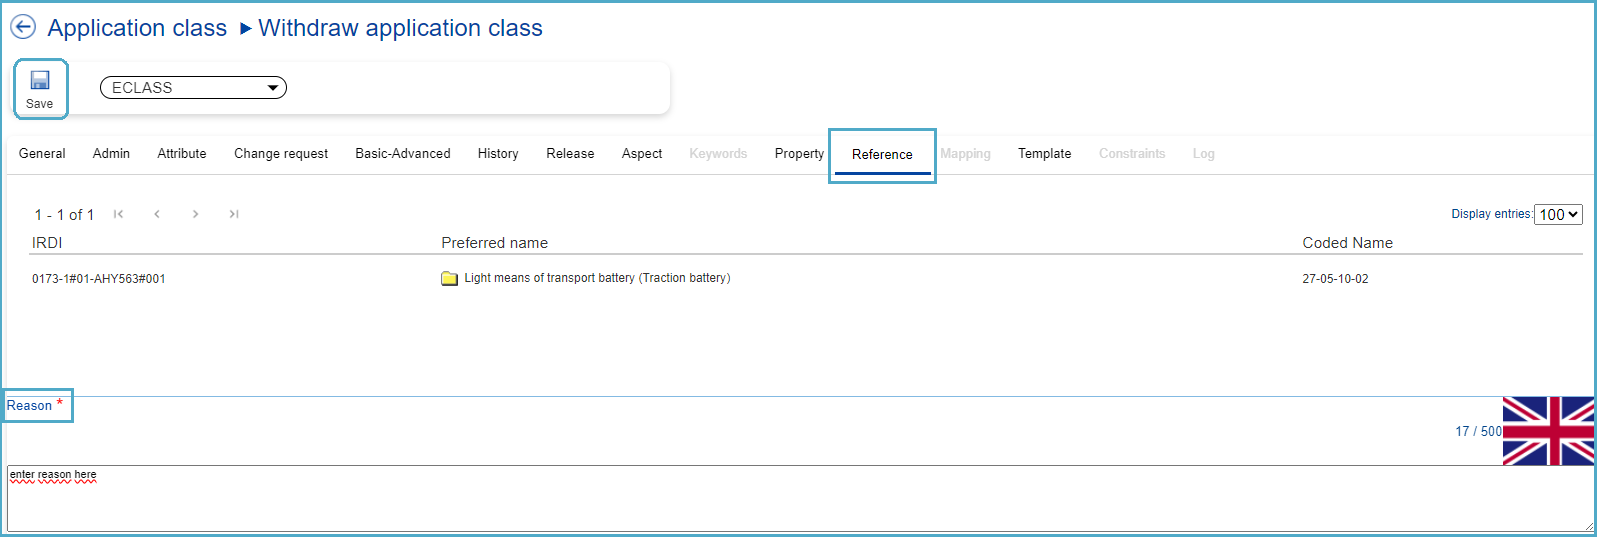
Figure 21: Reference Tab
Fill in the mandatory field “Reason” and press save -> “Change request saved” message will be displayed.
Figure 22: Chandge Request Saved
The CR for Deleting (CR) the Application Class can be viewed under “My Change Requests”.
Hard-delete Application Class
The hard-delete function gives the user the opportunity to remove structural elements that were created incorrectly or by mistake in Alpha and Beta versions.
In order to hard-delete an Application Class, the user needs to select first respective element in the corresponding list or tree view. Then he needs to open the drop-down of “Remove” button in toolbar and select option “Hard-delete”.

Figure 23: Select Application Class to Hard-delete
Depending on the structure element selected for hard deletion, system might display one of the following messages in console:
- in case selected element fulfills the requirements for hard deletion, a confirmation question is displayed, including Warning that after confirmation, the structure element will be removed completely from respective dictionary and will not be part of the Release. Example:
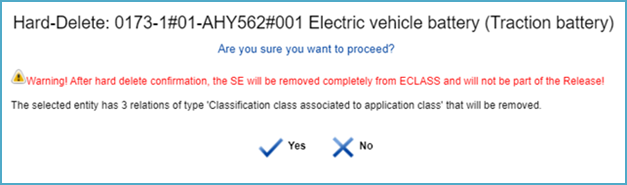
Figure 24: Confirmation Question for Hard-delete
- in case that Release of the selected Application Class is FINAL, system indicates that no release of the selected entity allows modifications, example:

Figure 25: Console in Case of a Final Release
- in case respective User does not have appropriate rights to delete selected Application Class, system displays message that the selected entity can be hard-deleted only by its creator or the configured data-administrator, example:
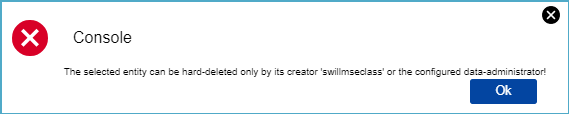
Figure 26: Console if Appropriate Rights are not given
Deprecated elements may also be hard deleted. As soon as the User presses OK, system starts processes of hard deletion. User will also receive an e-mail notification with details. The result of the hard deletion of any element is the permanent removal of respective entity and its connections. Hard delete does NOT trigger the removal of the connected elements themselves.
Clone Application Class
With the option “Clone”, users can create a new Application Class based on a selected one. For this purpose, after selecting Application Class under Content Manager, a specific Application Class has to be selected that the user would like to clone.
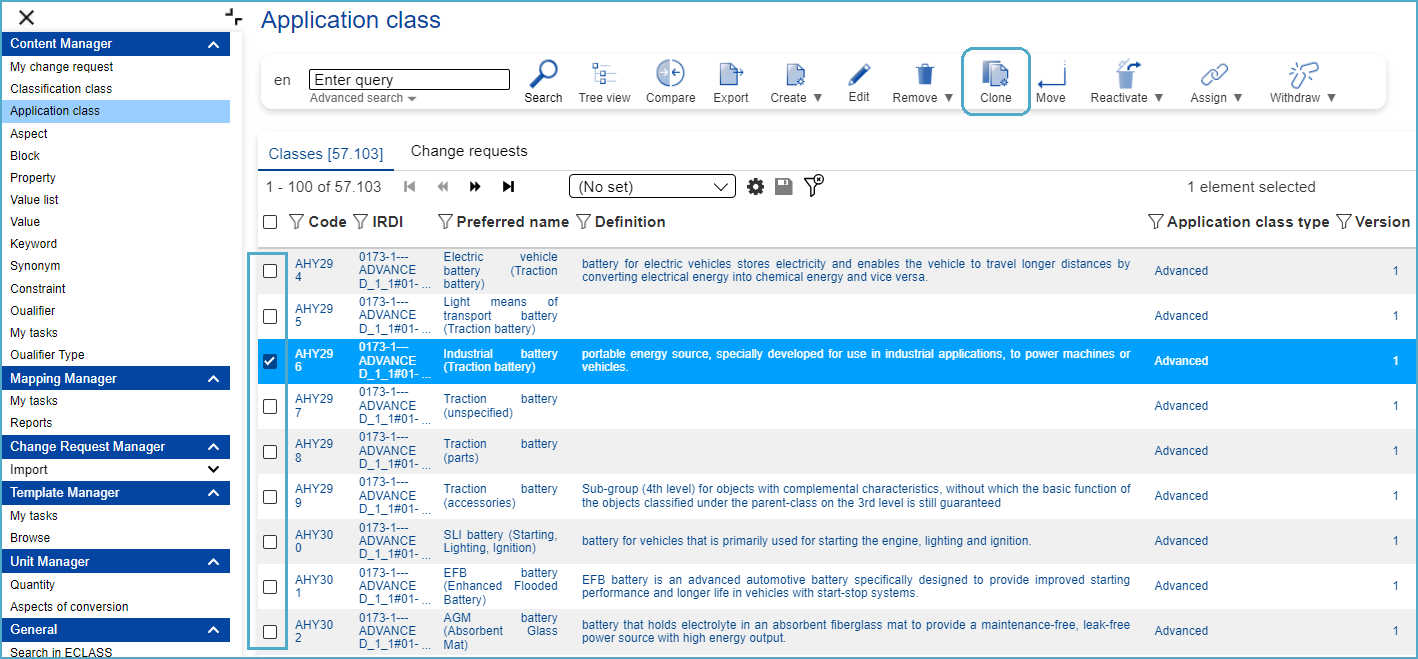
Figure 27: Select an Application Class to Clone
After clicking on the button “Clone”, the Create dialog will open:
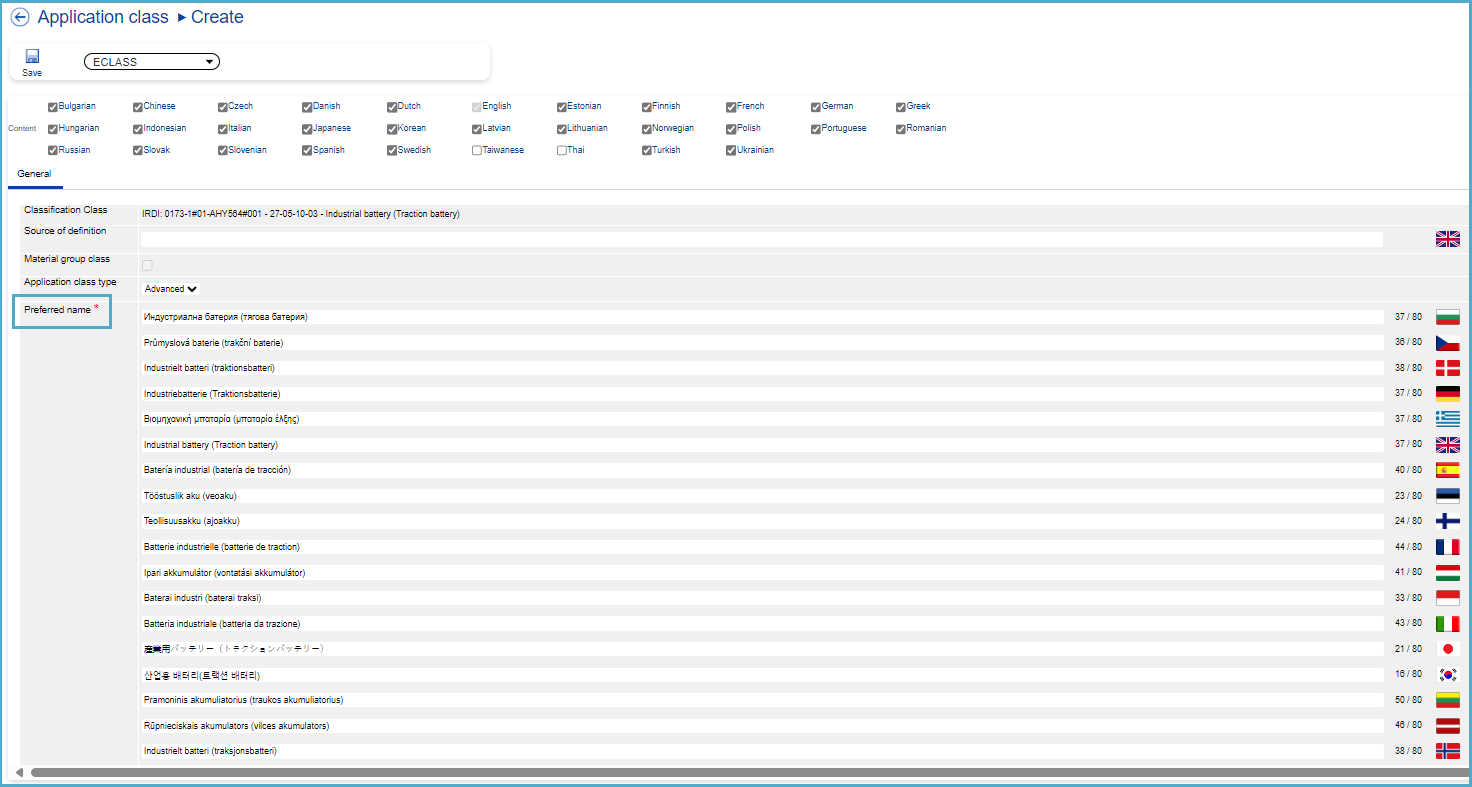
Figure 28: Create Dialog
The content languages can be deselected here as desired, which reduces the fields for Preferred Name and Definition for the corresponding languages.
Note: The user has to change the preferred name of the new class, since ACs with the same names are not allowed following the ECLASS Business rules.
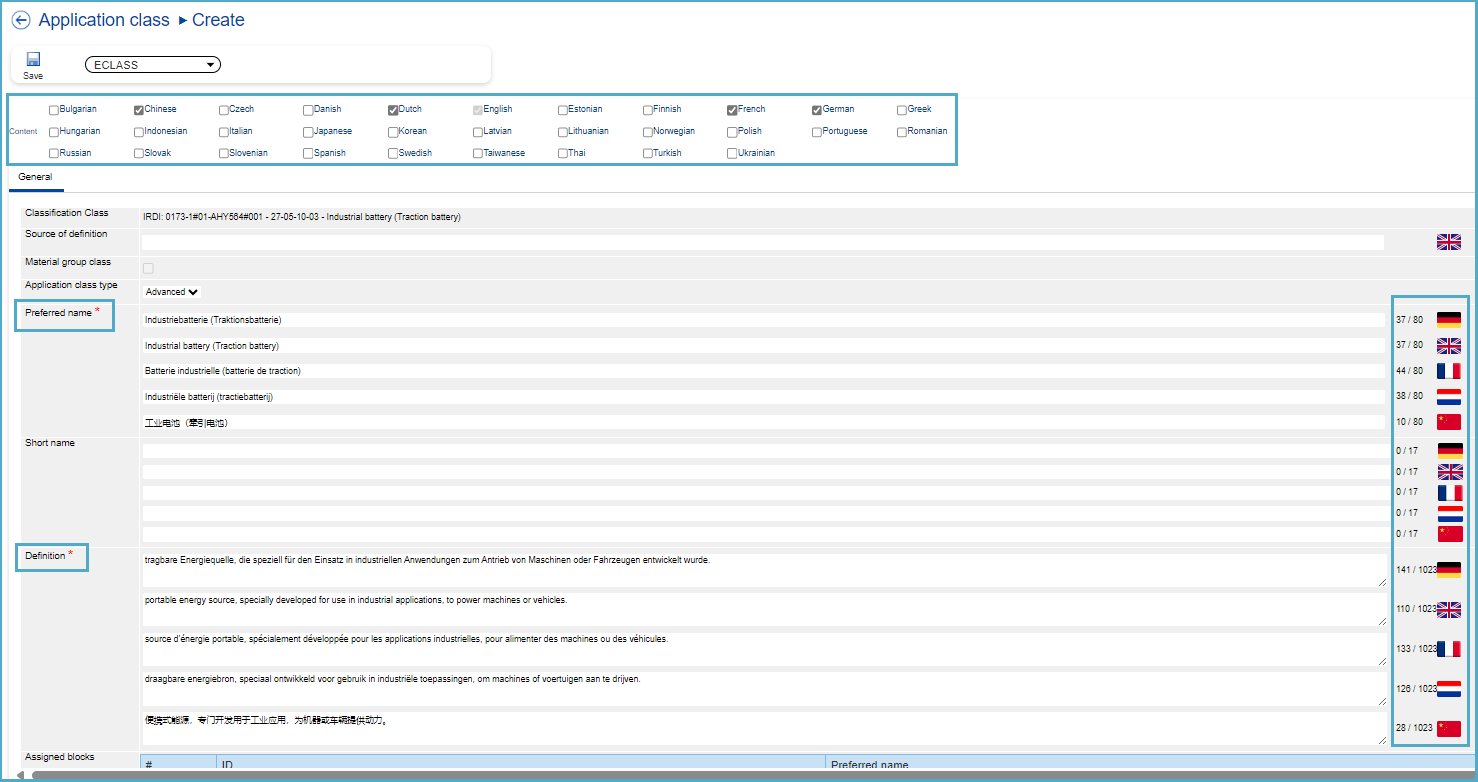
Figure 29: Content Language
By scrolling further down, additional structural elements can be seen that were assigned to the previously selected Application Class. For the Assigned Aspects and Assigned Properties, users can delete (“Trash” icon) or add (“+” icon) further ones as desired. In this specific case, there were no Assigned Blocks, but new blocks can be added if desired.
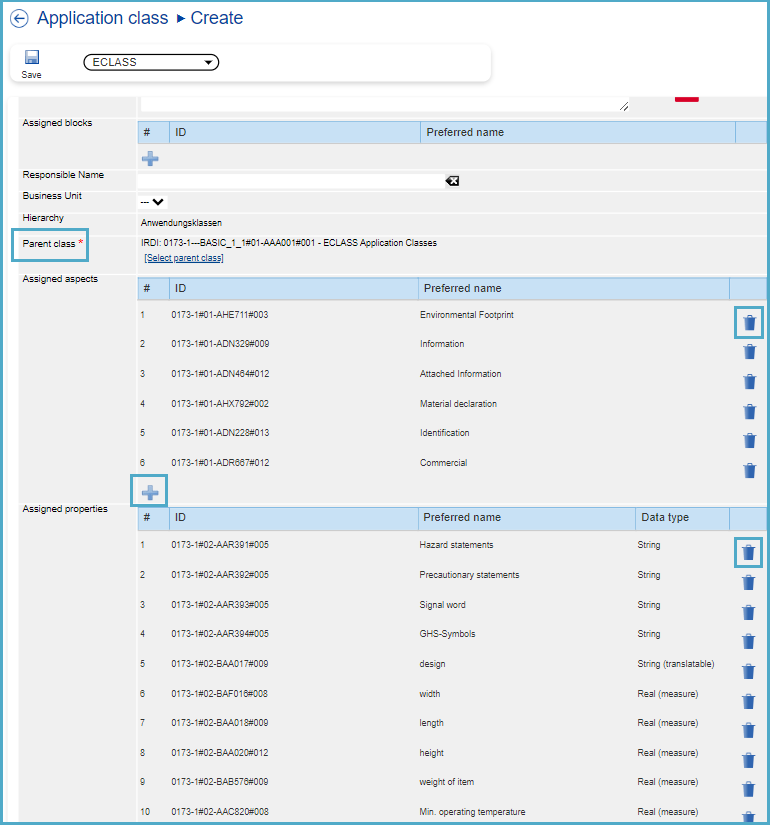
Figure 30: Assigned Structural Elements
Lastly the reason for the Change Request has to be entered and the creation of the Application Class can be saved.
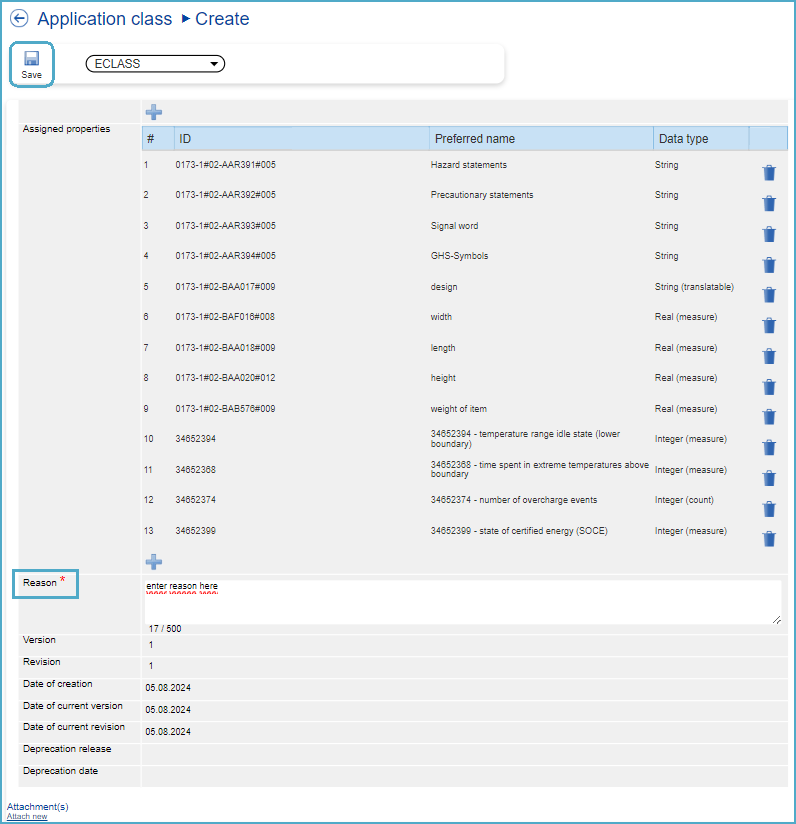
Figure 31: Enter Reason and Save
System will display message: Change Request saved. The new created Change Requests will be displayed under My Change Request.
Move Application Class
Note: The Move Application Class functionality refers to changing its parent class.
The parent class of an Application Class can be another Application Class or the root of all Application Classes.
After selecting Application Class under Content Manager, the user has to select a specific Application Class in the list they would like to move.
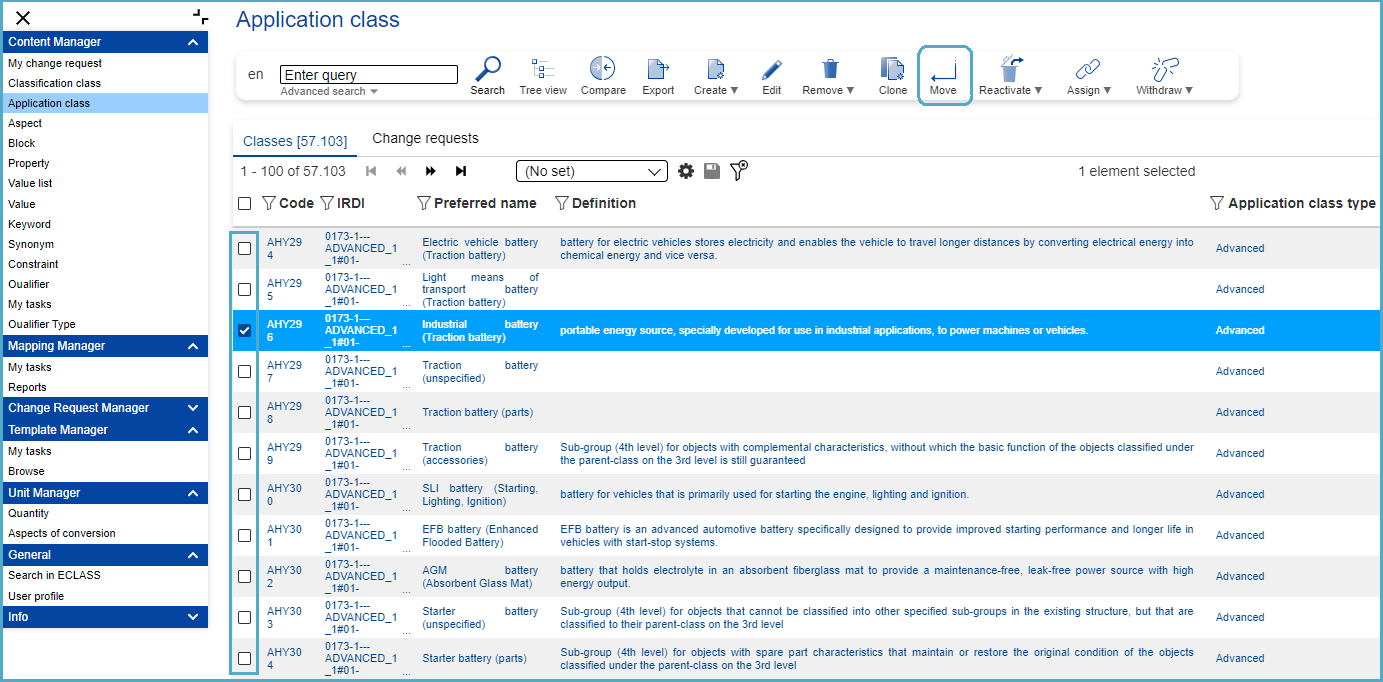
Figure 32: Select Application Class to Move
After clicking on the “Move” button, the user is asked to select the new parent.
Note: The user has to click on an Application Class and not on a Classification Class.
Figure 32: Select New Parent
After choosing the new parent and clicking on the “Select” button, the Move Application Class dialog will open:
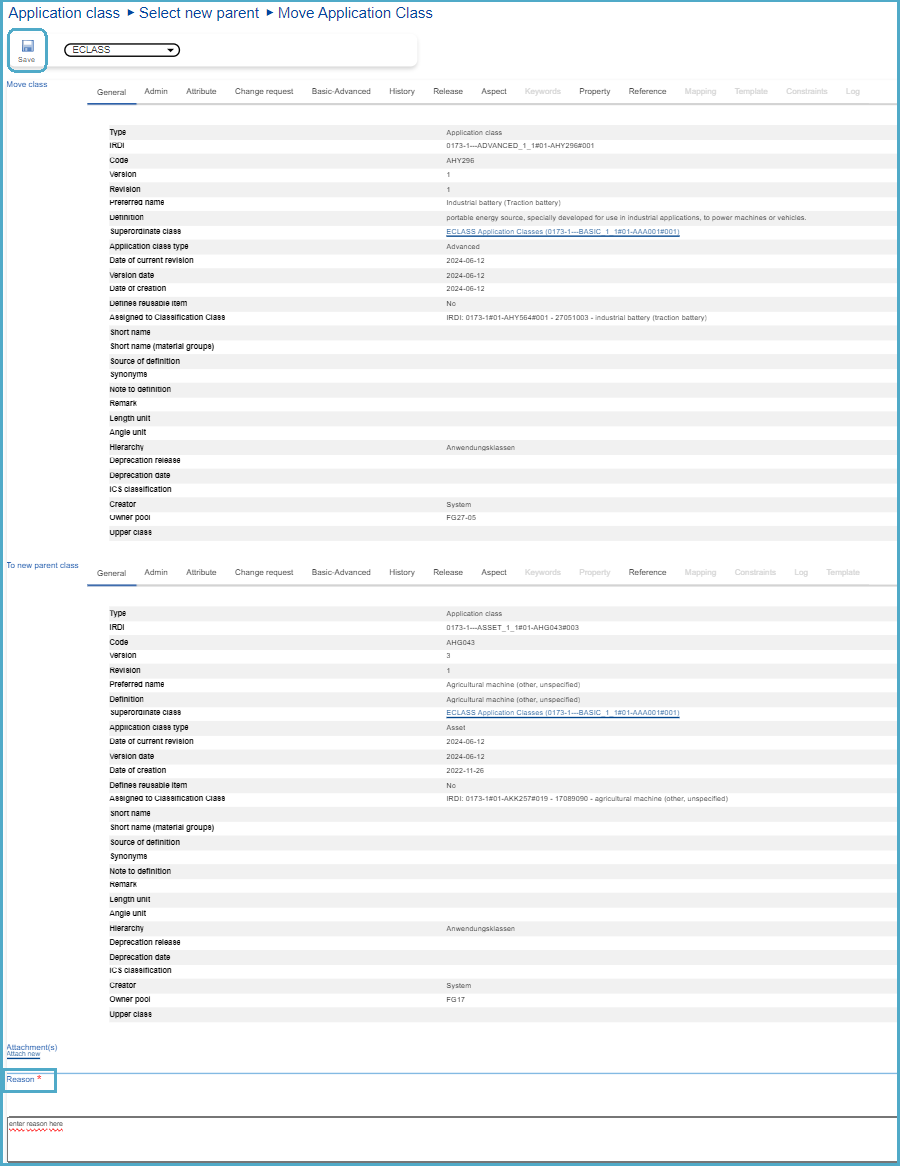
Figure 34: Move Application Class Dialog
Here, the reason for the move has to be given, after which the user can save the Change Request.
System will display message: Change Request saved. The new created Change Requests will be displayed under My Change Request.
Reactivate Application Class
Application Classes that have been withdrawn from a Classification Class can be reactivated again. Subsequently they would not be deprecated anymore.
Assign
After selecting Application Class under Content Manager, the user has to select an Application Class (SE or CR) in the list to which it is desired to assign a Structural Element to. Subsequently the user has to hover above the “Assign” icon and will have three options to choose from: “Assign Aspect…”, “Assign block reference…” and “Assign Property…”.

Figure 35: Select Application Class to Assign Structure Element
Assign Aspect
After selecting the "Assign Aspect..." option, the user must first select one or more Aspects to assign to the AC. To do this, click on 'Browse' and browse through the list of Aspects. Tick the box(es) in front of the Aspects you wish to select. If only one Aspect is selected, simply click the 'Select' button. If many Aspects are selected, select them first and click 'Select'.
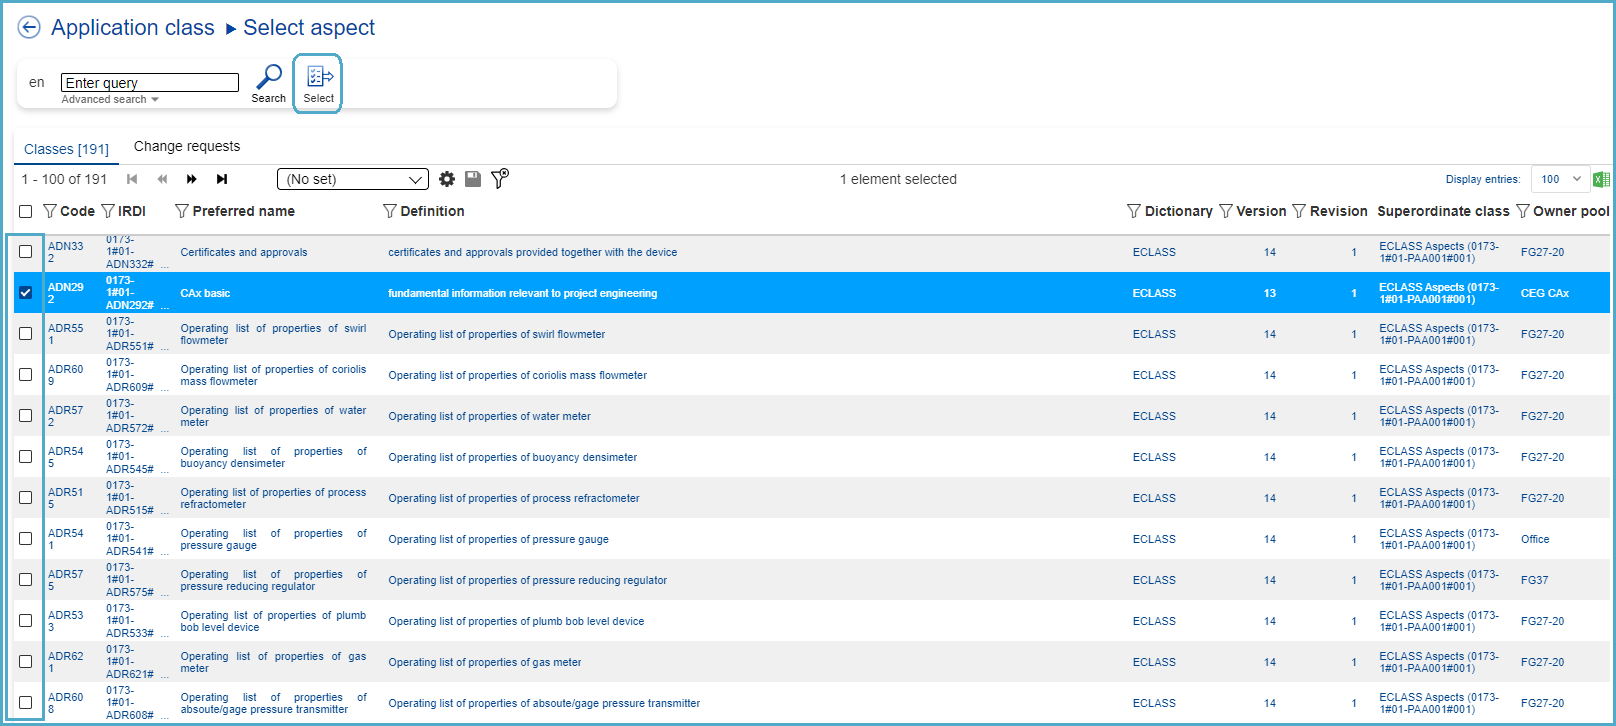
Figure 36: Select Aspect to Assign
After selecting an Aspect, the dialog Assign source to target entity will open:
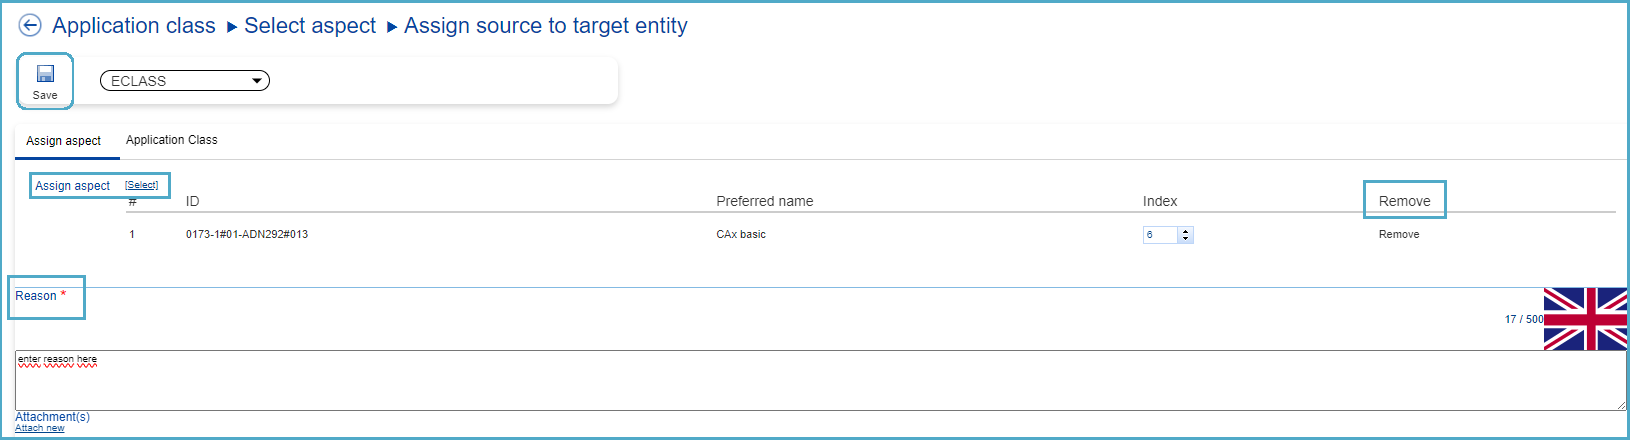
Figure 37: Assign Source to Target Entity
If required, an additional Aspect can be added using the "[Select]" button next to "Assign Aspect". If the user wishes to remove some of the Aspects previously selected, they can do so by clicking on "Remove" for the relevant Aspect. Finally, the reason for this type of change request must be entered before saving. System will display message: Change Request saved. The new created Change Requests will be displayed under My Change Request.
Assign Block Reference
NOTE: A Block is always referenced by a Reference Property. Therefore, a Reference Property has to be assigned to an AC in order to include the referenced Block in the AC.
After selecting the 'Assign Block Reference...' option, the user must first select one or more Properties to assign to the AC. To do this, click on 'Browse' and browse through the list of Properties. Tick the box(es) in front of the desired Reference Properties that refer to a Block. If only one Block is selected, simply click on the 'Select' button. If many Blocks are selected, first select them and then click 'Select'.
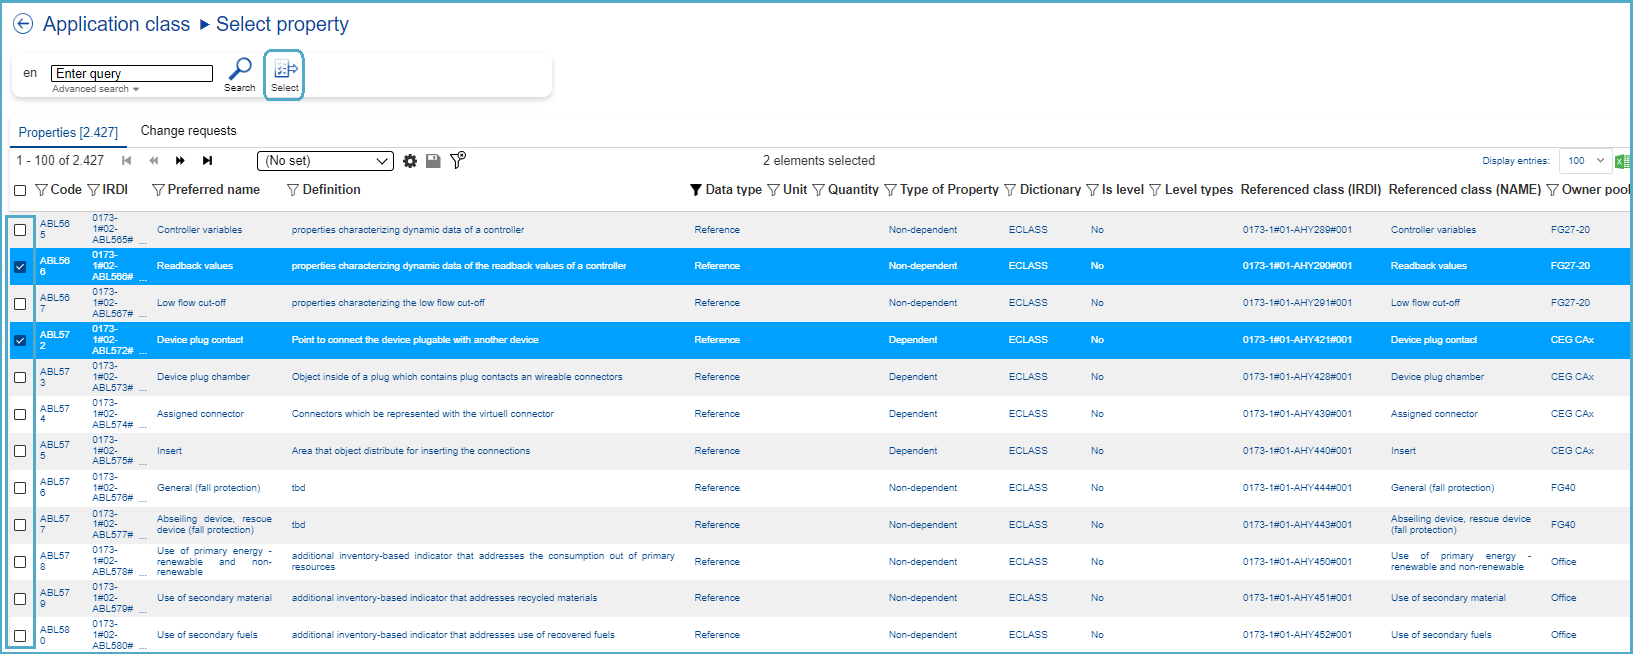
Figure 38: Select Property to Assign
After selecting the Properties, the dialog Add existing property will open:
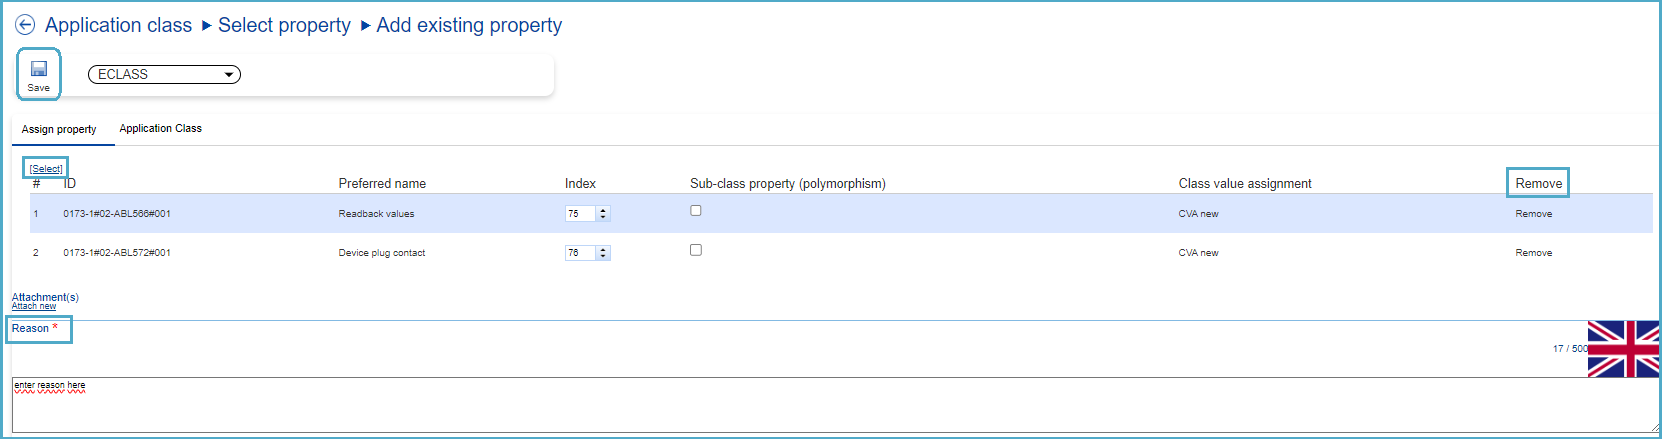
Figure 39: Add Existing Property Dialog
Here, if required, an additional Property can be added using the "[Select]" under "Assign Property". If the user wishes to remove any of the previously selected Properties, they can do so by clicking on the 'Remove' button for the relevant Property. Finally, the reason for this type of change request must be entered before saving.
System will display message: Change Request saved. The new created Change Requests will be displayed under My Change Request.
Assign Property
After choosing the option “Assign Property…”, the user has to first select one or more Properties they would like to assign to the AC. For this purpose, click on “Search” and browse through the list with Properties. Tick the box(es) in front of the required Properties. If only one Property is selected, simply click the 'Select' button. If many properties are selected, select them first and click 'Select'.
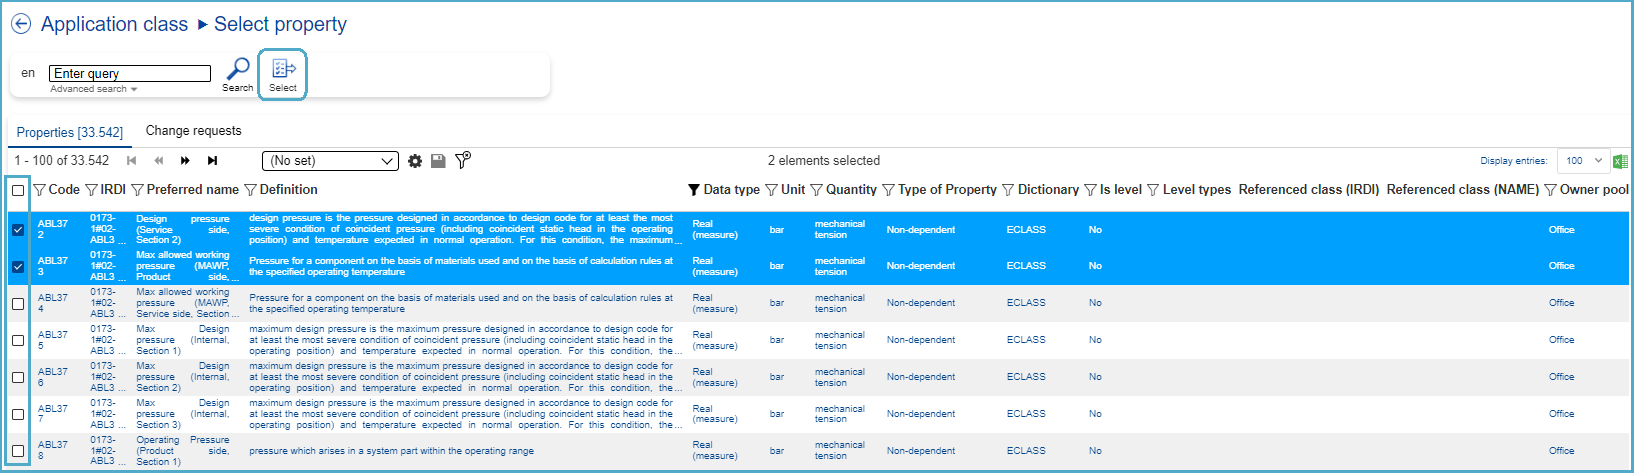
Figure 40: Select Property to Assign
After selecting the Properties, the dialog Add existing property will open:
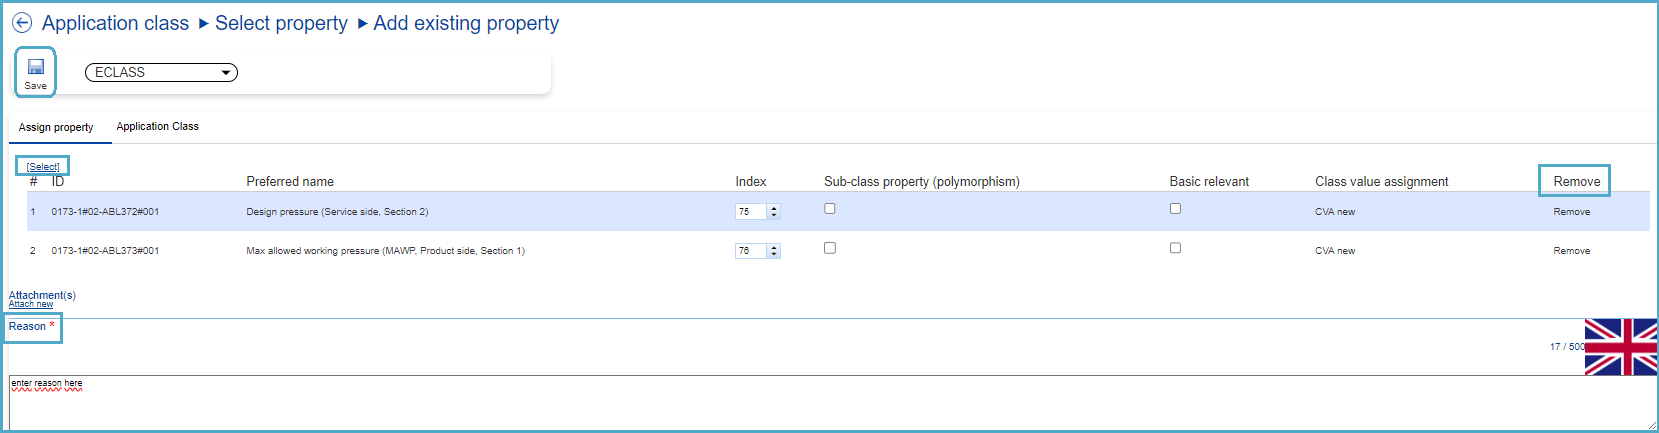
Figure 41: Add Existing Property Dialog
Here, an additional Property can be added if desired via the “[Select]” under “Assign property”.
Note: If the user wants the assigned Property to also be present in the Basic representation of ECLASS, the user must tick the check box in the "Basic relevant" column!
For Properties that are part of polymorph structures, please tick the check box in the column “Sub-class Property (Polymorphism)”.
If the user wishes to remove some of the Properties they have previously selected, they can do so by clicking 'Remove' for the relevant Property. Finally, the reason for this type of Change Request must be entered before saving.
System will display message: Change Request saved. The new created Change Requests will be displayed under My Change Request.
Withdraw
After selecting Application Class under Content Manager, the user has to select an Application Class (SE or CR) in the list they would like to withdraw a Structural Element from. After this the user has to hover above the “Withdraw” icon and will have three options to choose from: “Withdraw aspect…”, “Withdraw block reference…” and “Withdraw Property…”.
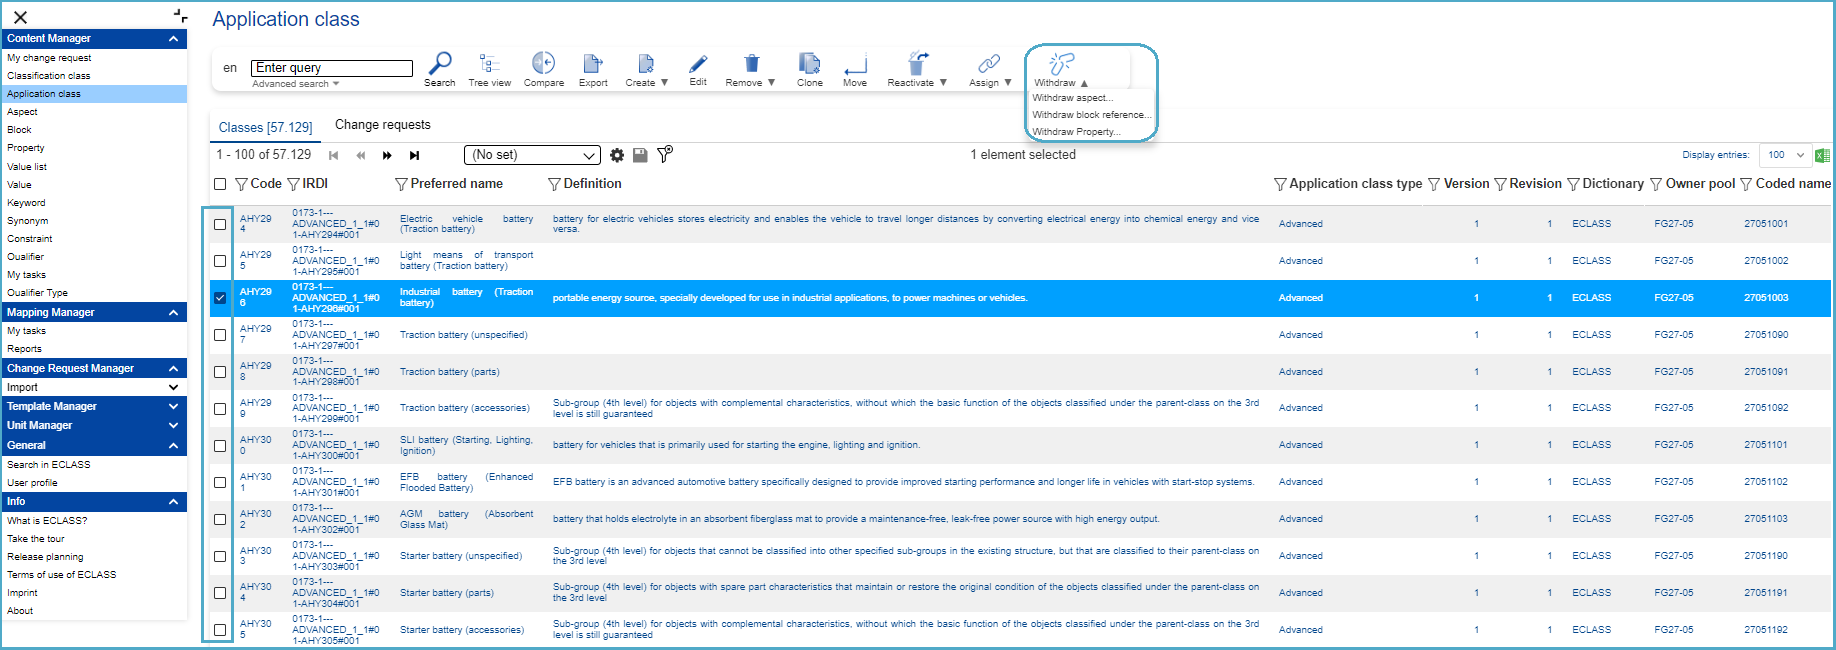
Figure 42: Select Application Class to Withdraw from
Withdraw Aspect
After selecting the "Withdraw Aspect..." option, the user must first select one or more Aspects to withdraw from the AC. To do this, click on "Browse" and browse through the list of available Aspects. Tick the box(es) in front of the desired Aspect(s). If only one aspect is selected, simply click on the 'Select' button. If many Aspects are selected, first select them and then click 'Select'.
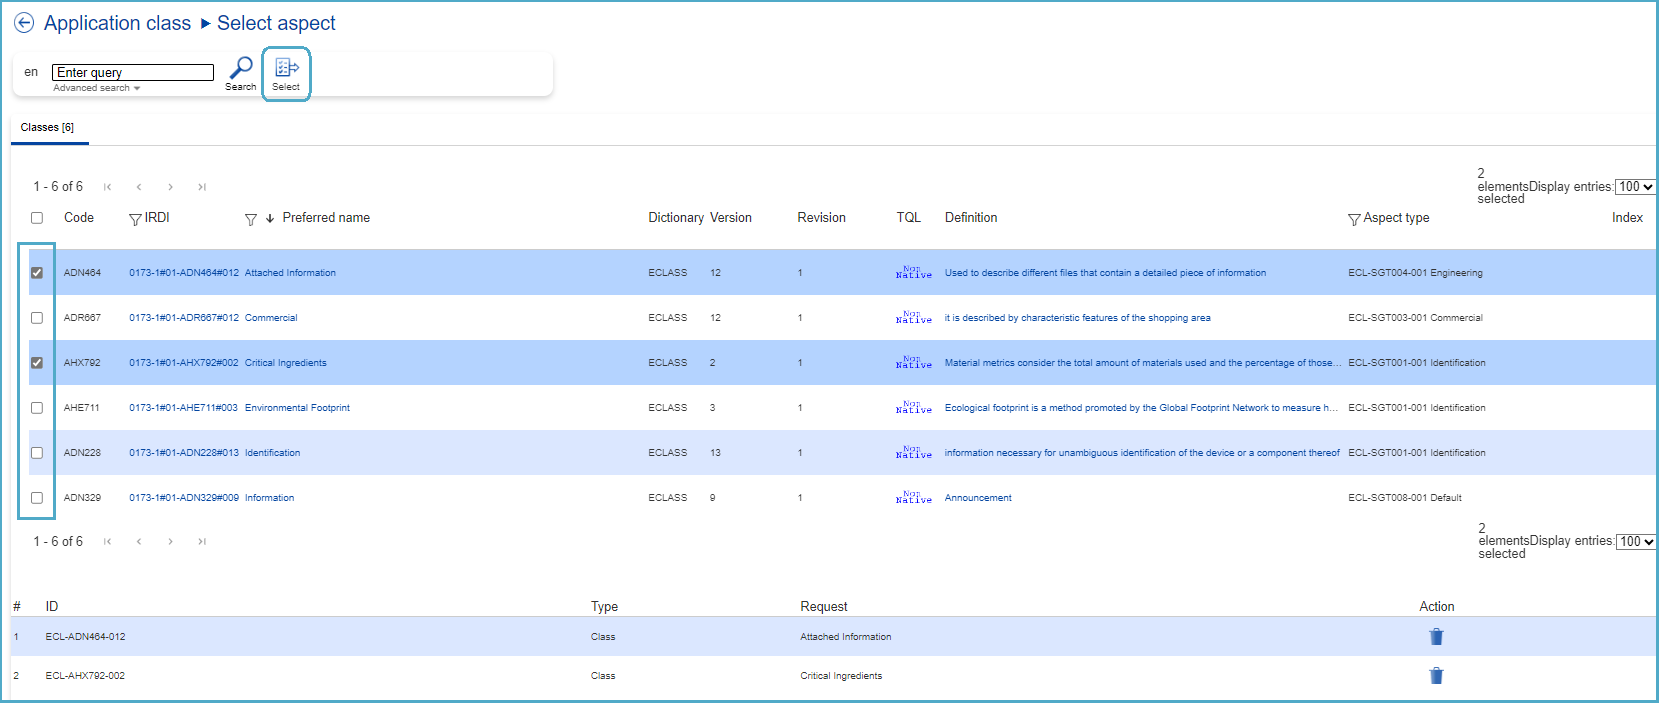
Figure 43: Select Aspect to Withdraw
After selecting an Aspect, the dialog Withdraw aspect from application class will open:
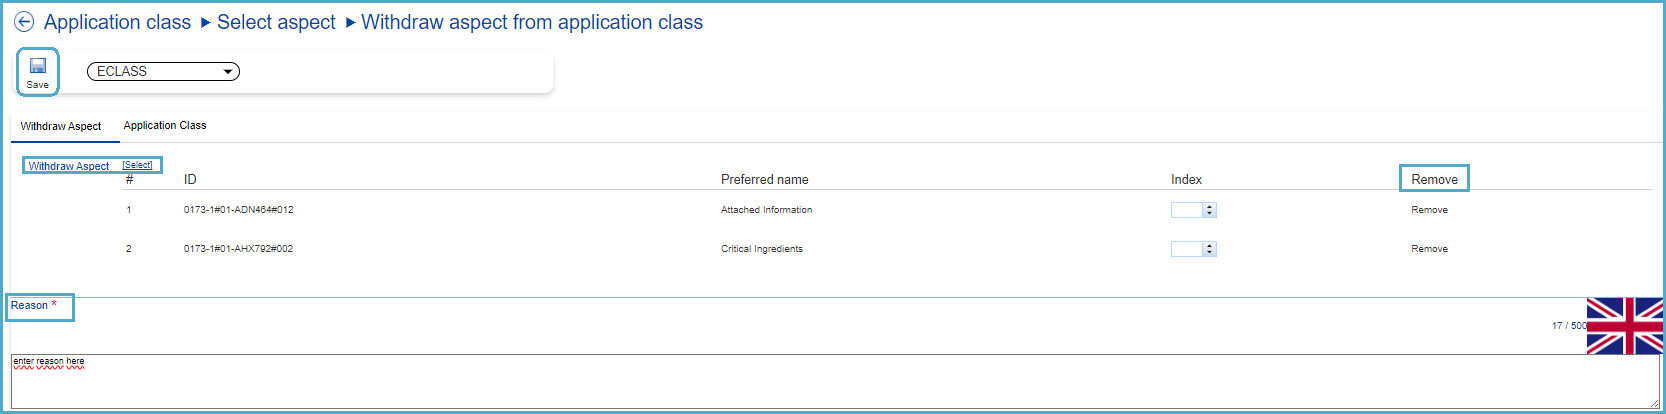
Figure 44: Withdraw Aspect from Application Class
Here an additional Aspect can be added if required using the "[Select]" button next to "Remove Aspect". If the user wishes to remove any of the Aspects previously selected, they can do so by clicking on "Remove" for the relevant Aspect. Finally, the reason for this type of change request must be entered before saving.
System will display message: Change Request saved. The new created Change Requests will be displayed under My Change Request.
Withdraw Block Reference
NOTE: A Block is always referenced by a Reference Property. Therefore, a Reference Property has to be assigned to an AC in order to include the referenced Block in the AC.
After selecting the "Withdraw Block Reference..." option, the user must first select one or more Properties to withdraw from the AC. To do this, click on 'Browse' and browse through the list of available Properties. Tick the box(es) in front of the desired Properties. If only one Property is selected, simply click the 'Select' button. If many properties are selected, select them first and click 'Select'.
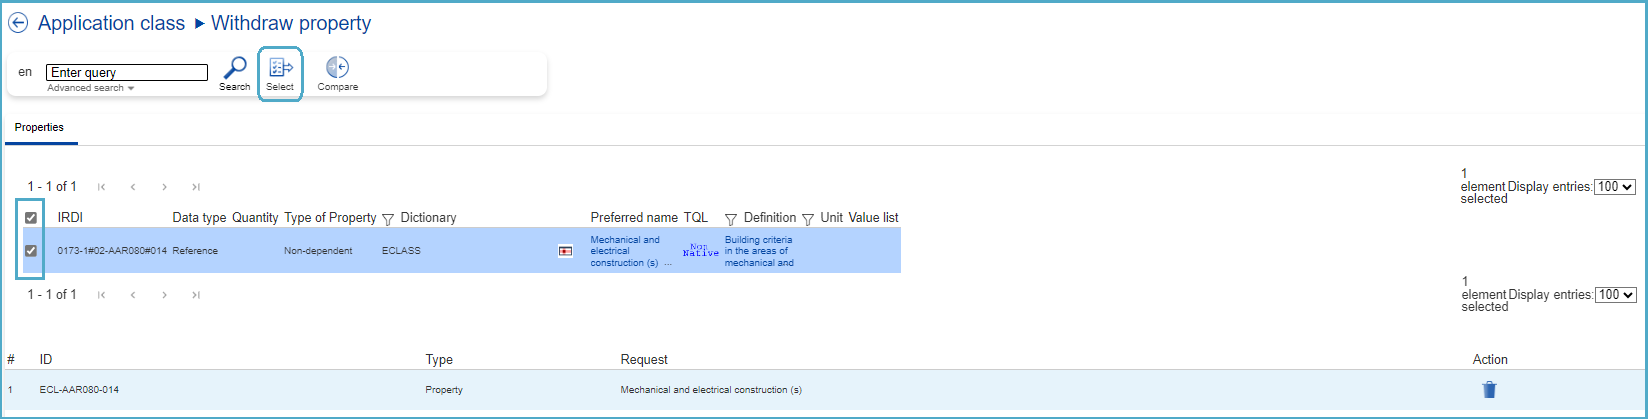
Figure 45: Select Property to Withdraw
Here an additional Property can be added if required, available via the "[Select]" button under "Withdraw Property". If the user wishes to remove any of the previously selected properties, they can do so by clicking the 'Remove' button for the relevant property. Finally, the reason for this type of change request must be entered before saving.
System will display message: Change Request saved. The new created Change Requests will be displayed under My Change Request.
Withdraw Property
After selecting the "Withdraw Property..." option, the user must first select one or more Properties they wish to withdraw from the AC. To do this, click 'Browse' and scroll through the list of available Properties. Tick the box(es) in front of the desired Properties. If only one Property is selected, simply click the 'Select' button. If many Properties are selected, select them first and click 'Select'.
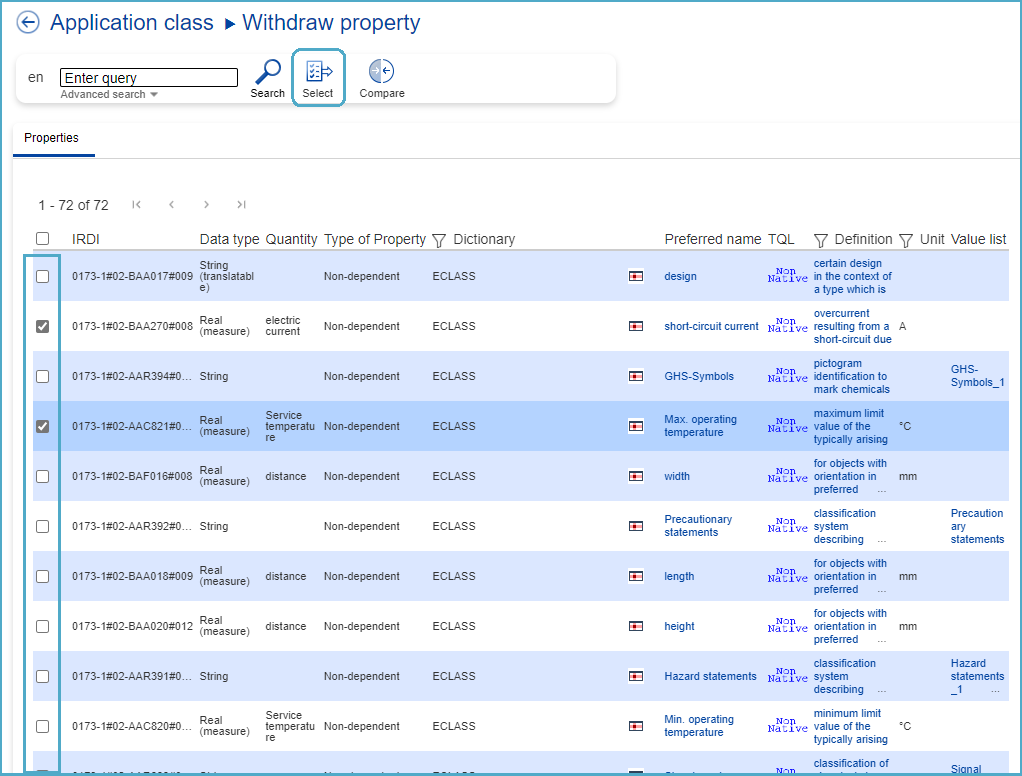
Figure 47: Select Property to Withdraw
After selecting the Property, the dialog Withdraw property will open:

Figure 48: Withdraw Property Dialog
Here, if required, an additional Property can be added using the "[Select]" button under "Withdraw Property". If the user wishes to remove any of the previously selected properties, they can do so by clicking the 'Remove' button for the relevant property. Finally, the reason for this type of change request must be entered before saving.
System will display message: Change Request saved. The new created Change Requests will be displayed under My Change Request.
Reactivate
Reactivate Property Assignment
A Property is withdrawn from an Application Class and needs to be reactivated. In order to create a Change Request (CR) to reactivate an existing Property from an Application Class, the user has to proceed as follows: After selecting Application Class under Content Manager, select an Application Class (SE or CR) in the list view. After this hover above the “Reactivate” icon and choose the option “Property Assignment”.
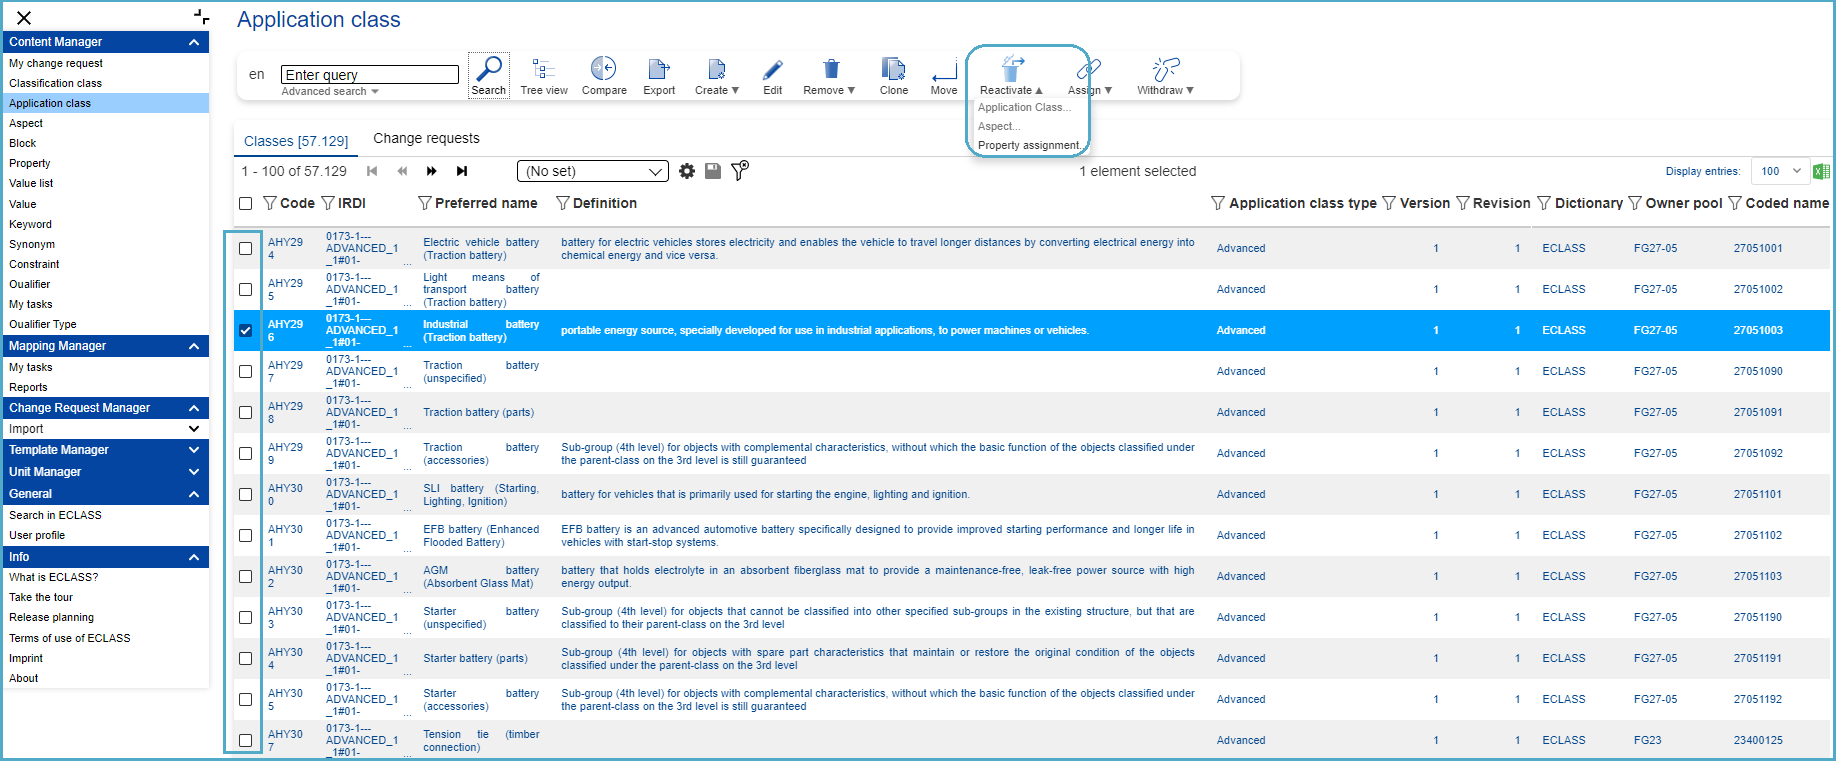
Figure 49: Select Application Class to Reactivate Property from
A list of Properties will then be displayed for the user to choose from. Select the required Property and then continue by clicking the 'Select' button.
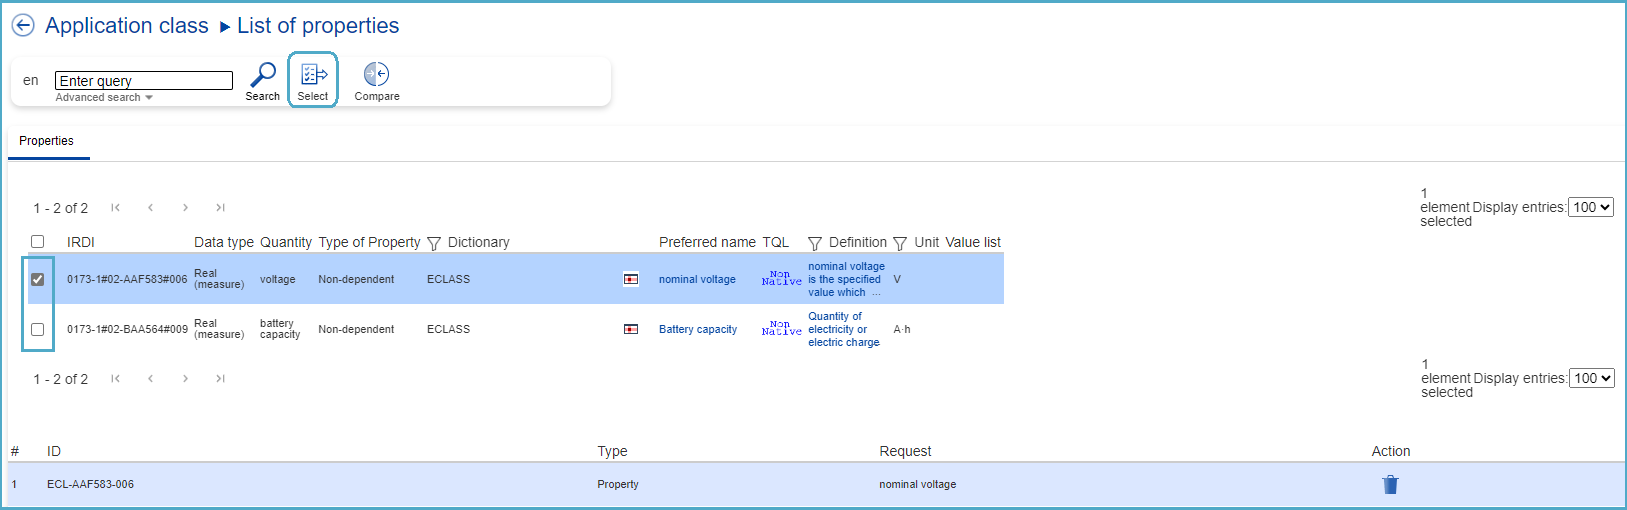
Figure 50: Select Property to Reactivate
After selecting the Property, the dialog Reactivate property will open:
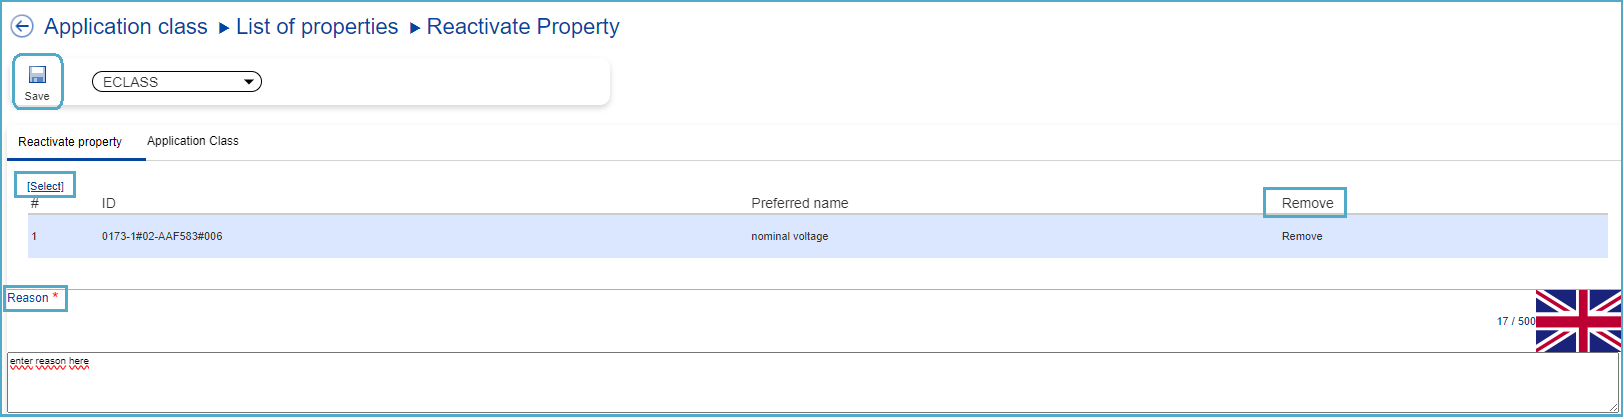
Figure 51: Reactivate Property Dialog
Here, an additional Property can be added if desired via the “[Select]” button under “Reactivate property”.
System will display message: Change Request saved. The new created Change Requests will be displayed under My Change Request.
Reactivate Aspect
An Aspect is withdrawn from an Application Class and needs to be reactivated. In order to create a Change Request (CR) to reactivate an existing Aspect (AS) from an Application Class (AC) proceed as follows:
After selecting Application Class under Content Manager, select an Application Class (SE or CR) in the list view. After this hover above the “Reactivate” icon and choose the option “Aspect”.
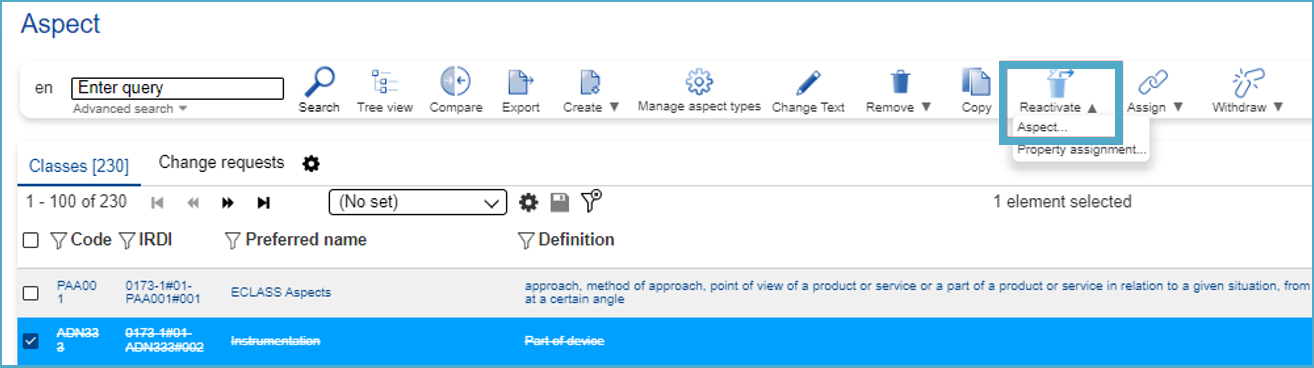
Figure 52: Select Application Class to Reactivate Aspect
The user has the possibility to tick the check box “Reactivate aspect usages”.
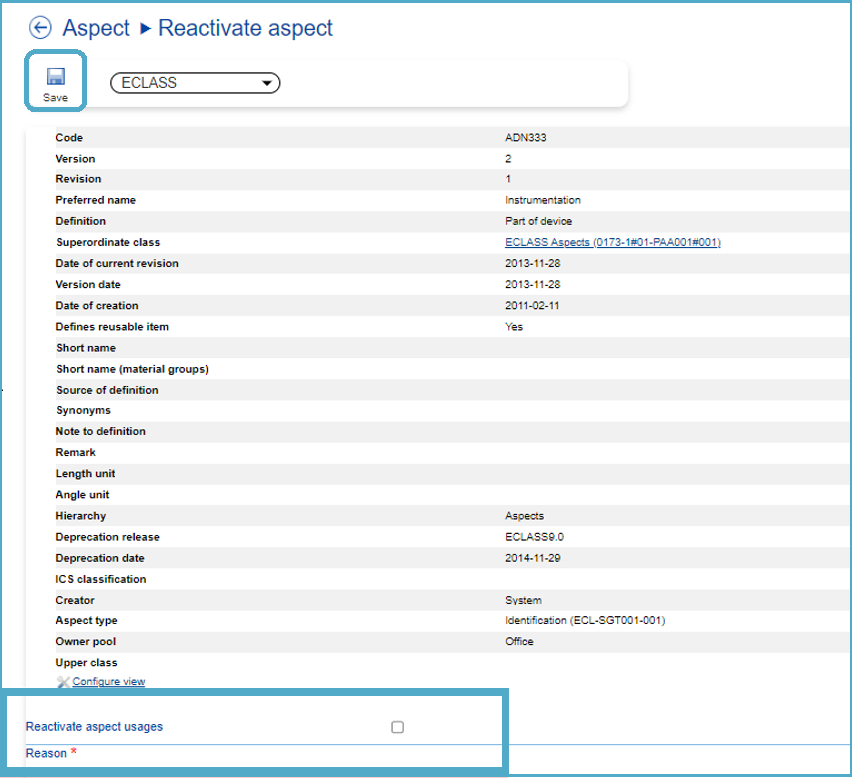
Figure 53: Reactivate Aspect Dialog
Note:
- By ticking the check box “Reactivate aspect usages” system will, besides the reactivation of the Aspect also reactivate its previous assignments, if available.
- If not selected system will simply reactivate the Aspect stand-alone.
Subsequently fill in the reason and save the Change Request.