Classification Class (Create Change Request)
Overview
For ECLASS as a classification system, the most fundamental structural element is the classification class. With the help of classification classes products are divided into certain categories of similar products, the product groups.
General Information
The workspace area for the management of Classification Classes can be accessed via menu Content manager → Classification Class.

Figure 1: General Information Classification Class
Search | Triggers a search in the available content, considering the search options set in the advanced search. |
Tree view | Allows navigation to the hierarchical view of Classification Classes (CC) |
Compare | Allows the comparison of two or more CCs: Currently not usable. |
Export | Allows the export of desired CCs |
Search for a Classification Class
First of all, the user can change the language of the content by navigating the mouse to the button "en" which is left to search field. Various languages can be selected.
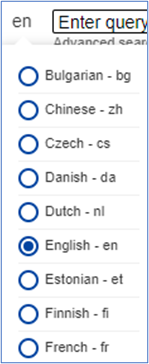
Figure 2: Language of the Content
In the field Enter query it is possible to type in the ID or the preferred name of the classification class.
By clicking on "advanced search" (under search field), there are several search options available.

Figure 3: Search Field
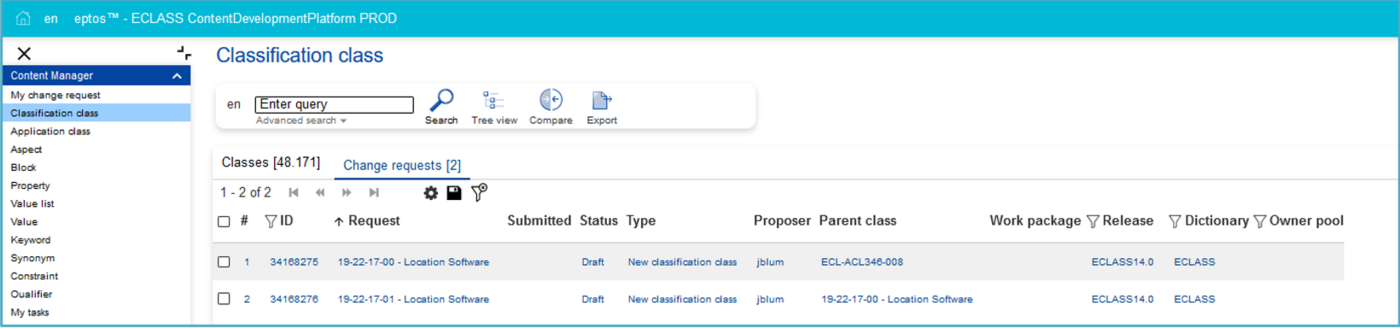
The search options are explained via mouse over in the CDP. By clicking on the Search button without entering name or ID in the search field, all Classification classes are displayed in the list view below.

Figure 4: List of Classification Classes
The user can select between the tabs Classes [number of existent CCs] and Change requests [number of Change requests]. Note: Number of Change requests is only displayed after clicking on the tab.
On the far-right side, the option to display up to 100 entries is available. Here the Excel icon allows to directly export in an Excel file the entries that are displayed on the page:

Figure 5: Display entries
Tab Classes

The list view contains the following columns:
Coded name | 8-digit ECLASS identifier – position in the ECLASS hierarchy |
Level | Level of the class in the ECLASS hierarchy (from 1 to 4). For more information, see: Classification Class - ECLASS Technischer Support. |
Code | 6-digit identifier (part of the IRDI) |
IRDI | International Registration Data Identifier |
Preferred name | Name of the Classification Class (CC) |
Definition | Definition of the CC |
Dictionary | The dictionary in which the CC is used |
Version | Displays number of changes of the CC (part of the IRDI) |
Revision | Technical versioning that is not part of the IRDI |
Date of current revision | Date when CC has changed without versioning |
Release(s) | Tab Release displays the release(s) the CC is part of. |
Version date | Date when the version number (last three digits of IRDI) of the VL has changed. |
Date of creation | Date when the CC has been created. |
Short name | Short name of CC. |
Source of definition | Source of definition of CC (e.g. "AI generated", "ISO-IEC") |
Owner Pool | Owner of the CC, meaning the responsible group for that CC |
Favorite set of user "star symbol" | The User can mark any desired elements as favorites in any list. In the column header section, a little to the right, there is a Star available, by which the User can filter his favorite elements marked in respective list |
Tab Change Requests
ID | Change Request Identifier |
Request | Name of the Change request |
Status | The status of the Change request |
Type | Basic, Advanced and Asset CC can be displayed. |
Proposer | Proposer of the change request |
Parent Class | Class above the CC in the ECLASS hierarchy |
Work package | Name of the work package the CC belongs to (if there is one) |
Release | Version of Release on which the Change is requested on |
Dictionary | The dictionary in which the Classification Class is used |
Owner Pool | Owner of the CC, meaning the responsible group for that CC |
Details Page
In order to view more details related to a Classification Class, users may open the Classification Class in view mode by clicking on it (IRDI or preferred name) from the tabular view. The details page of a Classification Class is subdivided into different tabs. Tabs which do not contain any information are grayed out.
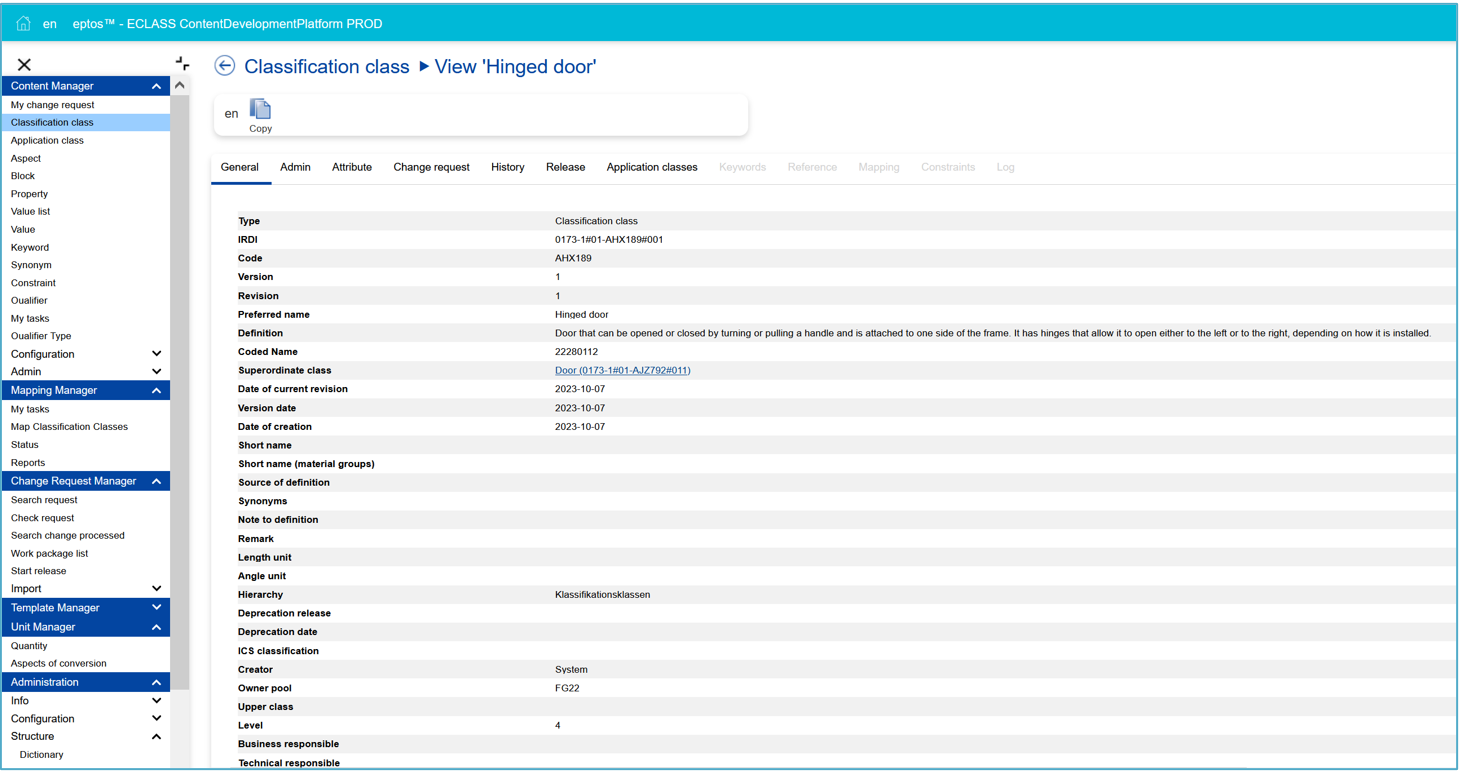
Figure 8: Classification Class in view mode
General (selected in screenshot) | Tab General displays the standard and extended Attributes of an CC. |
Admin | Tab Admin displays administrative information such as creation date, version date and creator of the selected CC. |
Attribute | Tab Attribute displays extended attributes of the selected CC. |
Change requests | Tab Change request displays the Change requests in connection with the selected CC. |
History | Tab History displays historical information on the selected CC. |
Release | Tab Release displays the release(s) the CC is part of. |
Application Classes | Tab Application Classes contains the ACs that are related to the CC. |
Keyword | If the CC has related Keywords, these are displayed here as well as the language of the assigned Keyword. |
Reference | Tab Reference displays in a tabular view information related to the Classification Class(es) in which the selected parent CC is used. |
Mapping | Tab Mapping is greyed out, because it is not used here. |
Constraints | Tab Constraints displays in a tabular view the Constraints existing for the selected CCs. |
Log | Tab Log contains logging information, structured in a clear, user-friendly manner, related to the selected CC and is visible only for users with administrator rights. |
Change Text
The textual information of a class is edited without changing the meaning of the class. If the meaning of a CC should be changed completely, please create a new class instead.
In order to create a CR for changing the textual information of a CC proceed as follows:
Select a Classification Class for which textual information will be changed under menu Content manager --> Classification Class press button “Edit” button.
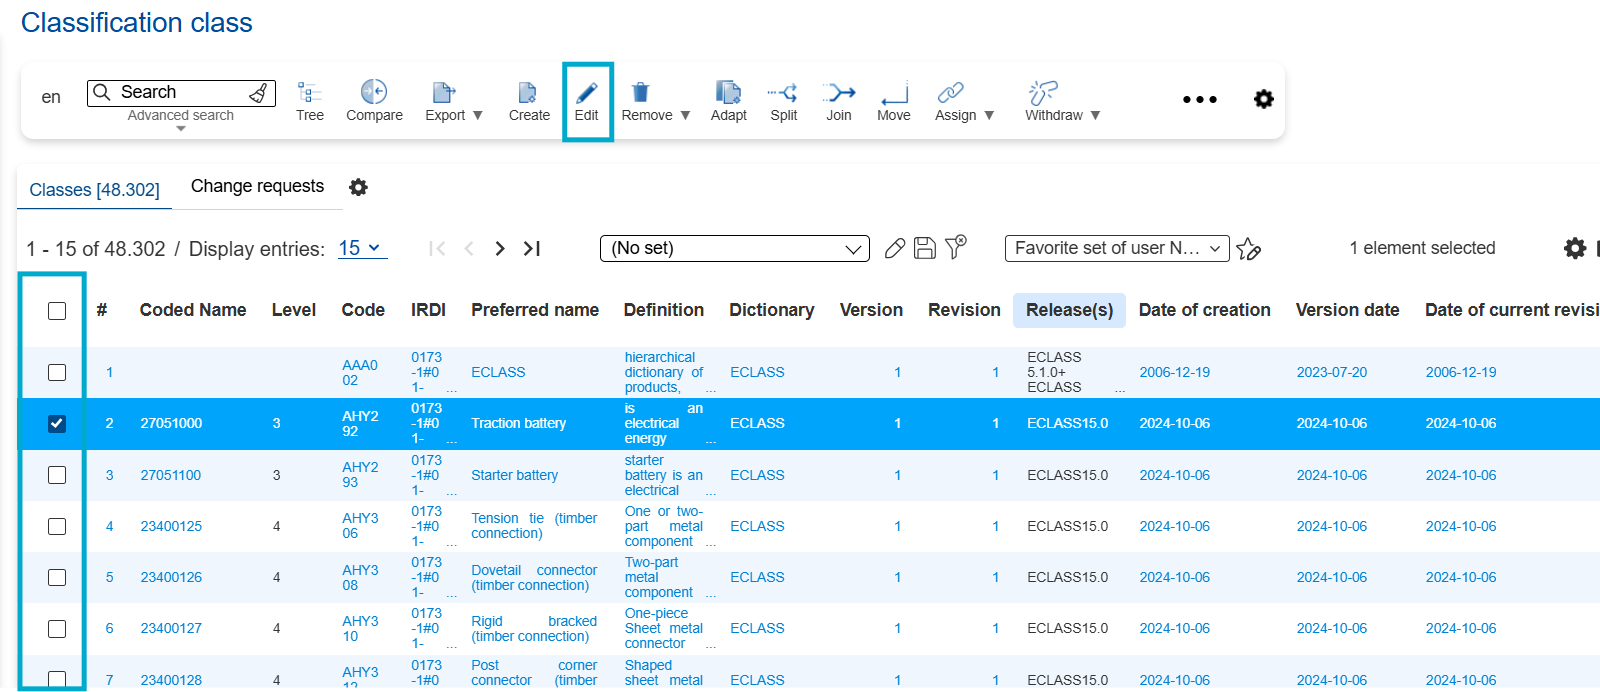
Figure 9: List of all available Classification Classes
Perform desired changes in Change Textual Info-Dialog and press “Save”.
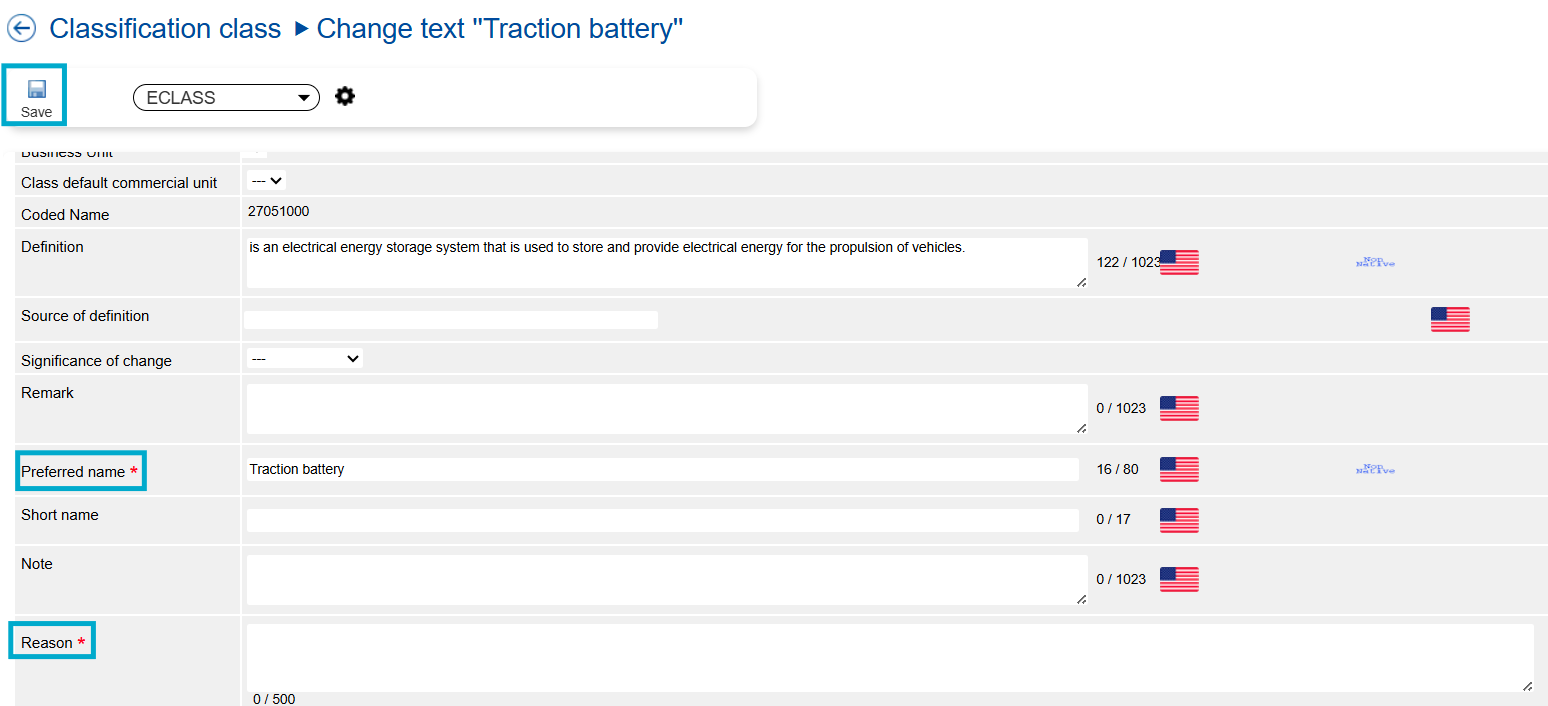
Figure 10: Dialog change text
Mandatory fields:
- Preferred Name
- Reason
- Definition
Result: CR for changing the textual information of CC will be saved and may be retrieved for further editing/submission under menu entry My Change Request.
Create Classification Class
A new classification class is created and positioned in the ECLASS class hierarchy. The levels 1-3 represent procurement markets; the 4th level represents classes of similar products or services. This has to be considered when creating a new class.
First, a requestor has to check whether the class already exists, possibly under a different name or as part of a more general term. The search function is available for this.
Second, the user has to decide on which level the class shall be created. The following questions may help the user to decide:
1st level (segment, market): Which procurement market does the product or service belong to?
2nd level (main group, market details): Which competence field or expert area does the product or service belong to? (e.g. the whole product portfolio of a wholesale company of machine elements)
3rd level (group, deeper market details): What kind of product or service do we deal with? (e.g. the portfolio of a screw manufacturer)
4th level (sub-group, commodity): What specific product class or service do we deal with? (e.g. Half-countersunk screw)
In order to create a change request (CR) for a new classification class (CC) proceed as follows:
Select parent class of new Classification Class and select “Create”
Note: A class on the 4th level cannot be a parent classification class.
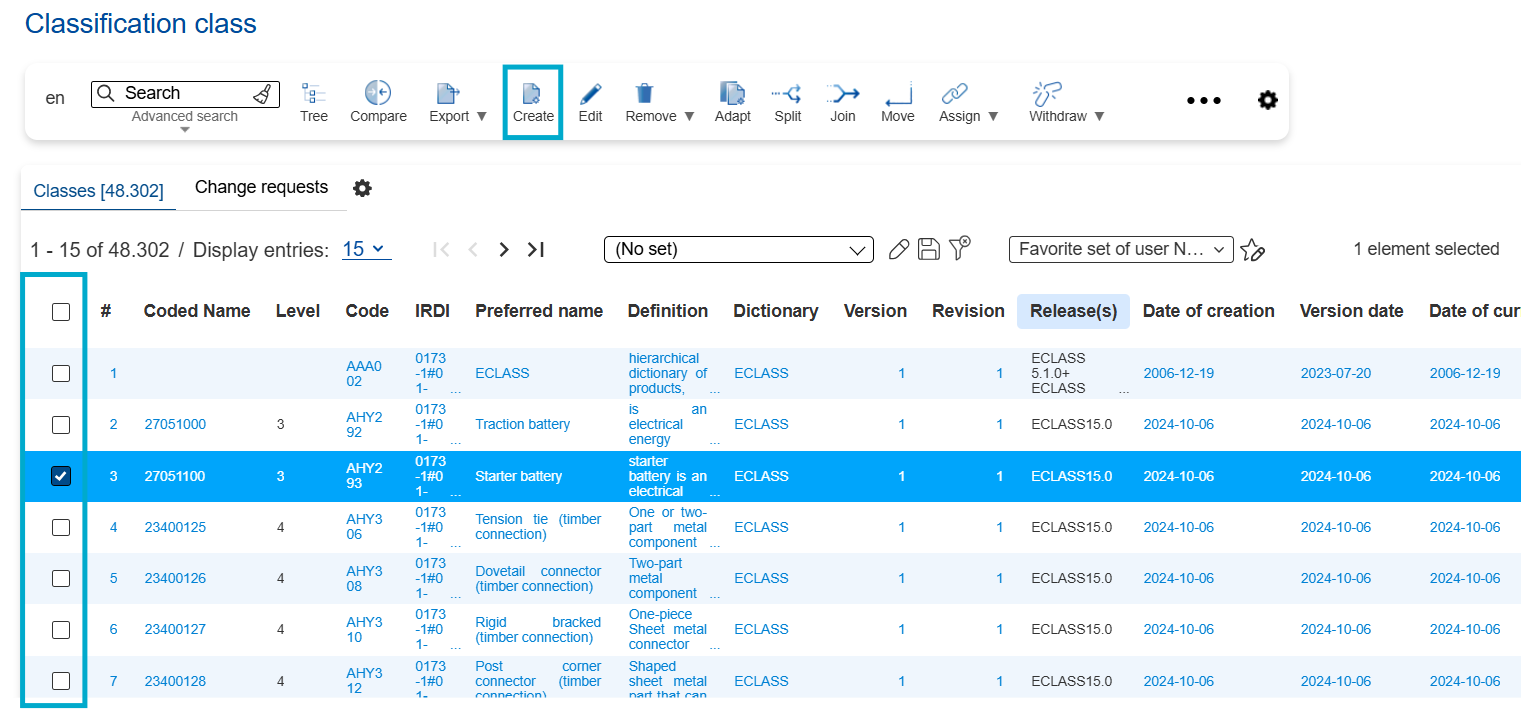
Figure 11: List of Classification Classes
Fill in information of new Classification Class and select “Save”.
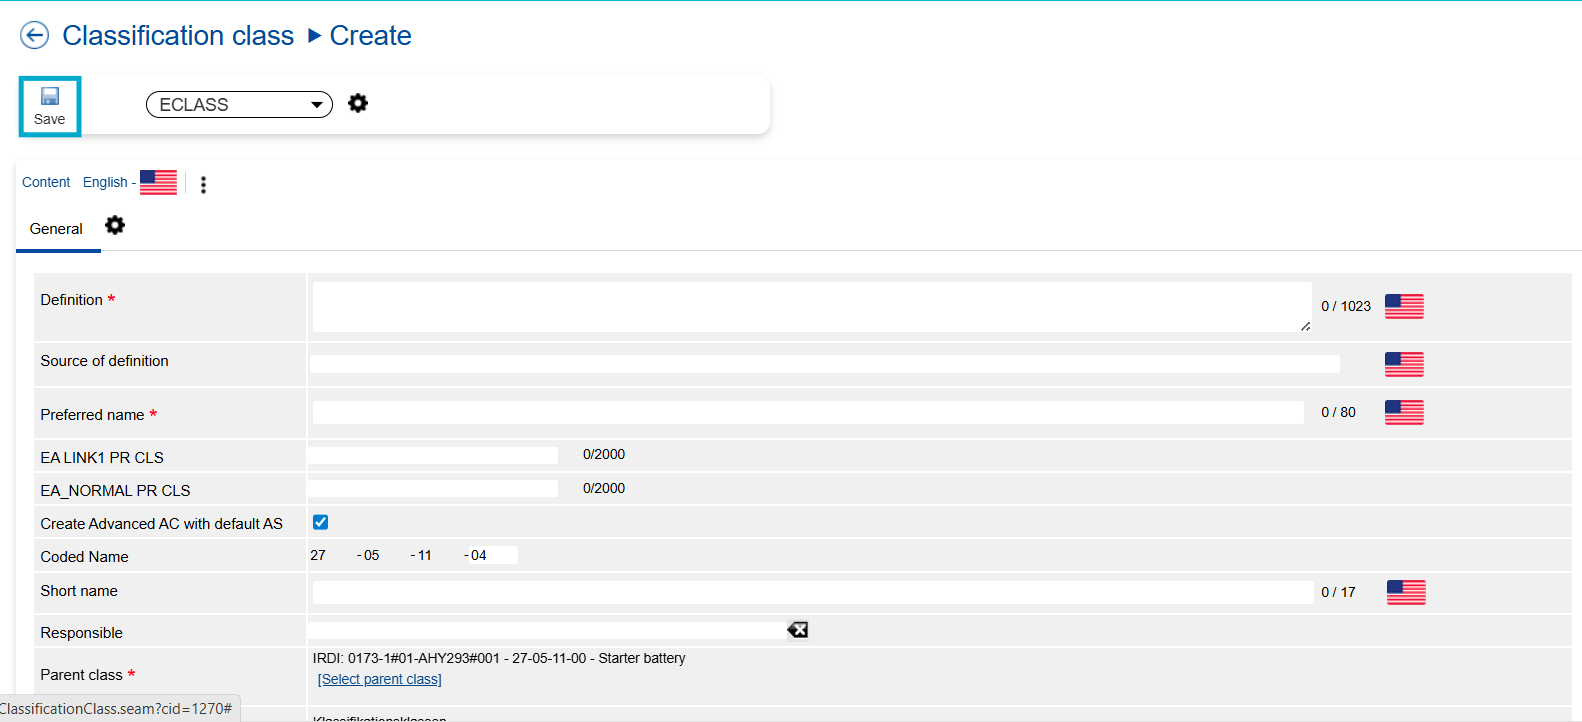
Figure 12: Create Dialog
Remove Classification Class
A classification class can only be removed from the hierarchy without a successor if it is located on the 2nd or 3rd level and no sub-classes exist anymore. A classification class on the fourth level can only be removed after having created a successor with the help of a SPLIT or JOIN (see below).
- NOTE: REMOVE CC is a structural change and therefore only allowed in an Alpha Release
- NOTE: REMOVE CC means that the class is marked as deprecated, its identifier cannot be used again. The removed class stays part of former releases, the coded name remains unused within the subsequent ECLASSRelease, but will be reused in R+2.x
- EXAMPLE: Class 19010101 [ID: AAA123] is part of release 8.1. It will be marked as deprecated inRelease 9.0, but stays part of all recent releases. AAA123 is never used again as a class ID. The CodedName 19010101 cannot be used within all 9.x releases. Starting withRelease 10.0.1 the CodedName 19010101 can be used again.
Delete (CR)
In order to create a CR for removing a CC proceed as follows:
- Select a Classification Class out of the list and click on Remove – Delete (CR).
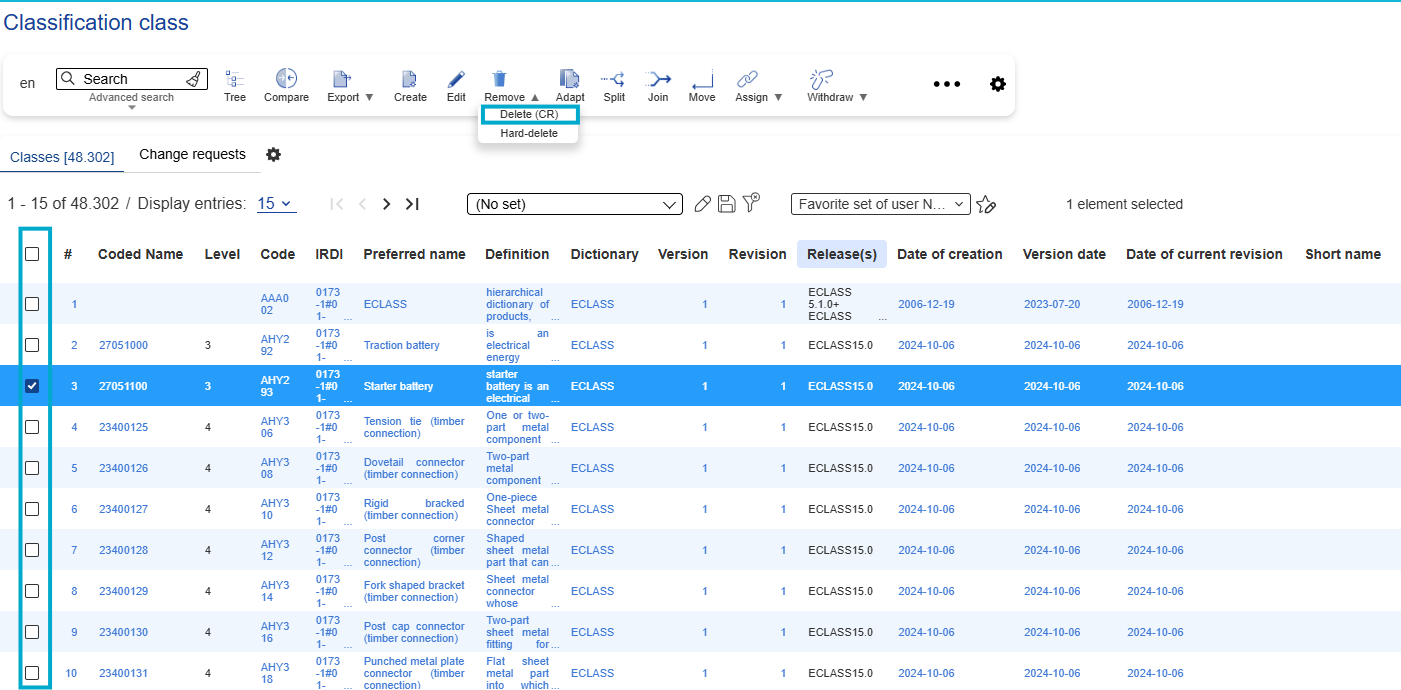
Figure 13: List of Classification Classes
Withdraw Classification Class dialog opens, enter reason for removal and click on “Save”.
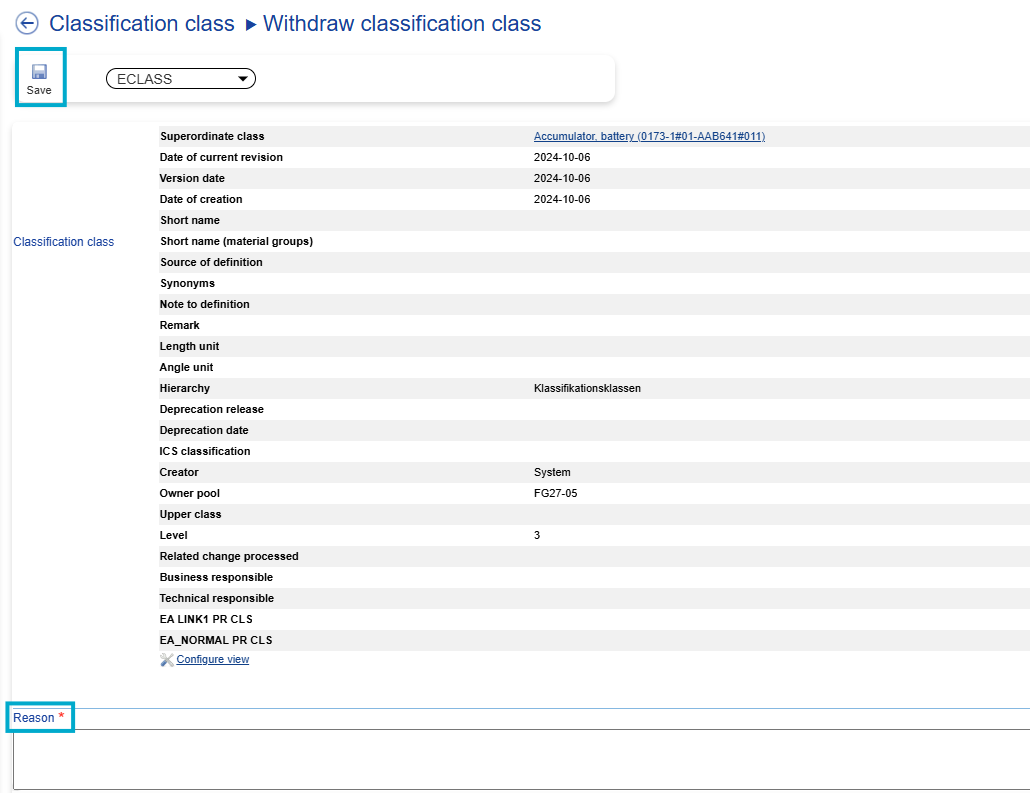
Figure 14: Delete Classification Class dialog
Hard-delete Classification Class
The hard delete function gives the user the opportunity to remove structural elements that were created incorrectly or by mistake in Alpha and Beta versions.
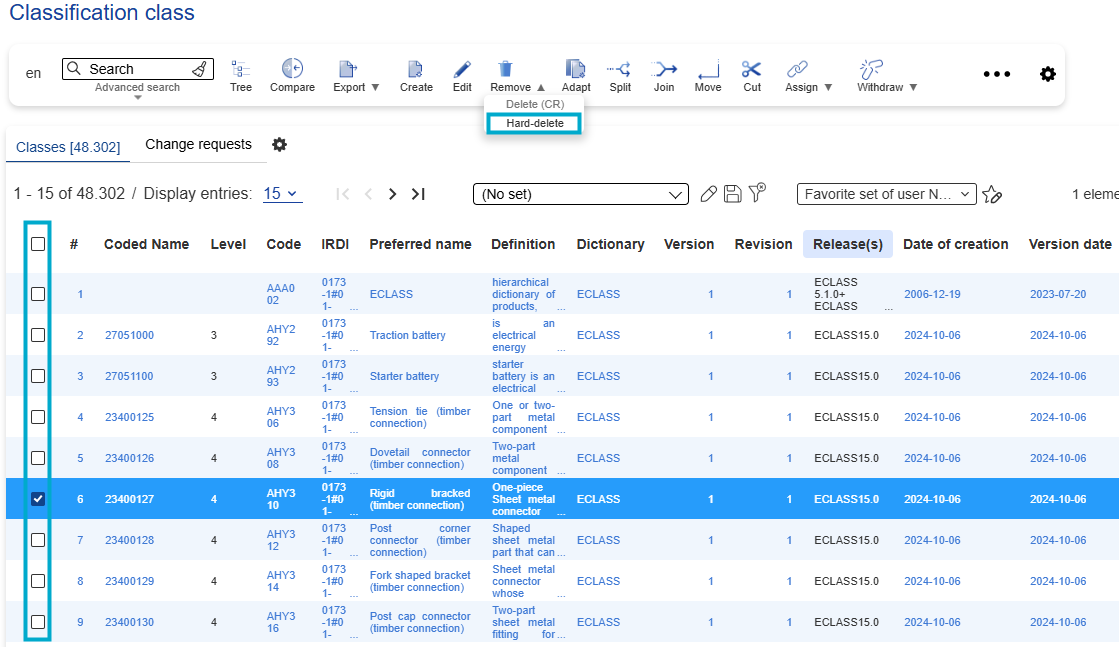
Figure 15: Select hard-delete
In order to hard-delete a Classification Class, the user needs to select the element in the corresponding list or tree view. Then it is necessary to open the drop-down of “Remove” button in the toolbar and select option “Hard-delete”.
Note: If the user tries to “Hard-delete” an element from the PROD release, the following ERROR message will be displayed:
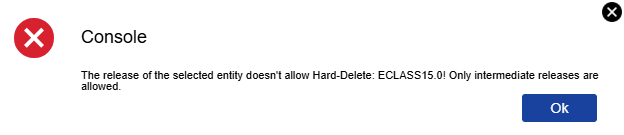
Figure 16: hard-delete error
Move
A classification class can be moved within the ECLASS class hierarchy, i.e. it is assigned to a new parent class. It does not change its identifier (IRDI), but only its CodedName, as the concept does not change, but only the classification location, i.e. the parent class. All assignments of keywords and properties will not be changed (Properties of AC/AS, keywords, attributes remain the same in the target class). Only when moving a class into a different segment, the segment-specific basic property list will change.
NOTE: All subordinate elements (especially the AC) remain identical with regard to name and content. Identifier of CC remains unchanged. Only Coded Name will be changed.
NOTE: MOVE CC is a structural change and therefore only allowed in a Alpha Release
NOTE: MOVE CC is only possible on the 4th level.
In order to move a CC proceed as follows:
Choose the Classification Class to be moved.
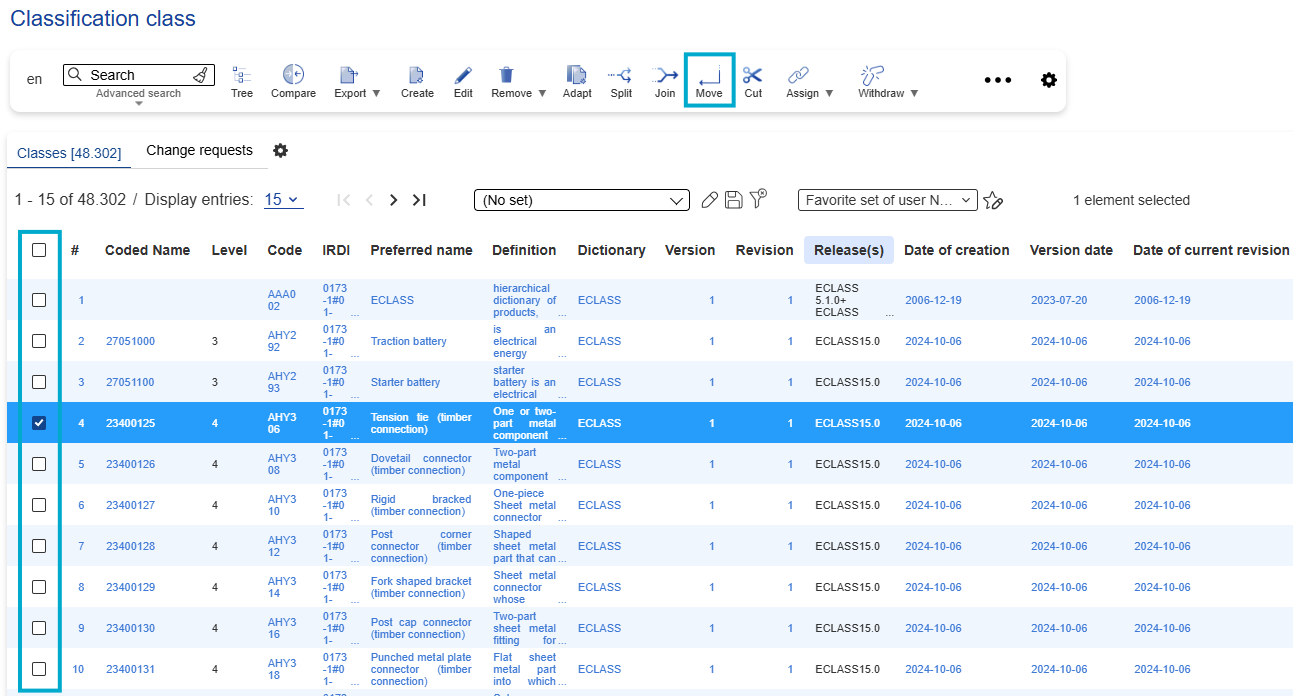
Figure 17: List of all Classification Classes
System displays the hierarchical structure of elements. In this hierarchy users also have the possibility to search for specific Classification Classes.
Select CC in the displayed hierarchical structure and press “Select”.
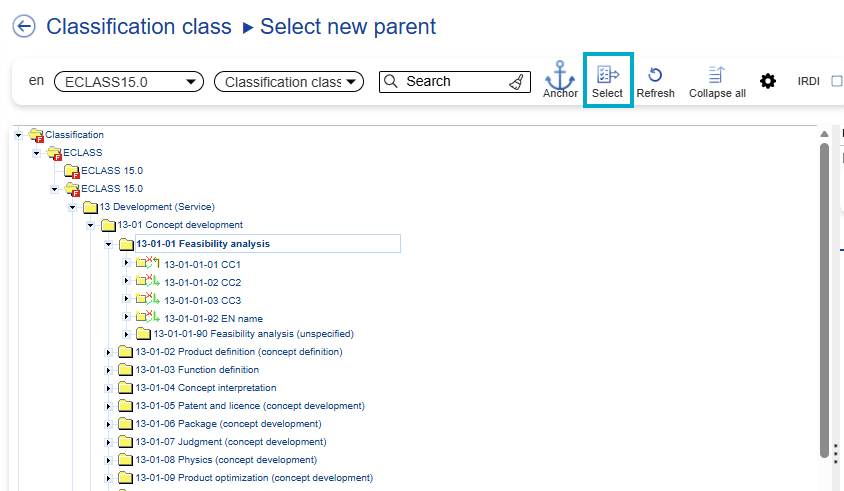
Figure 18: Hierarchical structure: Select new parent
In the MOVE CC dialog, the system displays the source-CC on 4th level and an editable field for coded name. Only the last 2 digits of the displayed coded name can be edited, whereas the first 6 digits will be inherited from the selected parent and will be displayed in read-only mode.
In the Move Classification dialog, enter the reason for moving the CC and press “Save”.
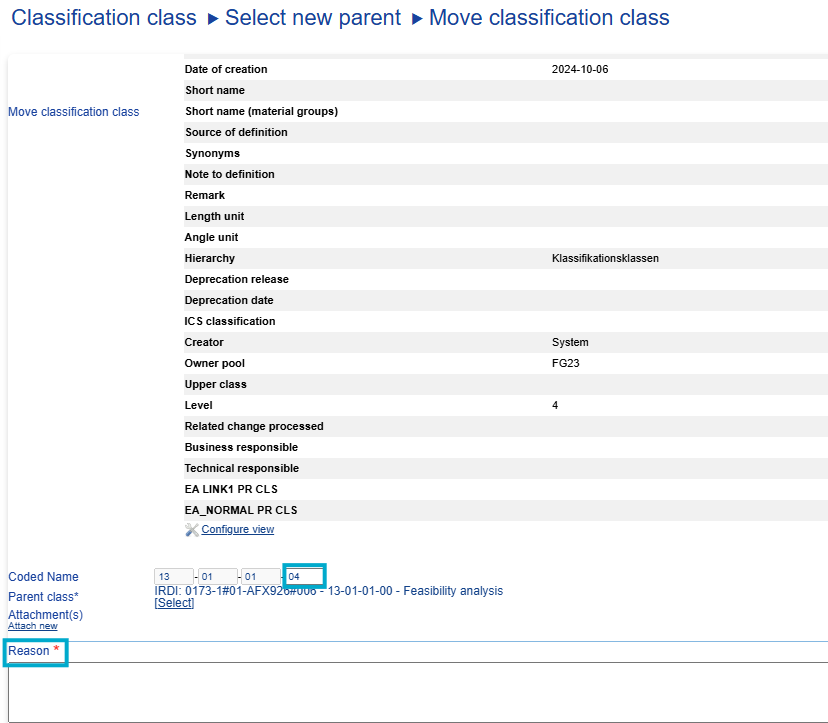
Figure 19: Move Classification Class dialog

Figure 20: Save Move Classification Class
SPLIT
One existing CC shall be split into minimum two other CCs, whereas the valuations (can be) are received together.
- NOTE: SPLIT CC intends that all assigned products and valuations are conveyed in the target CCs.
- NOTE: SPLIT CC is a structural change and therefore only allowed in Alpha Release
- NOTE: SPLIT CC does always have to include more than one successor class, i.e. there have to be at least two target classes with two different (new) class coded names. The original class will be automatically deleted, as the content is represented in at least two other classes. No separate CR DELETE CC has to be created by the requestor.
- NOTE: This structural change is only allowed for source classes and target classes on the 4th level, i.e. only a class on the 4th level can be split only into classes on the 4th level. Thereby a predecessor-successor-relation is documented for product classes (4th level) in the RUF and TUF. (There is only one source CC as SE and only on the 4th level, minimum two other target-CCs ALSO on the 4th level (CR or SE) in which it will be split.)
- NOTE: The source CC to be split is automatically set to deprecated.
- NOTE: Consequent to the above-mentioned details, a DELETE CC (CR/CP) is being automatically created, as the content is represented in at least two other CCs. The CR Proposer from SPLIT CC and Reason for request is overtaken from SPLIT CC into automatically created DELETE CC.
- NOTE: Consequent to the above-mentioned details, many SPLIT operations can result into identical TARGET CC.
- NOTE: A SPLIT CC has to be combined with NEW CC-changes, i.e. additional CR have to be created to create the new classes in which the old class will be split into.
- NOTE: When splitting a CC, all property and keyword assignments of the source class will be copied to the target classes, duplicates with the same identifier being automatically ignored. The requestor can manually change this in a second step or simply by withdrawing properties from the source class.
- Example: 19010101 shall be split into new classes 19020201 and 19020202. Three CR have to be created: NEW CC 19020201, NEW CC 19020202, SPLIT CC 19010101 into 19020201 and 19020202. The CR for DELETE CC for 19010101 will be done automatically in the name of the same requestor.
System displays the hierarchical structure of elements. In this hierarchy, users also have the possibility to search for specific CCs.
In the hierarchical structure of elements, select the source-CC SE (on 4th level) which needs splitting into minimum 2 other CCs (SE or CR). The user can filter the level.
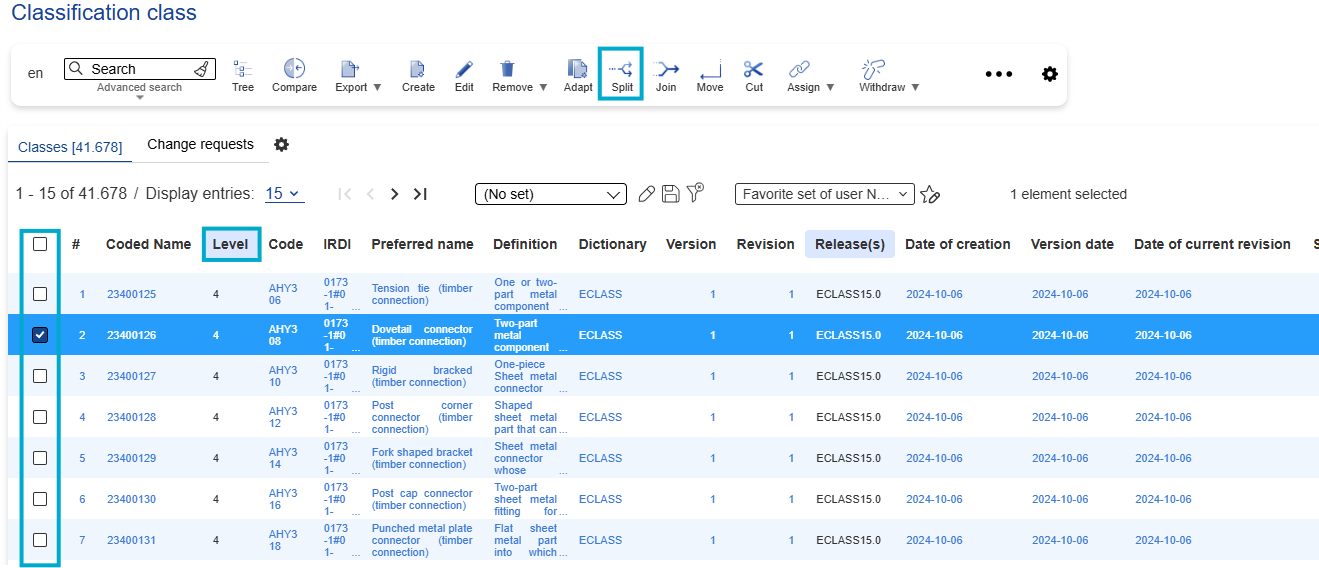
Figure 21: List of all Classification Classes on 4th level
System displays a list of all available CCs (SE and CR) on the 4th level, into which the source CC will be split. Press Select button.
System displays a list of available CCs (SE and CR) on the 4th level
Select the target CCs (SE or CR) into which the source-CC needs to be split. Use the check boxes, then press button Select.
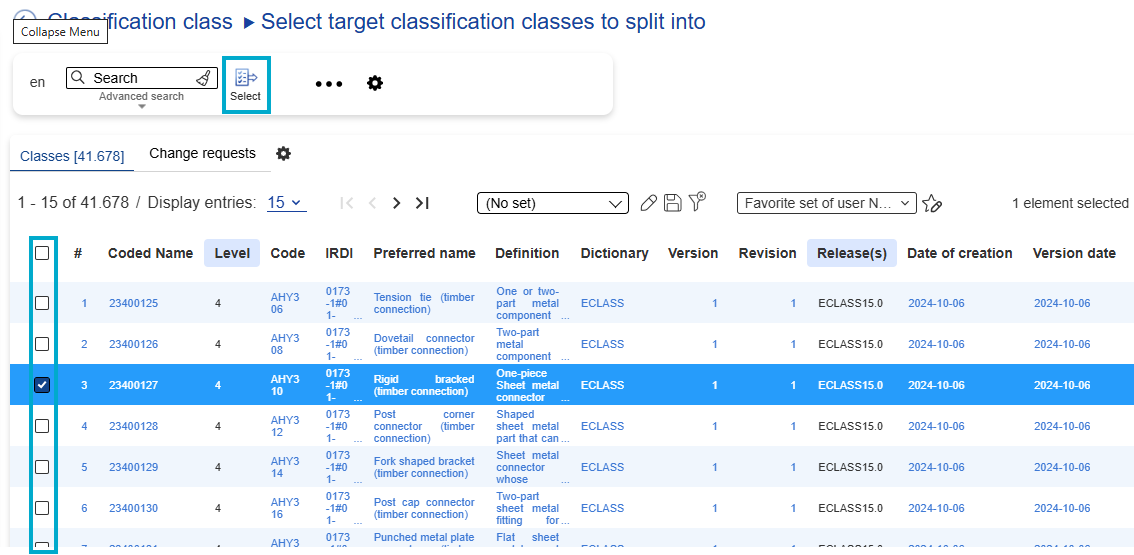
Figure 22: Select target CC to slip into
System displays the SPLIT CC dialog containing the source CC and target CCs, as well as two tabs: Properties and Keywords.
- NOTE: The properties of the source CC, which will be used in the target CCs, are displayed under tab Properties (here, users have the possibility to select the properties to be used in the target CCs).
- NOTE: The keywords of the source CC, which will be used in the target CCs, are displayed under tab Keywords (here, users have the possibility to select and define the keywords to be used in the target CCs).
Enter the reason for Split Classification Class and press “Save”.
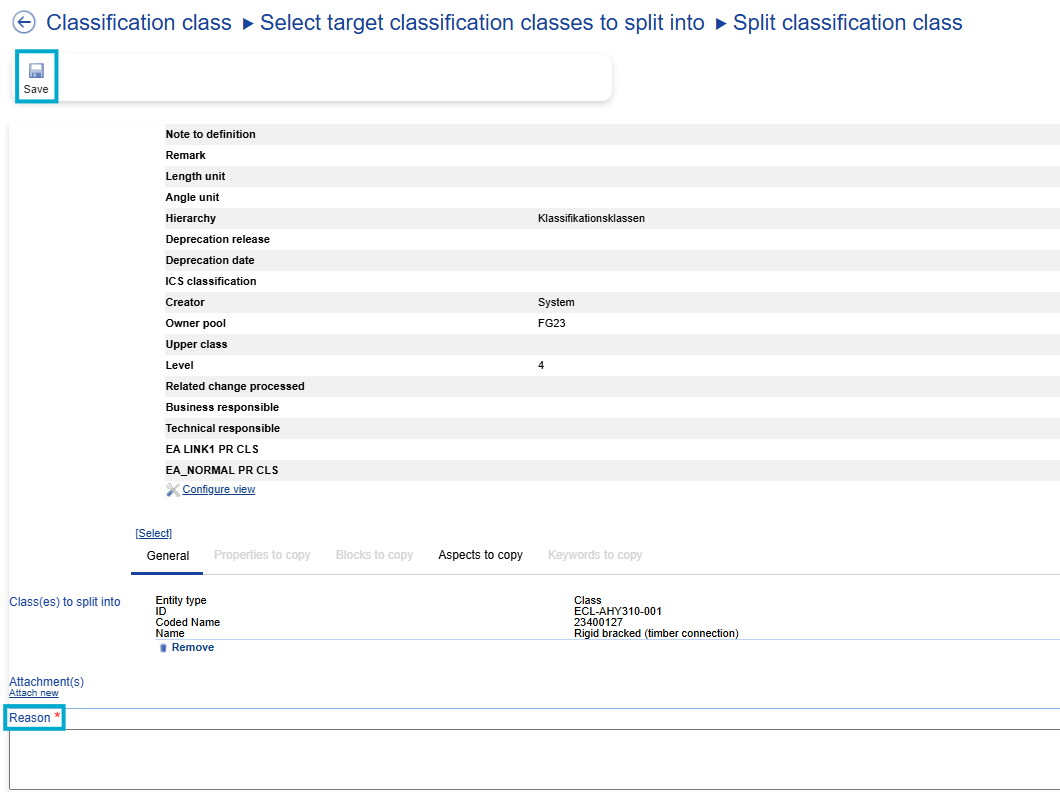
Figure 23: Split CC dialog
Result: CR for Split Classification Class will be saved and may be retrieved for further editing/submittal under menu entry My Change Request.
- NOTE: The assignment CRs are not visible to users. The SPLIT CRs are visible for users under menu entry My Change Request. When selecting a SPLIT CC CR, the properties of the source CC will be displayed under tab Properties, whereas the keywords of the source CC will be displayed under tab Keywords.
JOIN
One or more existing CCs shall be joined/merged into one new or existing CC.
- NOTE: JOIN CC is a structural change and therefore only allowed in Alpha Release.
- NOTE: JOIN CC can be done in an existing CC or a new CC, in which at least one other CC is joined. The original class(es) will be automatically removed (i.e. CR for Remove Classification Class will be automatically created).
- NOTE: This structural change is only allowed for source classes and target classes on the 4th level, i.e. only classes on the 4th level can be joined (on the 4th level). Thereby a predecessor-successor-relation is documented for product classes (4th level) in the RUF and TUF.
- NOTE: A JOIN CC can be combined with a NEW CC-change, in case classes are joined in a new class.
- NOTE: All properties and keywords assigned to the source classes will be joined in the target class, duplicates with the same identifier will be ignored automatically. A manual correction of these properties and keywords can be done afterwards. New properties have to be requested for the target class separately (see #Assign Property).
- NOTE: As the source class(es) is/are no longer necessary, the change requests for deleting the source class(es) will be created automatically by the ECLASS ContentDevelopmentPlatform.
- NOTE: User may run available Business Rule Check "Property assignment in split/join", which checks for split/join CC that every property is assigned to at least one target AC and that no duplicates exist.
- Example 1: 19010101 and 19010102 shall be joined in new class 19020201. Two CRs have to be created: NEW CC 19020201, JOIN CC 19010101 and CC 19010102 in 19020201. The CRs for DELETE CC 19010101 and DELETE CC 19010102 will be done automatically in the name of the same requestor.
- Example 2: 19010102 shall be joined in existing class 19010101. Only one CR has to be created: JOIN CC 19010102 in 19010101. The CR for DELETE CC 19010102 will be done automatically in the name of the same requestor.
- Example 3: 19010101 and 19010102 shall be joined in existing class 19010103. One CR has to be created: JOIN CC 19010101 and CC 19010102 in 19010103. The CRs for DELETE CC 19010101 and DELETE CC 19010102 will be done automatically in the name of the same requestor.
In order to join a CC proceed as follows:
Select a CC (on 4th level) and click on “Join”. User can filter the list to the 4th level.
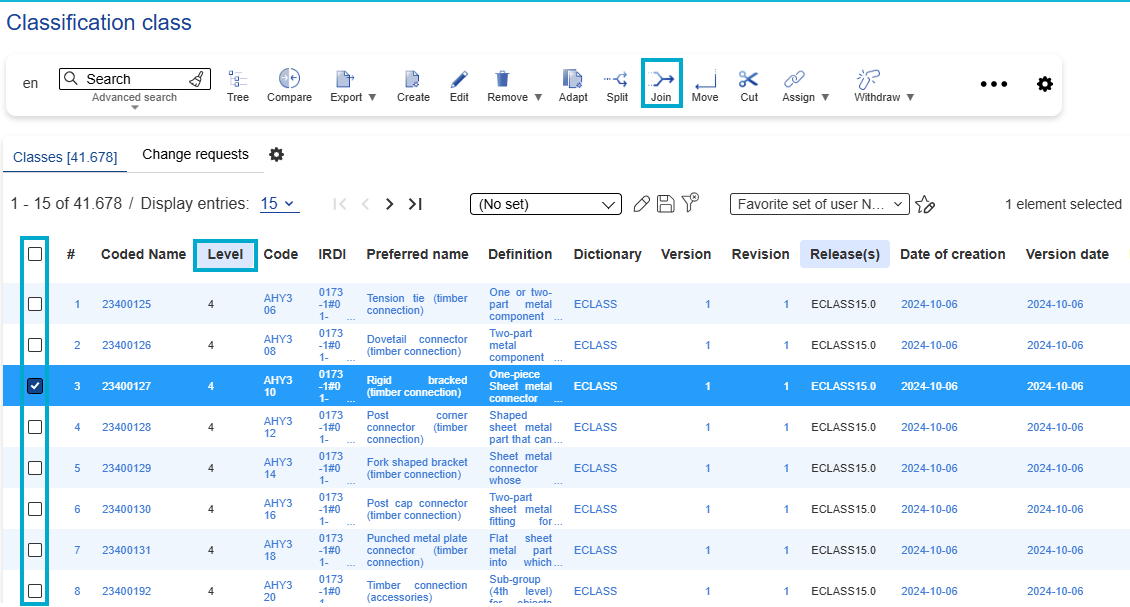
Figure 24: List of all Classification Classes on 4th level
Select Target CC to join into (a 4th level CC) from the displayed hierarchical structure and press “Select
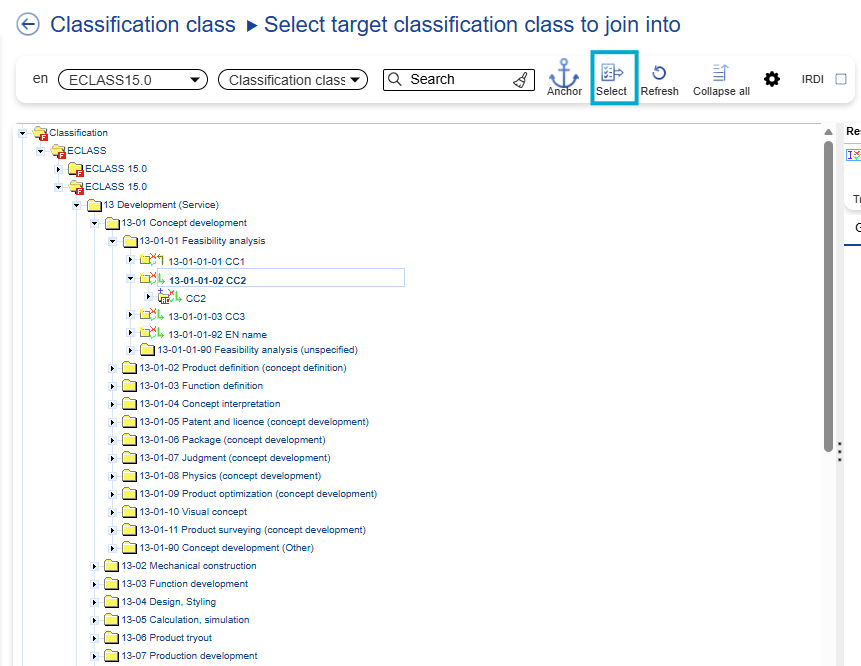
Figure 25: Select target CC to join into
In the Join CC dialog, enter the reason for joining the CCs and click on “Save”.
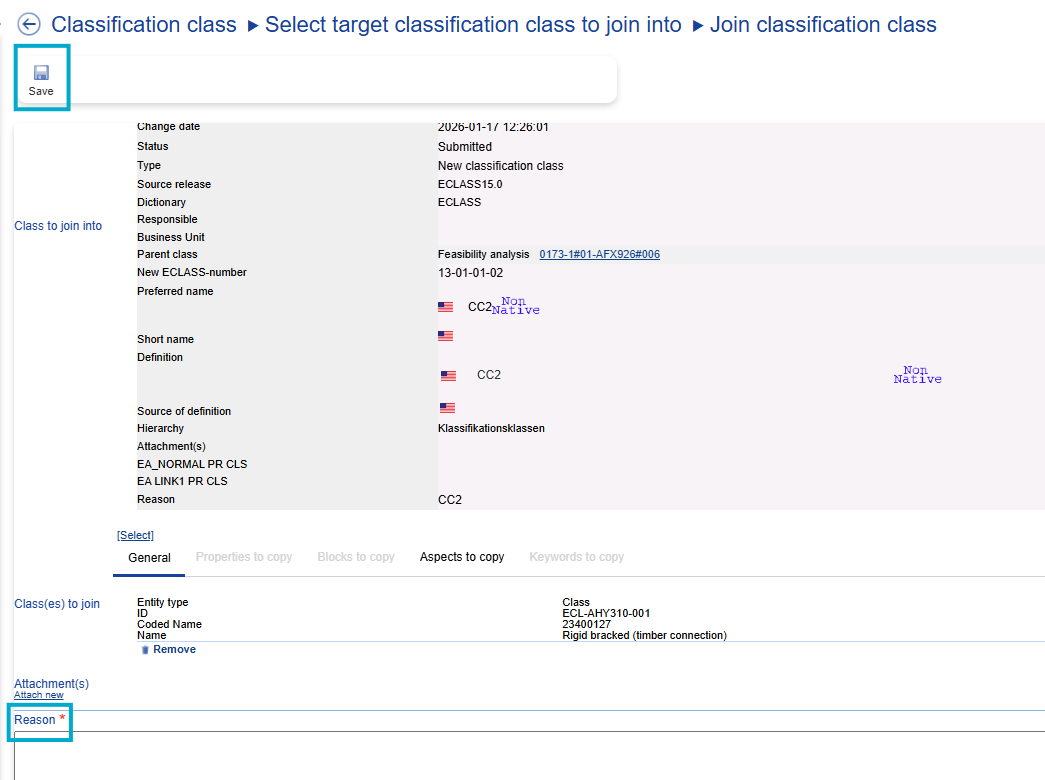
Figure 26: Join CC dialog
Result: CR for Join Classification Class will be saved and may be retrieved for submission under menu entry My Change Request.
- NOTE: The assignment CRs will not be visible to users.
- NOTE: The JOIN CRs will be visible for users under menu entry My change request.
- NOTE: When selecting a JOIN CC CR, the properties of the source CC will be displayed under tab Properties, whereas the keywords of the source CC will be displayed under tab Keywords.
Assign Keyword
In order to facilitate the search for product classes, keywords can be assigned to classes.
- NOTE: They cannot have the same PreferredName as the class as this would produce duplicates.
- NOTE: They shall be alternative spellings or alternative names for a class, not generic terms (e.g. KW "Coach bolt" for the CC "Saucer-head screw" is correct, but KW "Screw" or "Machine element" for this CC is too generic and not allowed as it refers rather to the parent classes.)
- NOTE: Keywords are language-specific, i.e. they cannot be translated. An alternative name in two different languages has to be requested as two separate KW.
In order to assign a Keyword (KW) to a CC proceed as follows:
Select a Classification Class to assign a Keyword to.
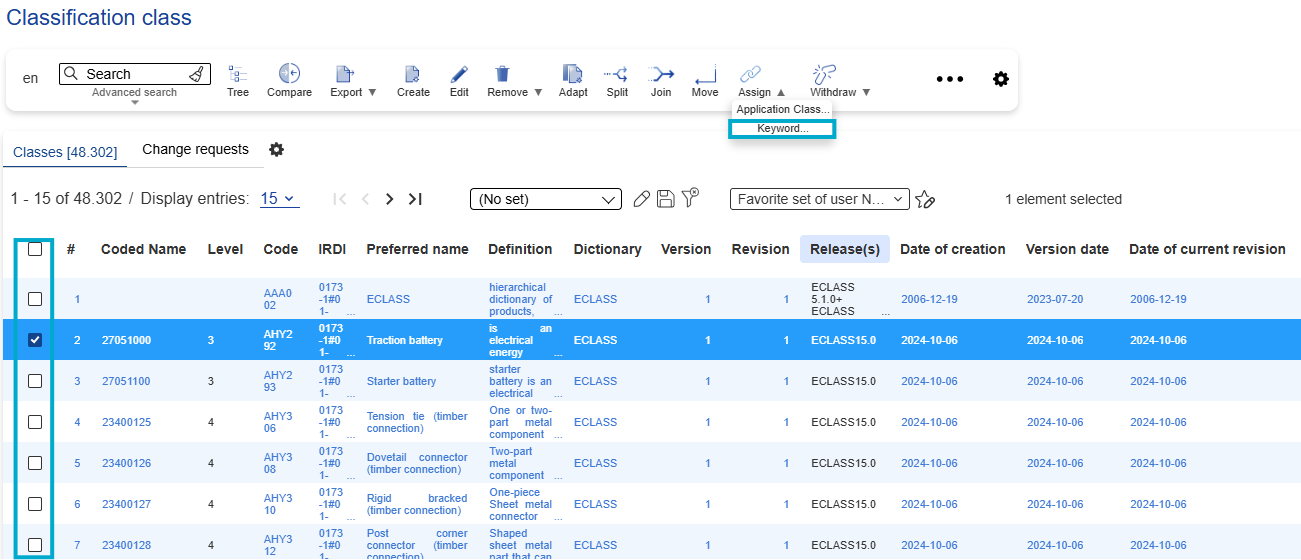
Figure 27: List of all CC
Select the desired Keyword.
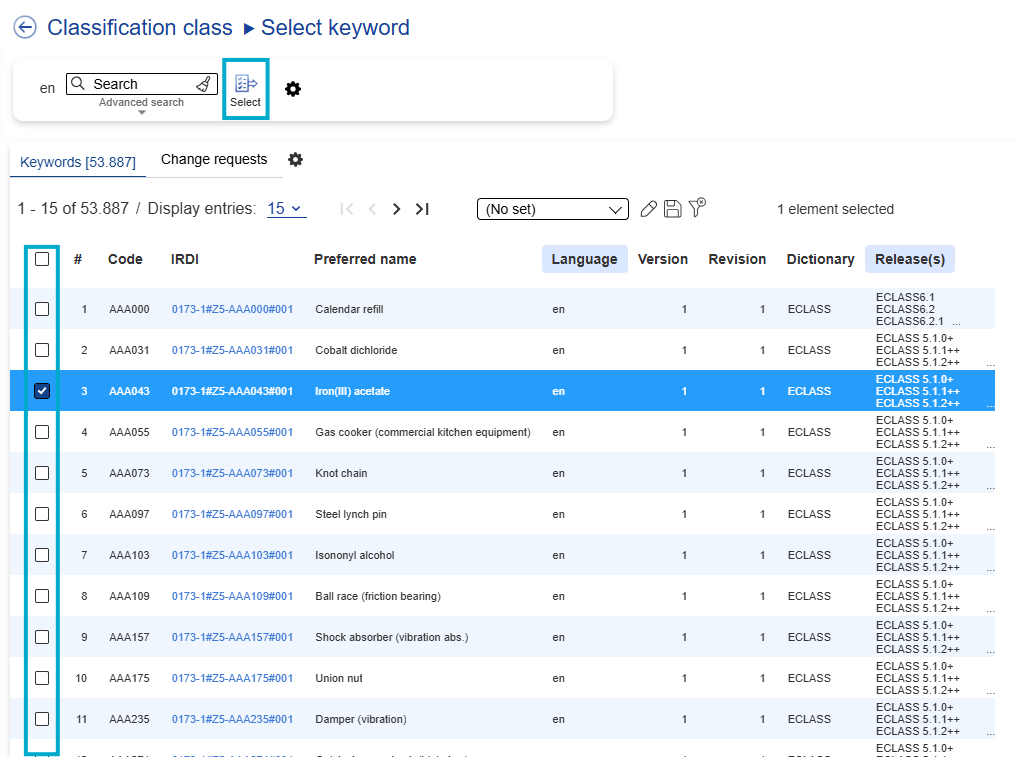
Figure 28: List of Keywords
Fill in the reason to assign Keyword and click on “Save”.
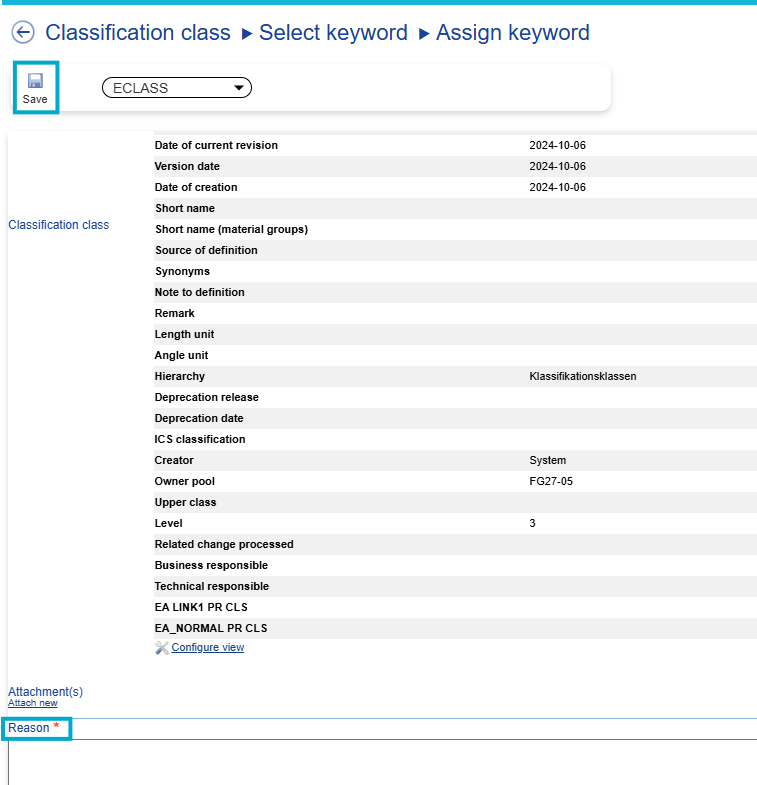
Figure 29: Assign Keyword dialog
Withdraw Keyword
In order to withdraw a Keyword (KW) from a CC proceed as follows:
- Select a Classification Class
- Hover over the “Withdraw”-Button and select “Keyword” in the menu.
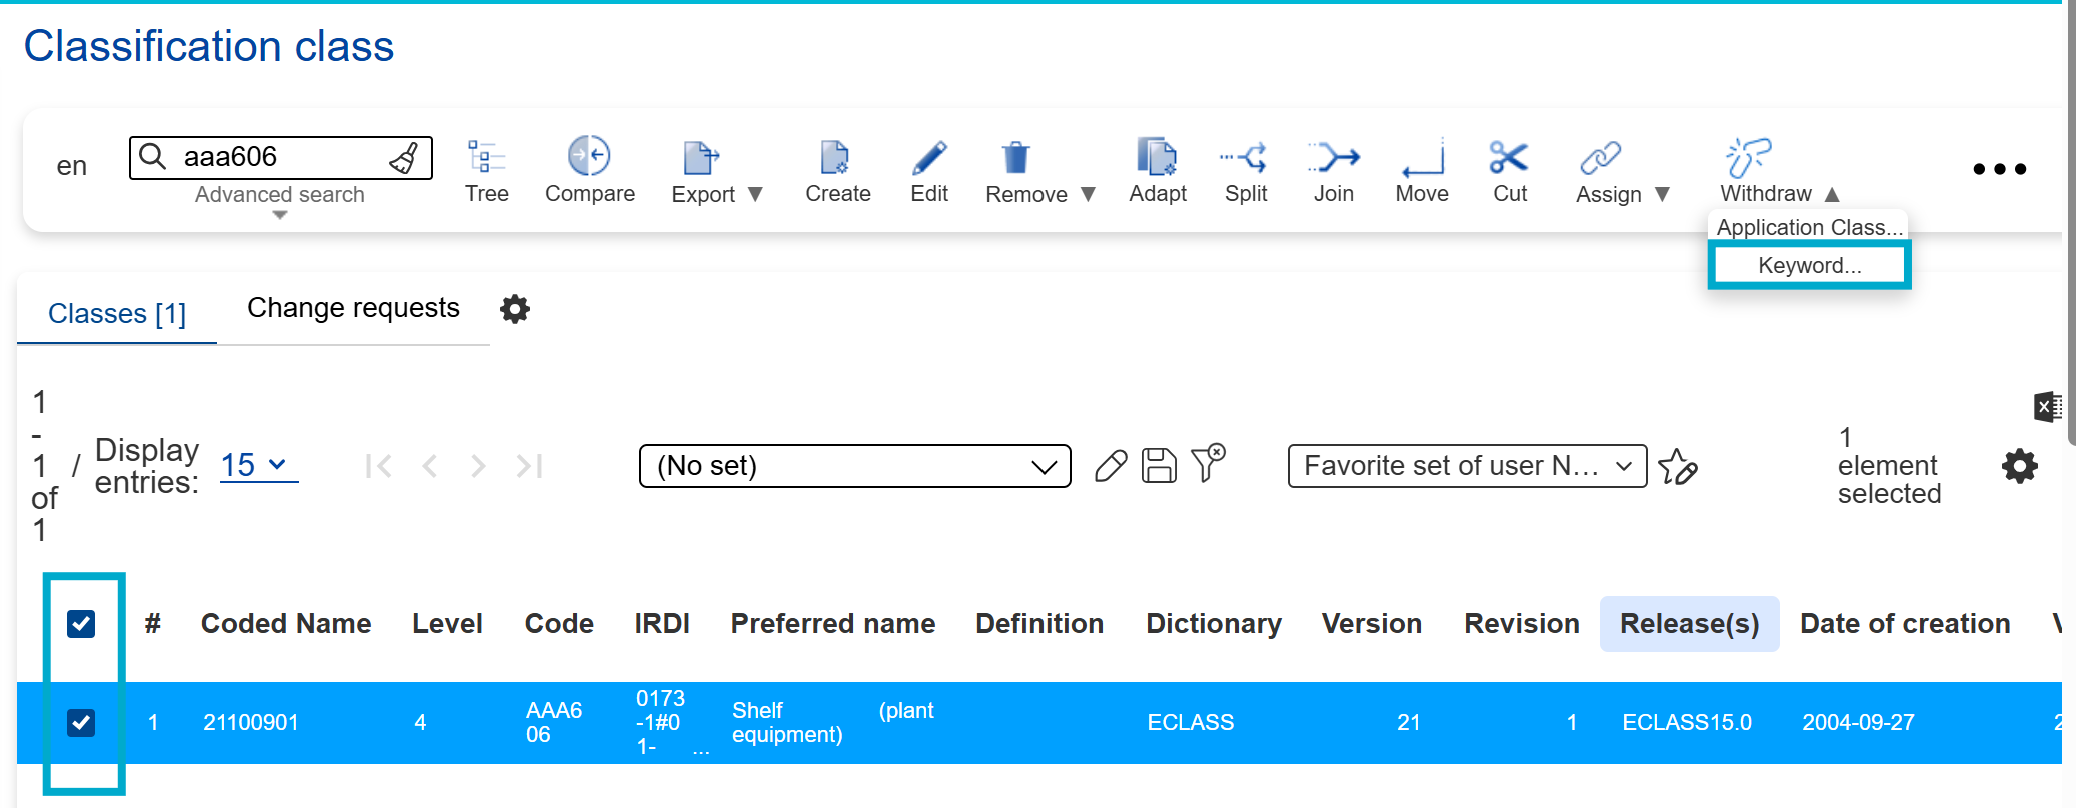
Figure 30: Select Classification Class
3. In the next window: Select the Keyword you want to withdraw and push the “Select”- Button
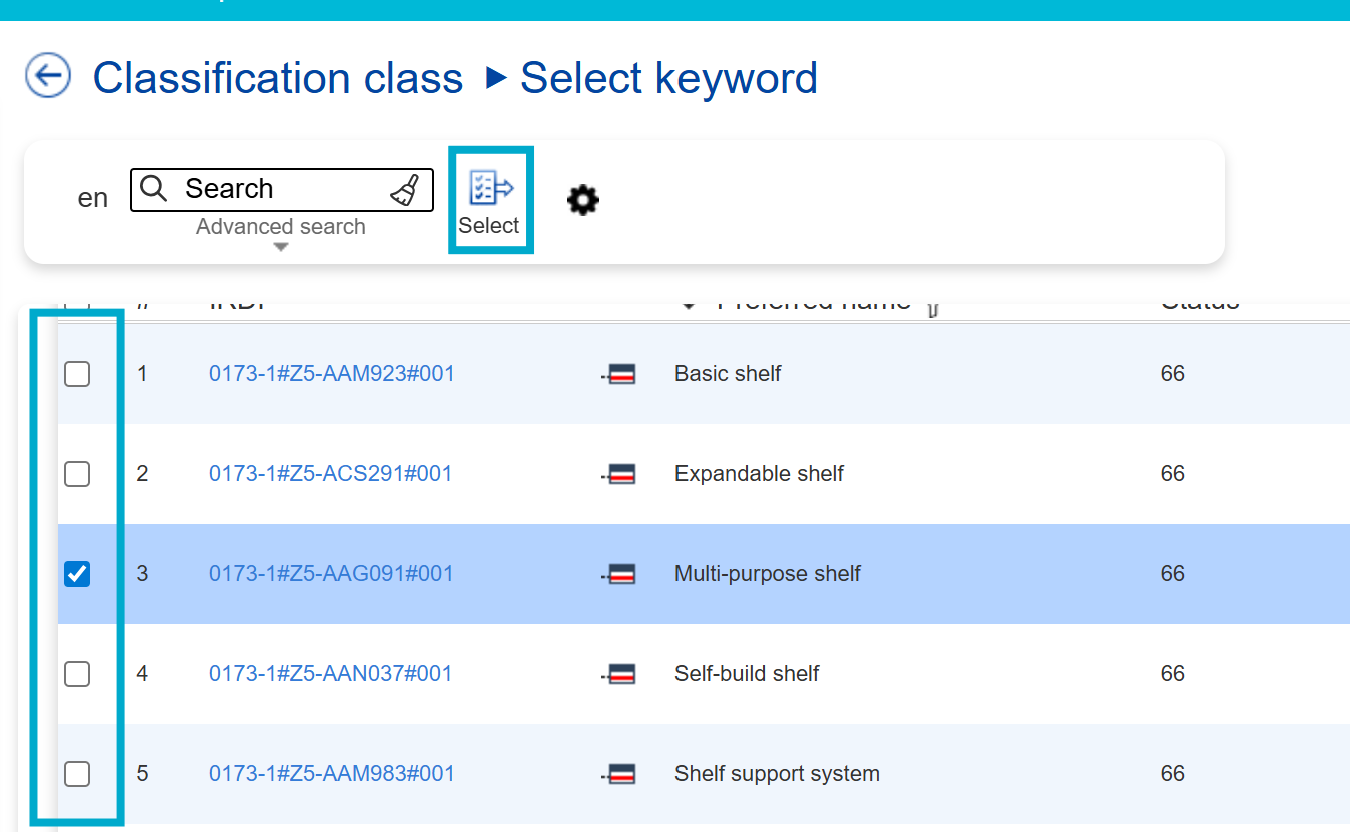
Figure 31: Select Keyword dialog
4. In the last step you have to type in a reason and save the Change Request
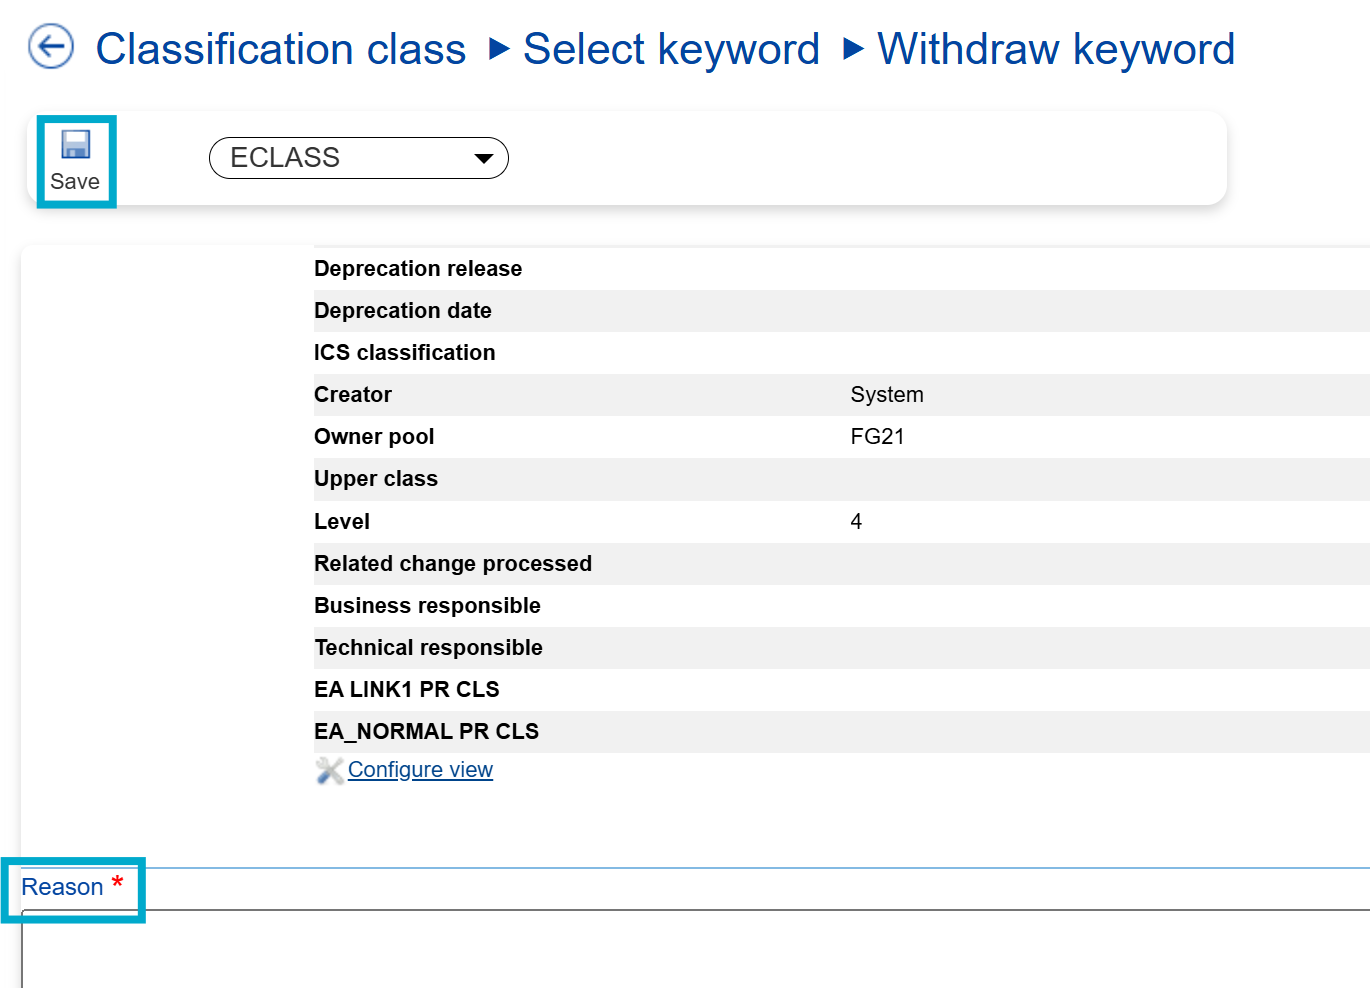
Figure 32: Withdraw Keyword dialog
Assign Application Class
Note: In order to assign a Application Class to a Classification Class you first have to withdraw the old Application Class (described below).
In order to assign an Application Class proceed as follows:
Choose a Classification Class from the list and click on Assign – Application Class.

Figure 32: List of all CCs
Select an Application Class and click on “Select”
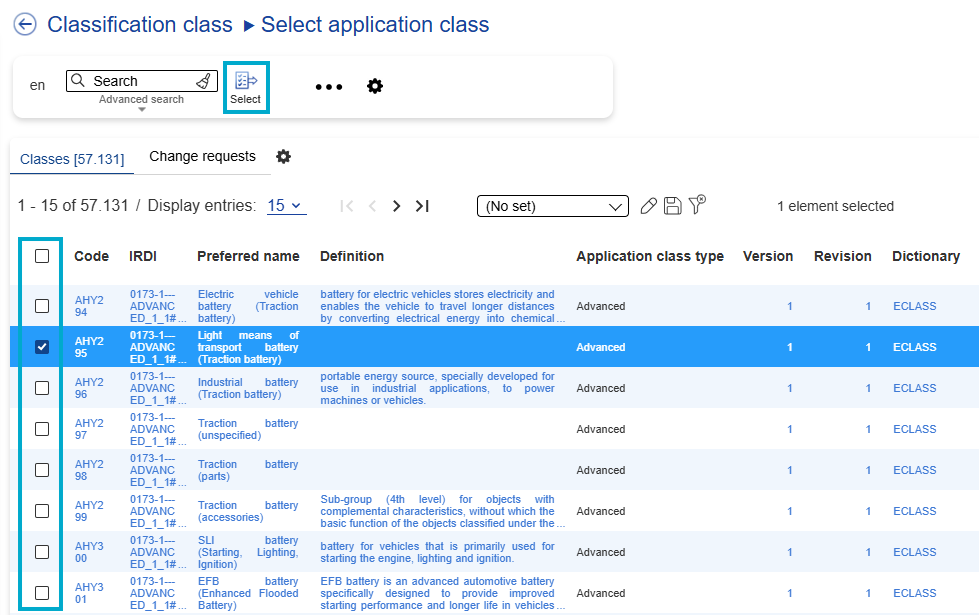
Figure 33: List of Application Classes
Assign Application Class dialog will open, fill in the reason and select “Save”.
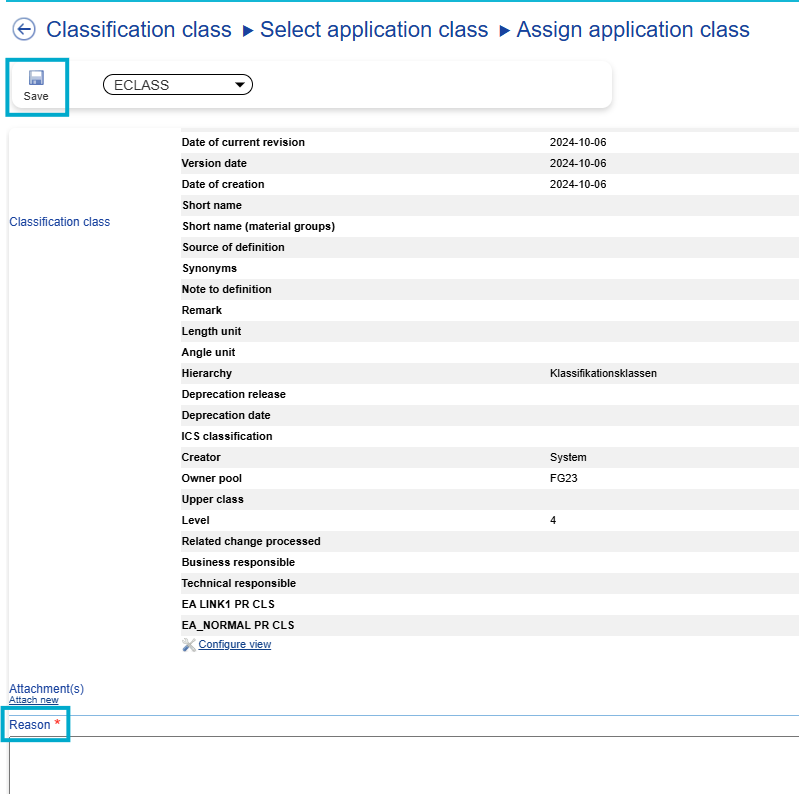
Figure 34: Assign Application Class dialog